 The four beach landings have been completed and Steve and I have brought the map up to date with the exploitation, march and strategic moves. Despite the loss on Gold beach, the armour from Juno exploited into the area to secure the British landings. The US paras on Utah enabled the US armour to exploit to St Jours and strengthen the US forces around Carentan and support a US move to cut off the Cherbourg peninsula. Allied air helped keep the Cherbourg garrison bottled up and minimise the German moves against Arromanches, however SS Panthers (2nd SS) are in the Foret de Cerisey and the SS PzIV (12th SS)is opposite Arromanches in the Bretteville area. The StugIV representing 17thSS has moved to La Haye to threaten US attempts to close on Barneville. The 21st PzIV moved into Mezidon opposite the British paras in Merville. A solid Allied landing should give a good platform for expanding the bridgehead in turn 2. As a side note, I like the way Firestorm allows a campaign structure to bring together games played as time allows. The campaign started last August and the battles have been fought as stand alone games but have contributed to the map positions recorded. Jon

A blog for the Devon Wargames Group, which meets on the second Saturday of each month at the Whipton Institute, 16 Whipton Village Road, Whipton, Exeter, EX4 8AW. Doors open at 10.30am.
Wednesday, 30 March 2011
Firestorm Normandy Campaign End Turn 1
The four beach landings have been completed and Steve and I have brought the map up to date with the exploitation, march and strategic moves. Despite the loss on Gold beach, the armour from Juno exploited into the area to secure the British landings. The US paras on Utah enabled the US armour to exploit to St Jours and strengthen the US forces around Carentan and support a US move to cut off the Cherbourg peninsula. Allied air helped keep the Cherbourg garrison bottled up and minimise the German moves against Arromanches, however SS Panthers (2nd SS) are in the Foret de Cerisey and the SS PzIV (12th SS)is opposite Arromanches in the Bretteville area. The StugIV representing 17thSS has moved to La Haye to threaten US attempts to close on Barneville. The 21st PzIV moved into Mezidon opposite the British paras in Merville. A solid Allied landing should give a good platform for expanding the bridgehead in turn 2. As a side note, I like the way Firestorm allows a campaign structure to bring together games played as time allows. The campaign started last August and the battles have been fought as stand alone games but have contributed to the map positions recorded. Jon
Monday, 28 March 2011
Firestorm Normandy, Gold Jig Green
Hi all,
The fourth and final game in the first turn of our Firestorm Normandy campaign was fought this Sunday, and featured the landing at Gold Jig Green Beach by the Hampshires. The beach is an interesting scenario because where the 1st Hants. landed marked the boundary between the 716th and 352nd Divisions, and thus meant that the British veterans came up against German veterans on one side of the defences, and reluctant Ost troops on the other (see map and orbats for details)


 The British objective on this beach was to penetrate the defences and wheel to their right, taking the objectives (green and yellow flags) at Asnelles and Le Hamel. This reflected the original objective of 231 Brigade with their mission of securing the right flank of the Gold Beach landing to allow the 47th RM Commandos to pass through to Port en Bessin and link up with the Americans on Omaha. Below is the tabletop interpretation of our map
 With a current running from right to left (facing the beach, seaward side), the Brits landed their first three infantry platoons, DDs and an AVRE troop, headed for the ramp off the beach and the sea wall next to WN36, ably garrisoned by the 441 Ost, who sadly for the Germans lost a section to the naval bombardment and remained pinned for practically the whole game.
 The AVRE's closed on WN36 and started to create breaches and batter the seafront buildings, preparing the way for the infantry assault.
 Meanwhile the DDs were tasked with keeping the veterans of the 352nd in the Chateau Asnelles and sanatorium complex quiet whilst the attack developed on the other end of the beach. The smoke was deployed to prevent fire from the 7.5cm bunker of WN37 raking the beach. However a continual peppering of small arms and mortar fire came in from this strongpoint.
 The assault on WN36 when it came was short and bloody, with the Ost troops fighting back stubbornly, taking three groups out for the three groups they lost. The remnants were forced to withdraw shaken but unbowed.
 By turn 4 the attack on WN36 was gathering momentum, but would it be able to get clear of the strongpoint and swing in on the objectives?
 The German commander decided to not wait for all the reinforcements to assemble and decided to just take a section of the infantry platoon and two Marders, seen here entering Asnelles. The truck and dug in infantry mark the objective hex.
 Turn 5 saw the Brits starting to assemble their units in preparation to head out across country
 Infantry supported by armour, make the dash across the open fields towards the cover of the hedgerows and immediately draw fire from the Marders and 352nd infantry sections.
 The attack stalls in front of Asnelles as the British attempt to bring up M10s to support the infantry and the Commandos to make a last desperate assault on Le Hamel from the beach, which ended in failure.
  At game end the German veterans were securely in control of Le Hamel and Asnelles and having inflicted over 21% more casualty points than they received were declared the winners, so ending turn 1 of our campaign with the only German win.
 Many thanks to Gus, Jason and Nathan for a great days wargaming, and a slightly longer game than planned due to the fact that I hadn't advanced the clock an hour in the room and thus we thought we were finishing at 6pm when it was in fact 7pm!!
Jon
Sunday, 13 March 2011
Epsom Linked Campaign Game 1
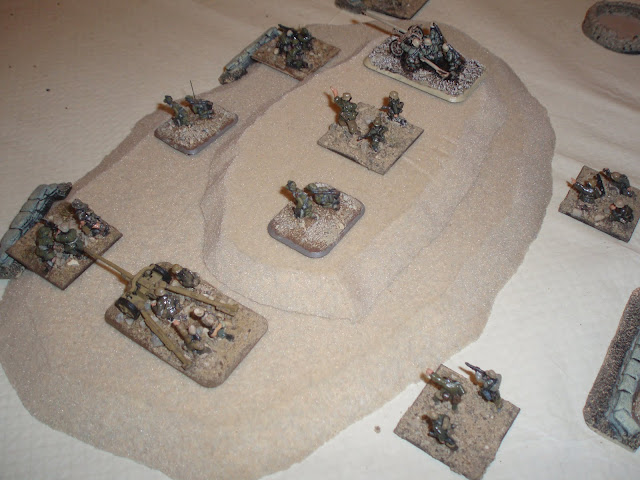
This was a game I had been looking forward to playing when painting my collection of British Infantry and Waffen SS Panzer Grenadiers. The campaign was written by Gary Martin and is available on the Battlefront Website, from which you can find the orders of battle. Mission 1 represents the "Break In" attacks launched on the 26th June 1944 by the 15th Scottish Division and the particular attack by the 6th Royal Scots Fusiliers as they fought to take the village of St Manvieu. The village was held by 2 Kompanie, 26 SS Panzergrenadier Regiment and the command post of the first battalion.
 The SS troops had been in almost continual action since June 7th, when they had counterattacked the beachhead established by the Canadian 3rd Infantry Division. By the time the Scott's attack took place the 12th SS Division was firmly on the defensive and had started to harden their defences with prepared positions.
 This was the Scots initiation to battle after years of training in the UK. Although they were untried, they were confident and well trained in their assault tactics of "leaning in" to their supporting artillery barrage, backed up by Infantry tanks to shoot them on to the objective.
The day would prove how well that confidence was founded.
 The map for the game as per Gary Martin's briefing
 The table top interpretation. I decided to make some slight changes replacing some of the light woods with cornfields which were a major feature of the terrain and captured in so many photos of the battle of "Tommies" advancing with rifles at the port in waist high corn.
  I also decided to change the original game design by allowing the Scots to be preceded by their rolling barrage provided by the Divisional and Corps artillery batteries. This caused the loss of three SS foot groups and a dug in PaK40.
 Both sides placed an objective in the German set up area, and not unsurprisingly they were well separated to confuse the Germans as to where the attack would concentrate.
 The Scots advanced rapidly into the orchards on their right flank and approached the edges of the village, while the SS were busy trying to unpin from the artillery barrage.
 The Scots came up against the German wire and stopped to work on breaching it whilst exchanging desultory shooting into the village. The marker on the right indicates potential SS ambushers.
 It started to become clear that this was the main assault as the lead platoon supported by Pioneers was quickly followed by two more rifle platoons, backed up by the crocodiles.
 The Pioneers joined in by starting to flame the outlying houses and infiltrated into the outskirts.
 Whilst the attack was going in on the British right, the HMG carriers in the centre were supporting with indirect fire into the village. This prompted retaliatory fire from the SS mortars which caused damage to several carriers.
 Then the SS nebelwerfers joined in dropping a barrage into the orchards knocking out five rifle groups from two platoons and pinning the Scots attack. This also finished off the Pioneer platoon who had led the assault. The damage had been done to the German flank though, and the remains of the SS platoon there were forced out and retired. The other SS platoon started to feed reinforcements across their front to secure the objective, whilst leaving a security section to guard the German right flank.
In an effort to stop the German re-alignment, the Scots launched their reserve platoon at the German right, braving MG42s and mortars in the fields beyond.
This was where our game finished, with 8 turns completed and the fighting still very much in full swing. However with slightly under half of the SS company destroyed and only about 25% casualties of the Scots hors de combat, the battle looked to be heading to a historical win for the Brits. However as in the actual action the Scotts had been fought to a evening battle amid the flaming ruins of St Manvieu, where the follow up units of 11th Armoured Division would become embroiled in the mopping up next day. But that's another game!
Thanks to Malc, Jason Nathan and Steve M for fun game with lots of swings of fortune from one side to the other. The best bit was telling Nathan that he only had to avoid getting a 1 on a D12 when taking a morale check for his SS boys. Although I couldn't see the die, his face said it all. Don't take up poker Nathan!!!
Hill 112 next
Jon
Friday, 25 February 2011
South African Rifle Co. vs 90th Light Panzergrenadiers
Hi all,
Steve and I played a FOW game last night, pitching South Africans against DAK in a throw together mission. We both came up with our own force lists up to 1500 points.
 90th Light - Confident Veteran
Co HQ
2 x Panzergrenadier Platoons
1 x Heavy Weapons Platoon
2 x Pak 38
3 x Pz IIIG
1 x Pz IIIJ Long
3 x Sdkfz 222
4 x 10.5cm howitzer
Limited Air (Stukas)
South African Rifle Company - Reluctant Veteran
Co HQ
3 x Rifle Platoon
1 x HMG Platoon
2 x Valentine Troops (6 tanks)
Recce Troop (3 x Humber AC)
SP AT Platoon 3 x 2lbr portee
SP AA Platoon 3 x 40mm AA Bofors
RA Battery 4 x 25lbr
Limited Air (Hurribombers)
We randomly chose our mission which was Withdrawal and diced off for attacker/defender, with the Germans getting the defender role.
Steve opted for a night attack and advanced across the table towards the German position.
The Germans occupied a ridge in the centre with a patch of scrub on their left and a depression on their right. The three objectives were evenly spaced along the back edge slightly towards the German right.
We played 6 turns, with the Germans withdrawing their Panzers, which were held in ambush, and their artillery, whilst having one of the Panzergrenadier platoons destroyed in an assault.

The South Africans lost a Rifle Platoon, the Recce platoon and one rifle platoon being one base of 50% strength.
My Panzergrenadiers were almost permanently pinned throughout the game and would surely have inflicted even higher losses if they had managed some decent dice.
The final act before we totted up the score was the Stukas came in to the attack braving some bofors fire, only to break off because I stupidly left a group within 16 inches, doh!!!
Good game, German losses in points 14%, South Africans 21%
Thursday, 17 February 2011
February 2011 Spanish Civil War 28mm
 The Republicans try and early attack on the square
 Things that can ruin your day
 Reinforcements: Legion no less !
 You Cross the Road. No, after you !
This month Chas put on a SCW battle in 28mm. Steve M & me played the brave revolutionaries and Andy & Malcolm were the oppressive communist government.
The scenario revolved around government attempts to take the town of Sesena. A unit of Moroccans were caught resting in the town square and victory was deemed to go to whoever occupied the square a close of play.
The Republicans attacked with regulars supported by 3 x T 26's. This caused some alarm to my Moroccans, as they lacked any distance effect weapons that could damage tanks. The Moroccans duly spread out, manning the barricades and occupying the houses around the square.
A field gun and tow turned up in support and the gun deployed covering the square. The tow truck was used to block one of the roads into town.
A desperate fight for the church ensued and Andy launched several attacks on the barricades, only to be beaten back by the Moroccans.
With both sides receiving reinforcements the battle swung to and fro. The government lost the T 26 on the edge of the square, to a round from the field gun, but the gun crew then withdrew under mg fire.
Given the short ranges, crossing open ground was very costly and a stand off on the approach roads developed.
On our right Steve and Malcolm shot at each other from cover. Even the "Chip Van" could not be persuaded to turn the corner under fire from Steve's Legionnaire's, Civil Guard and Moroccans.
On our left, mg fire from the hill meant the Legion and Carlists could not leave the wood. Equally the POUM militia facing them dare not leave cover.
In a desperate assault Andy took the factory on the left of the square, only to be wiped out by counterattacking Legionaries (who died to a man in the process !).
As darkness fell 3 Moroccans still manned the barricades and a mass of Phalangists moved down the road to reinforce them.
A good game, played in a good spirit to "Rate of Fire" rules.
A little more aggressive use of the tanks and Chip Van might have swung the game. If we had lost the square, then the deadly cross fire from the buildings and barricades would have made retaking it very difficult.
Vince
P.S thanks to JJ for the photos.
Sunday, 13 February 2011
German Heavy Metal
Hi all,
Just a few pics of my Normandy Germans. From Top to bottom, (1)Tigers, Stugs and Jagdpanzers, (2)SS Panzergrenadiers, (3)Panthers and Jagdpanthers, (4) Lehr Panzergrenadiers, (5) King Tigers and PanzerIVs. (6) 21st PD Panzergrenadiers.
Jon


Battle of Le Mesnil Patry June 1944
Just a few photos from Gus's game "Battle of Le Mesnil Patry, 11th June 1944". I know Gus is going to do a game report. Just to say, great terrain, great figures, great fun. Thanks to Gus, Jason and Nathan.


Subscribe to:
Posts (Atom)