Labels

Monday, 16 May 2011

Morning of the 902nd, 11th July 1944

The second game in the mini-campaign from the Skirmish Scenarios book "Heroes of Omaha and Panzer Lehr" was fought this weekend which picks up from the first game where Battlegroup Heintz had held off the US 3rd Armoured Division whilst waiting to be relieved by the 902nd Panzergrenadier Regiment, Panzer Lehr.
The campaign position is even with both sides gaining five victory points in the first battle. The hill position at Hauts Vents in visible in the lower right corner of the map.
Panzer Lehr arrived at Point 91 in the early hours of the 11th July 1944 and prepared immediate plans to assault the US lines in the hours of darkness to enable their forces to close with the Americans, hoping to take full advantage of the confusion and intermingling of the opposing troops and thus avoiding US air attacks when the daylight came.
Steve, taking the role of Oberstleutnant Welsh, commander of the 902nd Panzergrenadiers, having the option to delay the attack until dawn, followed the historical plan and opted to attack at 0400 hours in the dark.
This decision meant that the action took place at very close range, no more than 240 yards (four hexes) and very often more likely to be at 60 - 120 yards (same to next hex).
The table and set up map show the starting positions and the objectives buildings at the top of the picture that Panzer Lehr had to capture. If they also took the manor house seen right at the extreme top of the picture on the North edge, they would gain four attachment credits, which would come in very handy for the next game. In addition because the US forces in the Hauts Vents game failed to capture their objectives, the Panzer Lehr have an optional flank set up area on their right flank.
The German battle group was very powerful with two armourd panzergrenadier platoons backed by mortars, tanks, SP guns and flamethrowers. In addition Steve managed to get the Recce platoon as his additional attachment enabling him to scout ahead of his main force.
The US forces represented the infantry of the US 120th Regiment, 30th Infantry Division, who had been battling in the hedgerows for several weeks since D Day. They were thus subject to an attrition die roll at the start of the game to represent this state, forcing me to remove a stand on a die roll of 1-2. This removed six groups including an HMG before a shot was fired. In addition, because Steve opted for the night attack option, my M10 TDs and additional recce platoon would now arrive in d4 turns as immediate reinforcements. It was obvious that with this reduced force I would not be able to defend the whole position and so I looked for obvious choke points such as gateways and enclosed fields where I could set up all round defence and turn neighbouring fields in to kill zones.

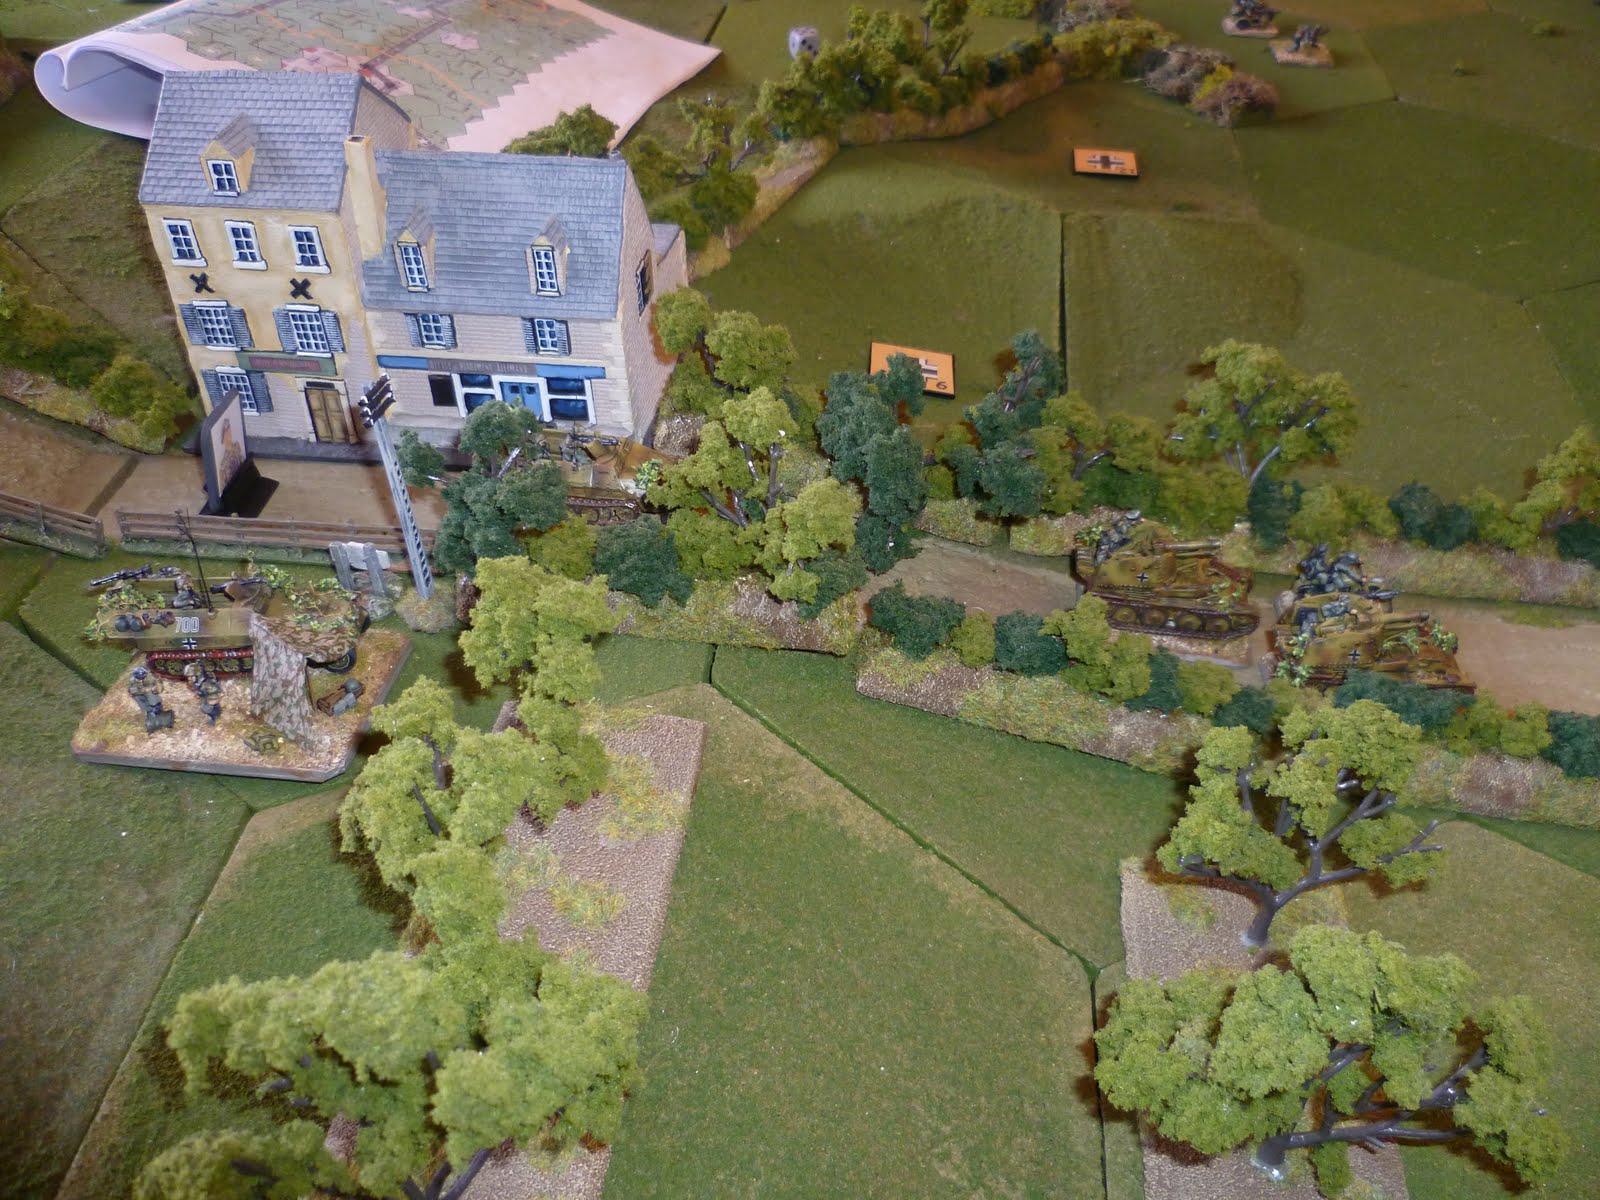
As expected, the Lehr recon platoon lead the intial probing of my defences. We had all un-spotted units recorded on the maps, or as blinds on the table until they were confirmed as troops. This gave the uncertainty that the actual commanders had to deal with when fighting in the bocage at night. In the picture above can be seen the Company commander and 2IC vehicles parked up on hill 91, with the two Grille SP 105 sIGs supporting the following Panzergrenadiers

The Grilles probed a bit too far down the road and one vehicle was disabled and the crew abandoning it after a shot from one of my defending M4 Sherman's.

The picture below shows one of the Panzergrenadier platoons that came on on the US flank deploying and carefully approaching the field my US platoon were holding.

I had placed the Sherman's in the corners of the field so they could contribute to any fire from my infantry. The US Company CO can be seen in the centre and off to the left are some Panzergrenadiers finding the only hex of mines placed to cover the gateway on that flank

The picture below shows the German positions at the bottom of the field. The terrain and darkness made it difficult to maintain command, and the US infantry were able to hit this platoon the hardest causing them to fail two mission resolve checks, without quite being able to break them with a third failure
With the Panzergrenadier section stuck on the mines and losing a casualty, I opted to close assault them taking them out but losing a casualty myself on my own mines. The casualty markers are testament to this battle. The Lehr platoon leader has moved up to clear his casualties in an attempt to stop his unit breaking.


Meanwhile on the other flank the main Lehr force was labouring across mud and bocage to turn the right of the US positions. I could only use my Tank Destroyer platoon to delay the inevitable and try and exact a toll on the advance. The burning Panzer IV was one success and caused the German armour to stop and wait for the infantry to catch up with them and lead the assault into the objective buildings.

With the arrival of the Panzergrenadiers the full armoured force was ready to assault the manor complex.


By turn eight and only one turn to go before checking for game end or an extension, the US forces were being forced back into the buildings. The Sherman's added their combined firepower to keep open the road back to US lines.

As the Lehr closed in for the kill, and a final lunge to capture the manor turn nine ended and a d4 was rolled, with 1-3 indicating an extension of that number of moves, and a 4 ending the game. The die gods took a hand and a four was duly rolled. The game ended with 8 victory points to the US and 10 for the Germans, but the manor was not taken. One Sherman and one PzIV were knocked out and one M10 and Grille were disabled and abandoned. The US infantry executed a textbook withdrawal in the face of the enemy losing eight stands of infantry, and surviving two mission resolves at below 50% strength, also losing their platoon commander in hand to hand fighting. Likewise the Lehr platoon that suffered on that flank were in on the objective, taking out one of the annoying M10s with a well directed barrage of Panzerschreck shots.

And the next game will be on the same table but with the full weight of US 3rd Armoured Division looking to counterattack and roll back this prong of the Panzer Lehr assault.
Thanks to Steve for a great days wargaming, good times.
Jon

Saturday, 30 April 2011

Hauts Vents 10th July 1944

Not being avid Royal watchers, Steve and I got together on Royal Wedding Day to kick off a mini campaign based on the Skirmish Scenarios Book "Heroes of Omaha and Panzer Lehr". As a display of loyalty to the Crown we did take a moment to toast the happy couple, several times as I recall!!
The particular campaign chosen is the Lehr Counterattack campaign of six linked games that recreate the attempt by Panzer Lehr to counterattack American forces threatening to engulf St Lo in early July 1944.
Having suffered 30% casualties facing off the British in front of Villers Bocage, Panzer Lehr were rushed in to bolster the front in the US sector. The first game "Hauts Vents" features the German Kampfgruppe Heintz (see orbats below) in front of Hill 91 which overlooks St Lo attempting to hold back a thrust from US 3rd Armoured Division, prior to the arrival of Panzer Lehr. The next two scenarios are also fought on this map, so Steve and I plan to carry on to the next game taking the consequences of the result of this one. As this was a linked game it was important to both sides not to take a heavy loss, as this might impact heavily on the prospects for the entire campaign.

The map shows the terrain with north at the top. The table represents a valley in between two ridges, the highest being the Hauts Vents village on top of point 91 at the south map edge. The Germans were able to occupy all the ground except the six hexes in the top right corner, the US entry area. In addition the US armoured infantry had the option to enter from the top left four hexes. The two buildings in the valley floor were the American objectives.
The table threw up several challenges for both sides but principally the US having to attack. The buildings and bocage were considered "closed terrain", requiring massed firepower to kill enemy groups in those hexes. The long table enabled the Germans to position OPs and AT guns on hill 91 and be able to see US units maneuvering and cover large areas of open terrain. These problems together with muddy ground due to recent rainfall, causing wheeled vehicles to bog, and a pesky German PaK 40 on the eastern board edge able to fire at US vehicles ending their movement in open fields on that flank, forced the US troops into prepared killing zones and required a level of circumspect before moving.
The Germans were set up with full hidden placement, and fortunately the US were able to field two mobile recon platoons that enabled them to spot these ambush sites more effectively.

The table below shows the German held hill 91 in the foreground with the US entry and objective points marked.

The picture below shows the Manor and neighbouring houses. The Manor was particularly important for the US as it was a three story building on the north ridge which gave a panoramic view of the German positions allowing the US mortars to play their part.

Picture below shows the outskirts of Hauts Vents on hill 91. The hill and three story building in the foreground were the highest points on the table and in German control.

US recce soon established that the US objectives were strongly held with a platoon of infantry, the Company HQ, HMGs, wire and mines

The US recce and armour were forced to deploy together and so commenced to shoot up the German platoon holding the Manor complex. They had to proceed carefully because the Armoured Doughs deployed on the other road, so the armour was very wary of panzerfausts.

The massed fire of tanks, armoured cars and recce halftracks soon had the barn on fire and started to cause casualties.


Meanwhile, below, the Armoured Doughs edged in from the other flank "brassing up" the house in the foreground with the Halftrack MGs. The infantry dismounted and prepared to assault, only to shoot up the house with a bazooka group and knock out the two remaining rifle groups.

The German platoon commander was forced to pull in the perimeter and with two morale failures already, loosed off a barrage of rifle and MG42 fire at the Doughs on the road, wiping out the assault section. The commander then set to clearing casualties and removing pin markers in preparation for pulling back down the road to the Company MLR.


The Germans looked like pulling off a masterful withdrawal after bloodying the US advance only to fail their final moral check on the turn end and rout back behind the lines.

With the Germans ejected from the Manor, the US prepared to assault down the road into the valley (see picture below). However it was important to get the Company CO up in the Manor in contact with the mortars to either shell or smoke off German guns and strong points before closing in. This proved a frustrating exercise as it took the CO two moves to get into the building, only to discover the mortars were out of range and required a move to get on the table.
Despite getting a two move extension to the game on the random die roll at the end. The US forces had to be content with the ridge in their control.

So the game ended in a German win as the US failed to secure the objectives in time, but as the casualties were even and no US armour was lost, the Germans do not get attachment credits (credits can be used to effect the chances of getting a particular unit in the next scenario orbat) but will get set up benefits in the next game.
Victory Points were awarded one for each group or vehicle destroyed (not routed, unless captured) German casualties were 3 Rifles, 1 LMG and a sniper. US losses were 3 Rifles, 1 Bazooka and 1 HMG group (Sorry Steve I missed the sniper off the list yesterday). Which gave 5 VPs to each side.
So the Campaign Score stands at US 5, Germans 5
Thanks to Steve for a great game and lots of laughs.
Happy Bank Holiday and best wishes to the Duke and Dutchess of Cambridge.
Jon

Tuesday, 12 April 2011

Bay of Pigs April 2011

Here they come.
Jeepers Tanks !

Look Bulldogs

CRA High Tide


Whilst the rest of the club lazed about in the Sudan, Chas and I took a trip to the island of Cuba.


Luckily the Adder had knocked up a few hundred troops in his lunch hour, so we decided to re-enact the Bay of Pigs using FOW rules and the Vietnam supplement.


Leading my intrepid counter revolutionaries were CLA paratroopers who had established themselves in a village near the beach.


It wasn't long before some CRA militia came into view and a fierce firefight started, with the paras withdrawing to the other side of the village. A platoon of T 34's consolidated the gains for the CRA, as a lone T 41 Bulldog shot it out with them. Three versus one is not good odds and it was soon burning.


With both sides receiving reinforcements things stabilised in the village, but the T 34's broke out on their right and a vicious hand to hand battle saw bazookas and a/t grenades send them packing.


Chas was not done, as a platoon of T 54's brought the other flank under pressure. Luckily my artillery took out one and an last ditch assault into CLA infantry in a wood proved to be a step too far for Castro's men.


A good bash and the Vietnam rules played well.


Next time the Yanks can keep their Bulldog's and aircraft !


Vince


Sunday, 10 April 2011

They don't like it up em in the Sudan

Hi all,
This months club meeting featured a game hosted by Nathan and took us to the Sudan in the 1880s using his lovely collection of 28mm figures. The rules were Too Fat Lardies, "They Don't Like It Up Em!" which are a card driven set and really help capture the flavour of the period.

The photo above shows the opening positions, Brits in red and the Sudanese in blue. The British punitive expedition, four units of Imperial infantry and one artillery unit (2) top left are returning to the Nile pick up point via the small village (4) in the centre. I have marked the village as Sudanese held because although to the British players it appeared to be held by Egyptian troops, it was in fact in Sudanese hands, one unit of Ansars and two artillery pieces,ready to ambush any unlucky British advance guard.
The Main British force (1) consisted of two units of Indian infantry, two units of Naval infantry, Bengal Lancers, two units of the Camel Corps, one Gardner one Gatling gun and a heavy artillery piece. These were in the process of landing before setting off to meet the raiding force.
The Sudanese hidden units were at (1) three units of light cavalry, (2) three units of Ansars, (3) four units of fanatical Fuzzies

As the British main force formed up, the Bengal Lancers set off to inspect the defences in the village, whilst the gunboat attempted to spot out trouble close to the shore.

Meanwhile our brave lads marched via hilly terrain, keen to make the safety of the village but ready for any trouble on the way.

The Egyptians in the village transformed into Ansars and opened fire with canister and rifles from the defences, stunning the Indian lancers, who were then hit by a charge from the hills to their left by Sudanese cavalry who pushed them further back.

Meanwhile the Imperial infantry became an island in a sea of screaming fanatical Mahdists, with the Highland and Coldstream Guards defending the hill at the centre of their positions.

Following the ambush at the village and the sound of mass musketry beyond, the British main force formed up and prepared to march forward to the relief of their beleaguered colleagues. Would they get there in time?

As the final shot shows there would be no force to rescue, with only a few Imperial troops left making a desperate bid to reach the main force. The Sudanese turned to face the new enemy in support of their village garrison. That was where our game ended.

Thank you to Nathan for a great scenario and fun game.
Winter War Finland and 12th SS Normandy next month
Jon

Thursday, 7 April 2011

Firestorm Normandy Turn 2

Hi Guys,

The German General Staff (Steve) and SHAEF (Jon) met up this evening at my place to sort out turn 2 in the campaign.

The map shows what is planned for turn 2 (2oth June - 3rd July).

The tempo of events certainly favoured the Germans with only three attacks generated (must have been stormy weather).

The Allies got the drop for the first attack and went for an assault by the US Paras on the FJ in Carentan. I backed up the assault with US artillery and naval gunfire support to secure this vital link between the US beaches and the 40 points that go with it.

The Germans got the next attack and went for an assault by the 17th SS Panzergrenadiers into the flooded area of St Jours supported by the Luftwaffe (if they can get through my fighter cover), aiming to grab back 20 points and forestall any push to seal off the Cherbourg Peninsula.

The final attack went to the Allies and I opted for the "big one", 3rd Division are going for CAEN and 80 points of glory. I'm going to make it easy for them and have given them air support and and Corps Artillery in the form of the big 5.5" guns.

Interestingly Steve mentioned that if the Germans had got the final attack he would have gone for the 12th SS attacking into Arromanches, but that just a forlorn hope.

So there we are, three key battles planned for the next phase to see who will control the Normandy bridgehead.

More anon

Jon

Wednesday, 30 March 2011

Firestorm Normandy Campaign End Turn 1

The four beach landings have been completed and Steve and I have brought the map up to date with the exploitation, march and strategic moves. Despite the loss on Gold beach, the armour from Juno exploited into the area to secure the British landings. The US paras on Utah enabled the US armour to exploit to St Jours and strengthen the US forces around Carentan and support a US move to cut off the Cherbourg peninsula. Allied air helped keep the Cherbourg garrison bottled up and minimise the German moves against Arromanches, however SS Panthers (2nd SS) are in the Foret de Cerisey and the SS PzIV (12th SS)is opposite Arromanches in the Bretteville area. The StugIV representing 17thSS has moved to La Haye to threaten US attempts to close on Barneville. The 21st PzIV moved into Mezidon opposite the British paras in Merville. A solid Allied landing should give a good platform for expanding the bridgehead in turn 2. As a side note, I like the way Firestorm allows a campaign structure to bring together games played as time allows. The campaign started last August and the battles have been fought as stand alone games but have contributed to the map positions recorded. Jon

Monday, 28 March 2011

Firestorm Normandy, Gold Jig Green

Hi all,


The fourth and final game in the first turn of our Firestorm Normandy campaign was fought this Sunday, and featured the landing at Gold Jig Green Beach by the Hampshires. The beach is an interesting scenario because where the 1st Hants. landed marked the boundary between the 716th and 352nd Divisions, and thus meant that the British veterans came up against German veterans on one side of the defences, and reluctant Ost troops on the other (see map and orbats for details)


The British objective on this beach was to penetrate the defences and wheel to their right, taking the objectives (green and yellow flags) at Asnelles and Le Hamel. This reflected the original objective of 231 Brigade with their mission of securing the right flank of the Gold Beach landing to allow the 47th RM Commandos to pass through to Port en Bessin and link up with the Americans on Omaha. Below is the tabletop interpretation of our map


With a current running from right to left (facing the beach, seaward side), the Brits landed their first three infantry platoons, DDs and an AVRE troop, headed for the ramp off the beach and the sea wall next to WN36, ably garrisoned by the 441 Ost, who sadly for the Germans lost a section to the naval bombardment and remained pinned for practically the whole game.

The AVRE's closed on WN36 and started to create breaches and batter the seafront buildings, preparing the way for the infantry assault.

Meanwhile the DDs were tasked with keeping the veterans of the 352nd in the Chateau Asnelles and sanatorium complex quiet whilst the attack developed on the other end of the beach. The smoke was deployed to prevent fire from the 7.5cm bunker of WN37 raking the beach. However a continual peppering of small arms and mortar fire came in from this strongpoint.

The assault on WN36 when it came was short and bloody, with the Ost troops fighting back stubbornly, taking three groups out for the three groups they lost. The remnants were forced to withdraw shaken but unbowed.

By turn 4 the attack on WN36 was gathering momentum, but would it be able to get clear of the strongpoint and swing in on the objectives?

The German commander decided to not wait for all the reinforcements to assemble and decided to just take a section of the infantry platoon and two Marders, seen here entering Asnelles. The truck and dug in infantry mark the objective hex.

Turn 5 saw the Brits starting to assemble their units in preparation to head out across country

Infantry supported by armour, make the dash across the open fields towards the cover of the hedgerows and immediately draw fire from the Marders and 352nd infantry sections.


The attack stalls in front of Asnelles as the British attempt to bring up M10s to support the infantry and the Commandos to make a last desperate assault on Le Hamel from the beach, which ended in failure.
At game end the German veterans were securely in control of Le Hamel and Asnelles and having inflicted over 21% more casualty points than they received were declared the winners, so ending turn 1 of our campaign with the only German win.

Many thanks to Gus, Jason and Nathan for a great days wargaming, and a slightly longer game than planned due to the fact that I hadn't advanced the clock an hour in the room and thus we thought we were finishing at 6pm when it was in fact 7pm!!

Jon