Labels

Sunday, 12 February 2012

Shoot out in Carterville

This years summer game is a planned Force on Force encounter covering the "Black Hawk Down" scenario. With this in mind we have been gaming this rule set to get up to speed for our planned game. The second club game this weekend was put on by Chas and Vince. 


News reports have come in today of a major clash between coalition forces and insurgents in the small town of Carterville in the North West province of Hyland. It is reported that major fighting occurred between US troops and several hundred militia and insurgents. It is also reported that two US soldiers were killed in today's fighting and that Helicopter gunships were called in to suppress enemy attacks.


A US military report states that the unrest in this previously quiet province is likely to go on for some time and that further troop reinforcements in the area will be launching a surge over the coming weeks to destroy insurgent forces.

Saturday, 11 February 2012

Gazala 1942, 4th Armoured vs 15th Panzer

"Gazala Dust Up"

Rommel, always close to the action, surveys the scene

This months game was a Flames of War encounter between 15th Panzer Division and 4th Armoured Division in a meeting engagement east of the Bir Hacheim strongpoint at the end of the Gazala line in May 1942.
The opening moves as Rommel's armour sweeps to the south of the Gazala position
RAF ground attack aircraft were becoming a potent threat to the Panzers
The map shows the layout of our terrain, with the objective placed by both sides. The red objectives indicating the German set up edge and the blue the British. As both sides were armoured companies we diced for the attacker and the British gained the advantage.


The table set up with British and German edges left and right respectively
With the positions agreed the British began the set up process by placing their 25lbr troop in the lower right corner. The process of placing platoons alternated from then on until up to half the platoons had been placed. The remaining forces were held in reserve to be diced for from turn three. The pictures below show the initial set ups, with all the British armour on from turn one together with the artillery. This left an armoured car, motor infantry, portee and towed anti-tank gun platoons to come on later. The British also had limited air support from RAF P40 Kittyhawks.

British set up with three troops of Honey's, one troop of Grants, Company HQ (2 x Honey) and a troop of 25lbrs

 The German force was a potent one with an HQ of one Panzer III and a Panzer IVF2, an 88mm FlaK platoon (1 x 88mm), a Panzer III platoon (3 x Panzer III & 1 x Panzer IIIJ), a Panzergrenadier platoon with an integral 50mm Pak 38, and a platoon of 4 x 105mm howitzers. Off table in reserve was another Panzer III platoon (2 x Panzer III, 1 x Panzer IVF1), an SP AA platoon of 3x20mm halftracks, and an armoured car platoon (3 x Sdkfz 222 ACs).  

The German set up with a Panzer III Special nearest to camera
As this was a meeting engagement both sides entered the table moving, and the race was on to occupy the most favourable terrain and be in a position to contest an objective. The British armour having the initiative raced across the open terrain of no-mans land (Honeys are light tanks and gain an increased movement) to threaten both objectives, the Honeys being supported by the slower but more potent Grant tanks, newly arrived in the Western Desert and coming as a big surprise to German troops.

British armour closes with the Afrika Korps. On the left the Honeys and Grants are duelling with the Panzers, whilst another Honey troop swing to their left to attack the German gun lines around the second objective.
 As the armour rushed forward the RAF made its first attack on the German lines with a strike of three Kittyhawks, which pinned the Panzer Grenadiers, who remained pinned for the remainder of the game. The RAF were superb in this battle appearing on four consecutive moves with two attacks of three aircraft and one of two planes. They knocked out the Panzer IVF2 in the German Company HQ and took out several artillery teams despite suffering hits from the German 88mm gun platoon.

RAF Kittyhawks come screaming in to bomb the German lines
The battle between the opposing tanks hung in the balance for a couple of moves until the Grants took a move of stationary firing to knock out three of the four Panzer IIIs and cause the platoon to rout, at the cost cost of a Grant and Honey tank. With the German armoured threat removed the British tanks turned on mass to assault the German artillery placed around the second objective, and pinned following a successful airstrike by the hard fighting Kittyhawks. The British artillery supported this attack by smoking off the German HQ and FlaK platoon to the right of the German gun line.

British and German armour duelling with the attack going in in the centre against the German artillery position with a smoke barrage (centre top) protecting the flank.
The coup de grace came in turn 6 as the British tanks swarmed on to the German gun position, followed up by a second assault on the German HQ position by Honeys and Humber armoured cars. The German Company was below half strength and was forced to test morale before being able to attempt to shift the British tanks off the objective. As reinforcements of Panzers arrived on the German left flank which threatened to wipe the British armour out, the German morale failed and they were forced to concede the field of battle.

The gallant Kittyhawks bomb the German Company HQ position
This was a nail bitter of a game with swings of fortune throughout and the German force was close to getting the initiative back when the game ended. This game was memorable because of the influence of the air support which was not devastating but definitely tipped the balance in favour of the British,

Thanks to Steve M for setting up the game and umpiring the day, and to Steve and Martin as the German commanders for making it an exciting finish to a close fought action.

Jon

Sunday, 15 January 2012

The Battle of Lavington 1688

The Club new year "kicked off" with a what if scenario based around the dramatic events of October to December 1688 which saw the landing of Prince William of Orange at Torbay and the departure of King James II to France and the beginning of the Jacobite struggle that finally culminated on the bloody moor of Culloden in 1746.

Our scenario assumed James taking a more resolute position and galvanising his supporters, including a contingent of French troops to help put an army in the field to contest Williams march on London. The two armies have finally met on the open terrain in Wiltshire near the small village of Lavington outside Devises and the battle lines drawn up to decide who will where the Crown of England and decide the fate of a nation.

King James II

William of Orange
Battlefield set up
The troop plan is diagramatic giving a general layout of the forces

The Royalist forces found themselves out-scouted and set their forces up first under the gaze of the rebels. The Royalist right looked fairly secure with the garrison around Lavington. The centre was anchored on the small hill-Lavington knoll, and the few artillery pieces were evenly spaced across the centre left. The bulk of King James' cavalry formed up in the more open ground on the Royalist left-left centre, with the King and his Guard cavalry and French troops just left of Lavington knoll
.
View of the Royalist lines looking towards Lavington in the top left corner
The Royalist garrison in Lavington with the camp behind
Lavington strongly held by Royalist troops, or was it?
King James' French contingent
The battle began with the Rebel cavalry and infantry advancing in the centre to meet Royalist cavalry. Both forces engaging in desultory artillery fire, with the Royalist getting the better of it and causing casualties on the Dutch infantry.

The French look on as the two opposing cavalry forces "lock horns"
The first cavalry clash in the centre went to William, with the Dutch elite infantry on the right background
seeing off the Royalist cavalry with devastating volley fire.
The first clash went in favour of the Rebels as crashing volley fire from the steady Dutch infantry emptied Royalist saddles.

Meanwhile on the Rebel left, the forces were happy to probe what seemed the formidable defences around Lavington and the Royalist camp.

The rebel cavalry started to probe the outskirts of Lavington
The rebel English foot looked on at Lavington. Did they know something was afoot?
With the repulse of the initial Royalist cavalry both sides prepared to raise the stakes in the centre as James threw in his heavy Guard cavalry, and William his elite Dutch Guard infantry.

Meanwhile the second round of action was building in the centre as William threw in his guard and more cavalry
Rebel cavalry to the right, William on the left oversees the Guard Infantry to his front.
King James ups the stakes in the centre by putting in the elite heavy
cavalry on the right to take on William's Guard Infantry-"game on"
A rebel Colonel looks on as the battle unfolds
King James' heavy cavalry are the victors in the centre and chase the Dutch Guard from the field,but at a terrible cost, their ranks severely depleted.
The battle in the centre was held in the balance for several turns as the two sides fought desperately for dominance. The Royalist cavalry eventually gained the victory but at a terrible cost and they were now a spent force. Both sides looked to their reserves, to "seal the deal". William brought up his last reserves of cavalry, whilst James committed the French infantry.

The centre is open and ready for exploitation, who would grab the initiative?
King James calls forward the French to push the rebel centre from the field and claim victory
The rebels play their next card and exploit dissension in the Royalist ranks.
The garrison commander in Lavington throws in his lot with
Williams forces taking half his brigade over to the rebel cause.
The centre of the field which had seen the heaviest fighting gradually moved in favour of the French infantry forcing the Rebels to consider other options. It was then that the Royalist lines were thrown into confusion as rebel sympathisers within their ranks threw in their lot with William's cause. The colonel commanding the Lavington garrison went over to the enemy taking half of his brigade with him and secured Lavington for the rebels.

However the loyal Royal forces were able to prevent any link up with the Rebel left flank and this cancelled out any advantage to William's army.

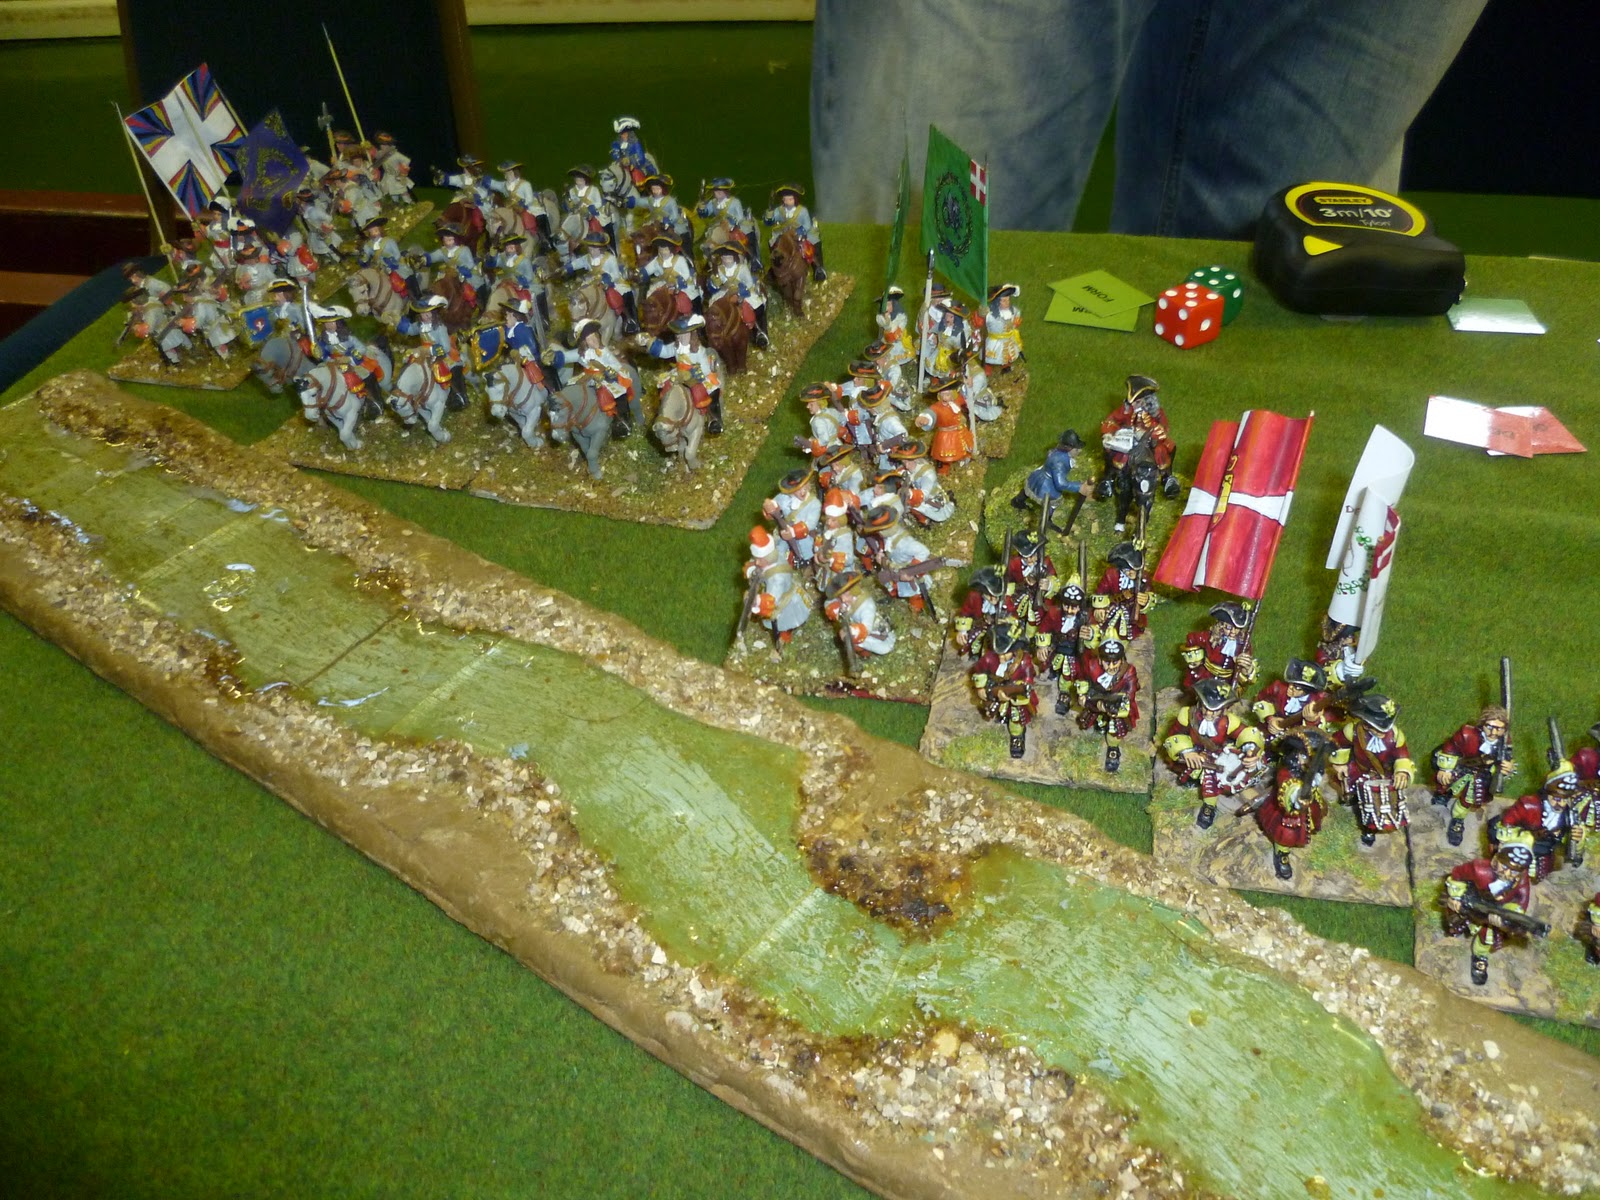
The final throw of the dice for the rebels, with their right wing attempting to get across the Lavington brook.
The final assault by the Rebels came with an attempt to force the Lavington brook on the Rebel right flank an roll the Royalist line up from their left. King James had kept a cavalry brigade back to cover any such attempt, and as the rebels came across the stream disordered, they were met by a furious cavalry charge that routed and chased the majority of them back.

Thus ended the Battle of Lavington. Prince William withdrew to Bristol unmolested, the Royalist army being too exhausted to follow up, and sailed for Holland in the January 1689. King James II secured the throne for the Stuarts and the course of British history was changed forever.

The rules used were Barry Hilton's "Under the Lilly Banners" which were new to many of us, but gave a fast moving game and were greatly enjoyed.

Thanks to Chas, Nick and Vince for supplying the figures and setting up the game . Great fun

Jon


Saturday, 19 November 2011

Sidi Rezegh - Witches Cauldron

Steve and I played the "Witches Cauldron" mission on Thursday night with the game based on a 7th Armoured Division Jock Column commanded by Brigadier Jock Campbell VC, occupying ground on the Sidi Rezegh airfield and bracing itself for the inevitable counter attack by the Panzers of 21st Panzer Division.
The Sidi Rezegh Battlefield
The Witches Cauldron has the defenders placed in the centre of their half of the table with two objective markers placed by the attackers. Once the defender has deployed the attacker dices to randomly deploy his initial forces to come on the table from the opposite edge or from either flank, with a 5 or 6 allowing a choice. The attacker can deploy up to half their forces with the rest coming on as reserves from turn 1. The defenders reserves cannot start testing before turn 3 and will arrive from the opposite table edge.

The Panzers are on the flank
The German placement die rolls produced fives and sixes allowing for the whole German force to arrive on the British left flank, the nearest to the two objectives and completely unhinging the defence set up. The two objectives were the building and sandbag emplacement either side of the soft sand area in the picture below.

The British set up with 25lbrs behind the infantry

The British position from the German perspective


Turn one saw the British ambush force (a troop of three A13s) immediately revealed (they have to be declared in turn one) and after a brief exchange of fire with the Panzers just as immediately dispatched.
The A13s in ambush are eliminated by the German tanks

The Panzers move in on the British Gun Line
The destruction of the British cruiser tanks left the 25lbr gun line as the main anti-tank defence to the infantry dug in on the airfield. These were supported by the infantry Boyes AT rifles. However the combined assault by the Panzers and Panzergrenadiers supported by the Stukas took its inevitable toll. Two of the guns were quickly neutralised for the loss of a Panzer II.
The Luftwaffe add to the destruction
As the battle waged furiously around the first objective, with the Panzergrenadiers seeking to drive off the British infantry and secure the ground, the British reinforcements appeared on turn 5. However the whole of the German force was on table at that stage and the German battery of four 105mm howitzers placed a smoke screen down to seal off the objective area from the onrushing Honeys.
The British reserves get smoked
With the objective taken in turn 6 and the Panzer IIIs in support of the two Panzergrenadier platoons, we called it a night.

The Panzers and Panzergrenadiers consolidate on the objective (the small round sandbag emplacement centre left)
Thanks to Steve for a fun game and "bearing up" whilst the God of Dice kept serving up the Afrika Korps fives and sixes. It just happens like that sometimes.
Jon

Sunday, 13 November 2011

Fire and Fury in the American Civil War

Hi all,

In addition to our Malayan Emergency Game this month, Jack laid on a 28mm Fire and Fury ACW game in preparation for the "Big One" in December as our annual Xmas game where all club members can come together on one table.

This year Nathan is organising an ACW big game using Fire and Fury rules so to get things warmed up for December, I grabbed a few photo's of Jack's game.