Labels

Sunday, 15 April 2012

Napoleon at War - Battle of Los Alcazarez

This month at our club meeting we had three games going covering WWII FOW version 3, an ACW game and our initial go at Napoleon at War, a new set of rules and a range of figures from the guys at Man at War.

Rule Book - Cover
In addition to describing our game I thought I would include my impressions. I should add that I am not an expert player of Napoleon at War, only having played two games, but I have played a lot of Napoleonics in thirty nine years of wargaming.
I will also point out that I have based my figures to this rule set, a collection of mainly AB's and Fantassin figures, but the guys at Man at War are producing their own ranges all prepacked with the bases to build the required brigades, and there is soon to be the launch of their first campaign book covering Waterloo and the 100 days.
For our test game I ran the fictional battle of Los Alcazarez which is a "Rear Guard" mission. The mission essentially requires the defenders to hold their ground for 6 turns by controlling or disputing possession of two centrally placed objectives, I used a couple of waggon models, and gaining more victory points vs the attacker by exhausting enemy forces. The forces tend to be brigades of three to four infantry battalions, two or three cavalry regiments of artillery batteries and they can become "exhausted by losing 50% of their forces and failing a commanders "valeur "test, usually 4,5 or 6 to pass for an average commander.

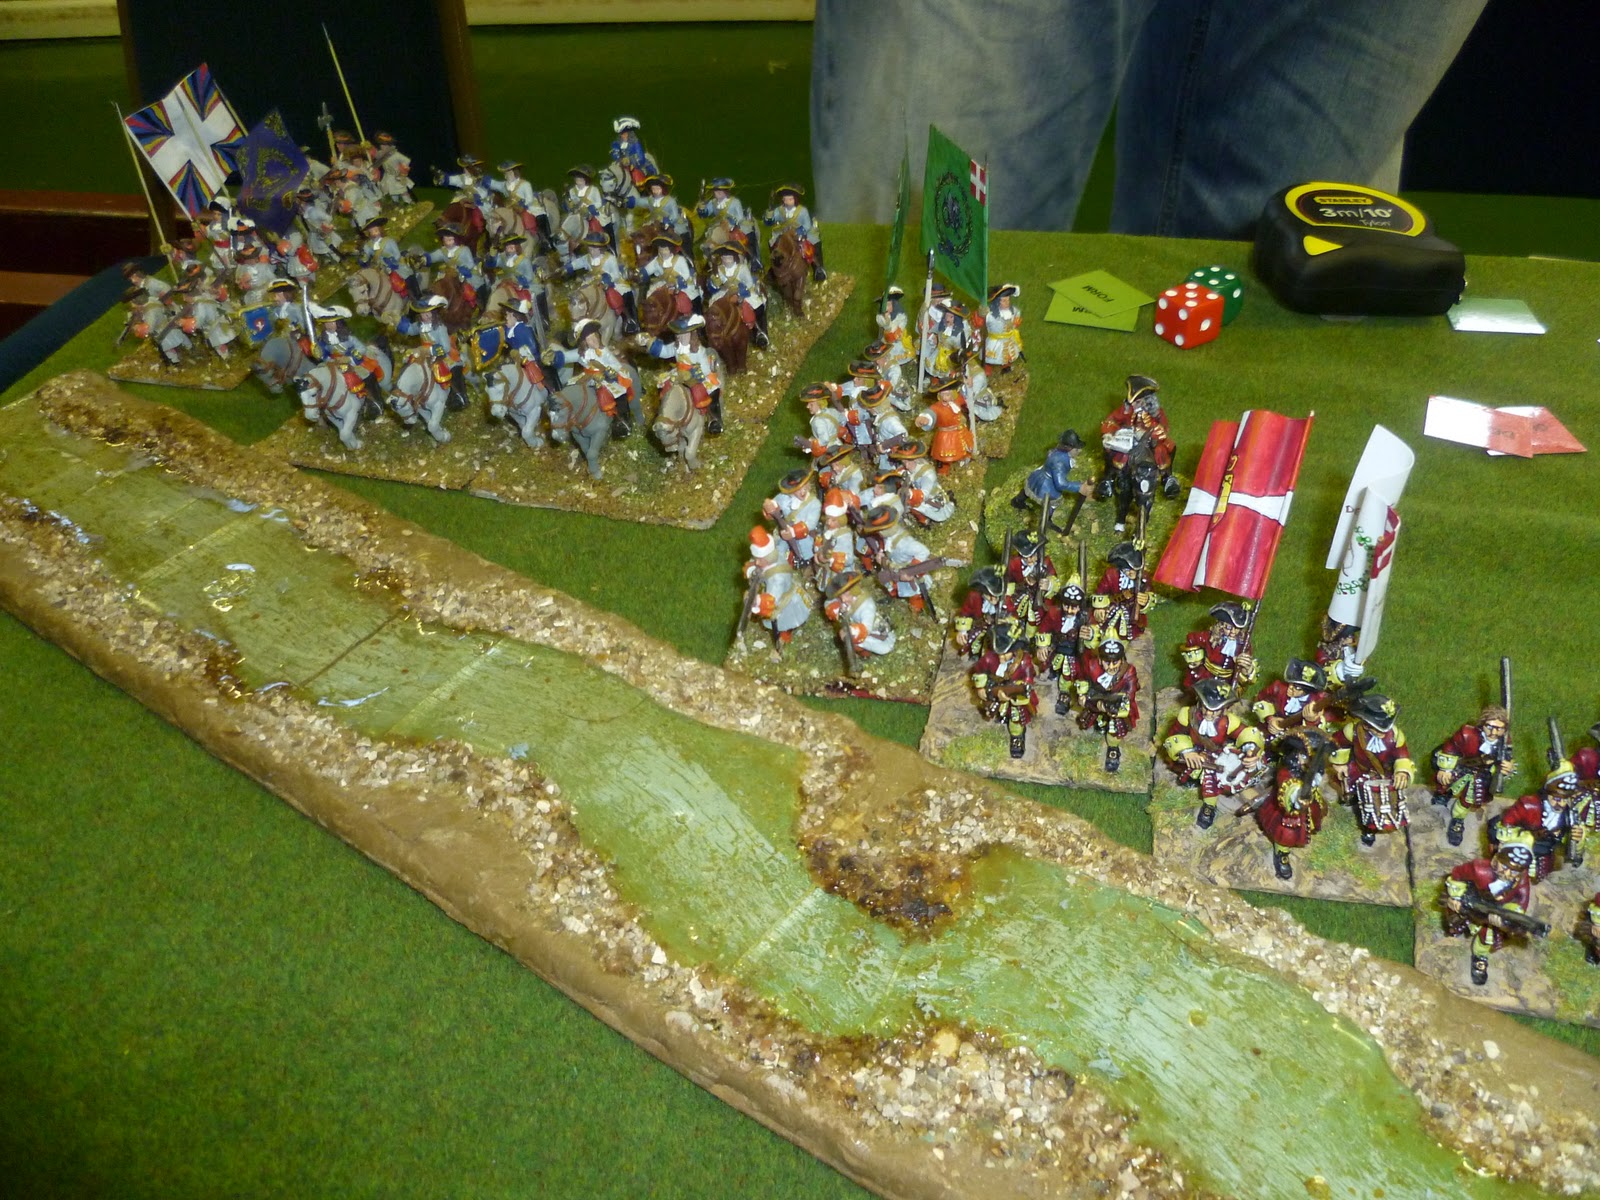
Map of the terrain, 6' x 4' table, French and British placed objectives shown
French start set up to two columns on from left facing British set up in the middle two columns
The French had three brigades of four battalions of infantry, two batteries of foot guns, 6 & 8pdrs and a light cavalry brigade. The British had two brigades of line infantry each four battalions one being highlanders, a Guards brigade of two battalions, a foot battery of 9pdrs and a light cavalry brigade. We played around with the characteristics to bring both forces up to about 2000 points.
During the game both sides test to bring on reinforcements to bolster their lines, and the picture below gives an impression of the initial set up (apologies for the quality of the pictures, done on the "Blackberry" because the camera batteries were out). The French are attacking from the left with two infantry brigades of eight battalions beyond the road supported by a battery of 8pdrs on the road. Whilst closer to camera we have another brigade of four battalions supported by a battery of 6pdrs. The French had a brigade of Chasseur a cheval in reserve.

The British defenders deployed an infantry brigade of four battalions beyond the road to dispute a parked waggon just visible behind their infantry, and placed the Guards brigade of two battalions in the farm and gardens just visible in the foreground. They placed the second waggon right behind the farmhouse to force the French to fight for possession of the complex to control the objective.

They placed a 9pdr foot battery to their rear on high ground to provide support and had an infantry brigade of four battalions (one highland) and a light dragoon brigade in reserve
The initial set up - French left, British right
I was interested in playing this scenario as I have an idea to recreate the famous battle of the Light Division retiring across the plains of Fuentes de Onoro, and some of the mechanics in this mission would seem to work quite well.
Guards lining the wall of the farm, another battalion was in support behind in the farmhouse
With both sides set up the French closed up on the British line, with their mighty D'Erlon like phalanx edging forward but not charging. The French commander opting to use his numbers to engage in a firefight by having his lead units in line and using his skirmishers to help absorb the hits from the initial British volleys (a French characteristic built into the special rules for the individual national characteristics). The British seemed happy to let the enemy use the time up shooting whilst they held their ground awaiting support. This might have worked if the British commander was able to throw half decent saving rolls, but because not, the British units were getting the worst of things by turn three.
Two brigades, eight battalions of French bear down on the redcoats
View from the French phalanx
French 8pdr battery in support
 Meanwhile on the other flank the French were trying to work out how to prize the Guards out of their stronghold. The arrival of the French cavalry in turn 2 allowed them to consider removing the battery of British artillery behind the main lines to enable their infantry to envelope the position. In addition the French 6pdr battery with its single howitzer started to shell the buildings.

The French prepare to assault the Guards stronghold
 The French commander in the spirit of testing the rules launched his assault on the Guards in the farm gardens. We described this terrain as outskirts (rough, restricting movement) with protection from shooting. The initial assault was on the wall defended by the Guards. This was easily seen off by the cold blooded volleys of the elite infantry. However whilst dealing with this attack they quickly gad to re-face the line to deal with a French unit that got into the gardens from another side.

This time the combat was slightly less one sided as we allowed for both units being in the terrain, however after a short combat the other French unit was ejected from the farm.


With the British line brigade getting mauled in the open by 8pdr artillery and French musket volleys, the French piled on the misery in turn four, and with the British continuing to have a bad day with the dice gods, we see a very satisfied French commander surveying the field of battle following the departure of the exhausted British troops who failed their Force morale test.

Nathan looking very happy with French forces in possession of the first objective
With the collapse of the British right flank and a battle royal going on for possession of the farm, the British reserves started to arrive in turns four and five. The British light dragoons immediately made their presence felt by charging in support of the Guards and mixing it with the French cavalry who had been attempting to get at the British gun line.
The battle for the farm is well under way as the cavalry melee in the foreground
As with most light cavalry hacks the fighting was furious but not entirely conclusive with one regiment of each opposing brigade winning their first round of combat.

The British gun line turns its fire in the victorious French masses to their right
The arrival of the British reserves was not able to repair the damage done in turn four, and although the British Guards held their objective, the collapse of the Line brigade was enough to give victory to the French by close of play.

I suppose I am what is commonly described as a "Grognard", in that I am of "middling years" and have played Napoleonics since 1973 when I cut my teeth on WRG, Bruce Quarrie's and Peter Gilder's rules. My impressions of Napoleon at War is they are a set of rules that give a fast action, fun game that can be played to a conclusion in an afternoon at club or in an evening at home. The rules suffer slightly from being as I understand things, a translation from Spanish into English. The layout of the sections requires a bit of application, but I really like the subtle qualities of the rules with their national characteristics, I like the fact that although this is an I go, you go system the non phasing player still has things to do, like return fire on units that have fired at them. I also like the look of the game with units in two lines of figures and batteries of three or four guns.

The guys that played our game all said they would be happy to play the rules again, and I think we still have plenty to master with this game in applying the subtleties, and we will be playing more Napoleon at War.

Thanks to Ian, Nathan Steve H and Will for a fun afternoon

Jon

Sunday, 11 March 2012

Guilford Courthouse 15th March 1781

http://www.historicalartprints.com/viewlatestgallist.php?id=4

This month we rolled out the Computer Strategies rules "Iron Duke" to run an AWI scenario recreating the battle of Guilford Courthouse. I haven't played these rules for a few years now but had fond memories of a system that was quick to master and gave a fast fun game allowing the commanders to direct their troops without having to work the rules or run the admin of morale, fatigue, ammo expenditure etc. The system we were using is the updated version 6 and is the latest incarnation. The order of battle was obtained from the Computer Strategies Yahoo group and the table set up and objectives took its inspiration from the scenario in the Grenadier rules by Dave Brown.

We set up the troop deployments on a 6' x 4' table with the British facing the first line of American militia. We set the game to run limited ammunition supplies, as this was an all day battle and this was likely to take effect. Unknown to us was the fact that one of the British commanders, General Leslie was suffering from a re-occurring illness that gave him periodic attacks of fever. This and the ammunition would take effect during the game

The British began their assault on the first line taking fire from the American cannon and riflemen as they closed, but managing to drive off Washington's dragoons with a well delivered volley from the Guards, but losing the services from the British Legion dragoons as they got themselves ambushed by Colonel Lynch's Virginia Rifles. After delivering their two required volleys the two militia units fell back from the picket fence and their withdrawal turned into a rout. The British light infantry managed to shoot up the American gun crews and they in turn broke with the militia. However the volley fire from the militia caused casualties and disorder on the 23rd Fusiliers who fell back to dress the ranks.

Now as the battle fell back into the woods and approached the second American line the two Virginia Rifle units came into their own. The Guards, Grenadiers, Von Bose's Hessians and the 71st Highlanders were subjected to a merciless sniping as they strove to drive off their elusive foes by ill directed volleys and charges. The relentless sniping proved too much for the 71st and they broke into a rout. The 2nd Guards and the Grenadiers were also badly affected by the battle in the dense woods and they fell back to the picket fence to regroup and redress the ranks.

The two Guards battalions either side of the Grenadiers have broken through the first line and are pressing on through the woods faced off by Campbell's rifles
The British pressed on with the Hessians, First Guards and Light Infantry, and it was now that the British Light Bobs took control of the battle in the woods by driving off and breaking Lynch's riflemen and then breaking the resolve of  Lawson's Virgina Militia causing them to break soon after. The First Guards finally managed to drive off Campbell's Rifles only after the riflemen had run out of ammunition. It was left to the re arriving 2nd Guards and Grenadiers to deal with Stevens' Militia.

The second American line had been dealt with, but at what cost? Several British units were out of the fight, the 71st Highlanders, British Legion dragoons, Hessian Jagers, and the 23rd Fusiliers. In addition the British command was under pressure, with General Webster mortally wounded, and General Leslie incapacitated with the fever he had caught in this damnable Southern climate.
The British decided to regroup, resting several units to allow them to regain their composure, and reassigning the final assault units under one commander General O'Hara who would deal with the continentals third and final line.

General Isaac Huger and General Greene with the Virginia and Maryland Continentals await the final British onslaught
 The Americans also took the respite to pull back their only surviving unit from the fight in the woods Campbell's rifles, to support the final line
The first Guards finally see off those pesky rifles, but would they have enough men left for the final assault?
With both armies ready for the final clash the British stated to manoeuvre their forces to the edge of the tree line. The forces available to the British were the two Guards battalions, the Grenadiers, the Light Infantry, Von Bose's Hessians, the 33rd Foot and Capt McLeod's Royal Artillery section. A rather unsteady 23rd Fusilier battalion trailed along behind.
The British attack plan was to flank the America ridge by the courthouse with the 33rd Foot and Von Bose's Hessians. The Guns would start to shell the Americans from the road whilst the Guards, Grenadiers and Light Bobs would assault the front of the ridge.

The British right flank about to clear the Virginia Militia and Lynch's rifles. The 71st Highlanders nearest to camera were routed in this fight.
The American commander was not prepared to rest solely on the defensive and launched a pre-emptive charge by the 4th Virgina Continentals on the 33rd Foot as they emerged from the tree line by the courthouse in column of march. The 33rd Foot were a solid veteran unit by this stage of the war and displayed that coolness of the tried veteran by forming line, turning to face and delivering a crashing point blank volley into the Virginians faces, who immediately turned tail and fled back to the hill.

The British move in on the Continentals, with the 33rd foot and the Hessians just emerging from the treeline, far background, and the Virginians charging them.
Meanwhile the Royal  and Continental Artillery had been peppering there opposite lines with the British guns having the best of it. The 33rd Foot followed up their initial success by proceeding up the slope and dealing with the 5th Virginia Continentals, with both sides swapping close range volleys, before the Americans had decided enough was enough. However the 33rd Foot were now worn, and it was down to the Guards and the Hessians to "seal the deal".

The 33rd Foot about to assault the 5th Virginians, with the Hessians in close support. 
Captain McLeod's guns blast the American line with the shaky Fusiliers in support
The Guards pressed forward supported by the Grenadiers to exchange compliments with the remaining two Maryland battalions. The Marylanders blinked first and started to give ground but not without one final insult to the Crowns forces. In the last move of the game, turn 21, General Cornwallis himself was seen to fall from his horse killed in the last exchange of fire.

So who won the day? The British objective was to break all three American lines and for destroyed American units, including routers, to be double those lost by the Crown. They had clearly broken all three lines and had lost four units doing so. In return the Americans lost nine units.

So a British win, of sorts, but with the death of Cornwallis, certainly a Pyrrhic victory similar to the actual battle.

Great game, with plenty of highs and lows for both sides as units broke, or refused commands. With officers being killed or incapacitated, and riflemen taking it to the Gentlemens Sons in the Carolinan woods

Jon

Sunday, 12 February 2012

Shoot out in Carterville

This years summer game is a planned Force on Force encounter covering the "Black Hawk Down" scenario. With this in mind we have been gaming this rule set to get up to speed for our planned game. The second club game this weekend was put on by Chas and Vince. 


News reports have come in today of a major clash between coalition forces and insurgents in the small town of Carterville in the North West province of Hyland. It is reported that major fighting occurred between US troops and several hundred militia and insurgents. It is also reported that two US soldiers were killed in today's fighting and that Helicopter gunships were called in to suppress enemy attacks.


A US military report states that the unrest in this previously quiet province is likely to go on for some time and that further troop reinforcements in the area will be launching a surge over the coming weeks to destroy insurgent forces.

Saturday, 11 February 2012

Gazala 1942, 4th Armoured vs 15th Panzer

"Gazala Dust Up"

Rommel, always close to the action, surveys the scene

This months game was a Flames of War encounter between 15th Panzer Division and 4th Armoured Division in a meeting engagement east of the Bir Hacheim strongpoint at the end of the Gazala line in May 1942.
The opening moves as Rommel's armour sweeps to the south of the Gazala position
RAF ground attack aircraft were becoming a potent threat to the Panzers
The map shows the layout of our terrain, with the objective placed by both sides. The red objectives indicating the German set up edge and the blue the British. As both sides were armoured companies we diced for the attacker and the British gained the advantage.


The table set up with British and German edges left and right respectively
With the positions agreed the British began the set up process by placing their 25lbr troop in the lower right corner. The process of placing platoons alternated from then on until up to half the platoons had been placed. The remaining forces were held in reserve to be diced for from turn three. The pictures below show the initial set ups, with all the British armour on from turn one together with the artillery. This left an armoured car, motor infantry, portee and towed anti-tank gun platoons to come on later. The British also had limited air support from RAF P40 Kittyhawks.

British set up with three troops of Honey's, one troop of Grants, Company HQ (2 x Honey) and a troop of 25lbrs

 The German force was a potent one with an HQ of one Panzer III and a Panzer IVF2, an 88mm FlaK platoon (1 x 88mm), a Panzer III platoon (3 x Panzer III & 1 x Panzer IIIJ), a Panzergrenadier platoon with an integral 50mm Pak 38, and a platoon of 4 x 105mm howitzers. Off table in reserve was another Panzer III platoon (2 x Panzer III, 1 x Panzer IVF1), an SP AA platoon of 3x20mm halftracks, and an armoured car platoon (3 x Sdkfz 222 ACs).  

The German set up with a Panzer III Special nearest to camera
As this was a meeting engagement both sides entered the table moving, and the race was on to occupy the most favourable terrain and be in a position to contest an objective. The British armour having the initiative raced across the open terrain of no-mans land (Honeys are light tanks and gain an increased movement) to threaten both objectives, the Honeys being supported by the slower but more potent Grant tanks, newly arrived in the Western Desert and coming as a big surprise to German troops.

British armour closes with the Afrika Korps. On the left the Honeys and Grants are duelling with the Panzers, whilst another Honey troop swing to their left to attack the German gun lines around the second objective.
 As the armour rushed forward the RAF made its first attack on the German lines with a strike of three Kittyhawks, which pinned the Panzer Grenadiers, who remained pinned for the remainder of the game. The RAF were superb in this battle appearing on four consecutive moves with two attacks of three aircraft and one of two planes. They knocked out the Panzer IVF2 in the German Company HQ and took out several artillery teams despite suffering hits from the German 88mm gun platoon.

RAF Kittyhawks come screaming in to bomb the German lines
The battle between the opposing tanks hung in the balance for a couple of moves until the Grants took a move of stationary firing to knock out three of the four Panzer IIIs and cause the platoon to rout, at the cost cost of a Grant and Honey tank. With the German armoured threat removed the British tanks turned on mass to assault the German artillery placed around the second objective, and pinned following a successful airstrike by the hard fighting Kittyhawks. The British artillery supported this attack by smoking off the German HQ and FlaK platoon to the right of the German gun line.

British and German armour duelling with the attack going in in the centre against the German artillery position with a smoke barrage (centre top) protecting the flank.
The coup de grace came in turn 6 as the British tanks swarmed on to the German gun position, followed up by a second assault on the German HQ position by Honeys and Humber armoured cars. The German Company was below half strength and was forced to test morale before being able to attempt to shift the British tanks off the objective. As reinforcements of Panzers arrived on the German left flank which threatened to wipe the British armour out, the German morale failed and they were forced to concede the field of battle.

The gallant Kittyhawks bomb the German Company HQ position
This was a nail bitter of a game with swings of fortune throughout and the German force was close to getting the initiative back when the game ended. This game was memorable because of the influence of the air support which was not devastating but definitely tipped the balance in favour of the British,

Thanks to Steve M for setting up the game and umpiring the day, and to Steve and Martin as the German commanders for making it an exciting finish to a close fought action.

Jon

Sunday, 15 January 2012

The Battle of Lavington 1688

The Club new year "kicked off" with a what if scenario based around the dramatic events of October to December 1688 which saw the landing of Prince William of Orange at Torbay and the departure of King James II to France and the beginning of the Jacobite struggle that finally culminated on the bloody moor of Culloden in 1746.

Our scenario assumed James taking a more resolute position and galvanising his supporters, including a contingent of French troops to help put an army in the field to contest Williams march on London. The two armies have finally met on the open terrain in Wiltshire near the small village of Lavington outside Devises and the battle lines drawn up to decide who will where the Crown of England and decide the fate of a nation.

King James II

William of Orange
Battlefield set up
The troop plan is diagramatic giving a general layout of the forces

The Royalist forces found themselves out-scouted and set their forces up first under the gaze of the rebels. The Royalist right looked fairly secure with the garrison around Lavington. The centre was anchored on the small hill-Lavington knoll, and the few artillery pieces were evenly spaced across the centre left. The bulk of King James' cavalry formed up in the more open ground on the Royalist left-left centre, with the King and his Guard cavalry and French troops just left of Lavington knoll
.
View of the Royalist lines looking towards Lavington in the top left corner
The Royalist garrison in Lavington with the camp behind
Lavington strongly held by Royalist troops, or was it?
King James' French contingent
The battle began with the Rebel cavalry and infantry advancing in the centre to meet Royalist cavalry. Both forces engaging in desultory artillery fire, with the Royalist getting the better of it and causing casualties on the Dutch infantry.

The French look on as the two opposing cavalry forces "lock horns"
The first cavalry clash in the centre went to William, with the Dutch elite infantry on the right background
seeing off the Royalist cavalry with devastating volley fire.
The first clash went in favour of the Rebels as crashing volley fire from the steady Dutch infantry emptied Royalist saddles.

Meanwhile on the Rebel left, the forces were happy to probe what seemed the formidable defences around Lavington and the Royalist camp.

The rebel cavalry started to probe the outskirts of Lavington
The rebel English foot looked on at Lavington. Did they know something was afoot?
With the repulse of the initial Royalist cavalry both sides prepared to raise the stakes in the centre as James threw in his heavy Guard cavalry, and William his elite Dutch Guard infantry.

Meanwhile the second round of action was building in the centre as William threw in his guard and more cavalry
Rebel cavalry to the right, William on the left oversees the Guard Infantry to his front.
King James ups the stakes in the centre by putting in the elite heavy
cavalry on the right to take on William's Guard Infantry-"game on"
A rebel Colonel looks on as the battle unfolds
King James' heavy cavalry are the victors in the centre and chase the Dutch Guard from the field,but at a terrible cost, their ranks severely depleted.
The battle in the centre was held in the balance for several turns as the two sides fought desperately for dominance. The Royalist cavalry eventually gained the victory but at a terrible cost and they were now a spent force. Both sides looked to their reserves, to "seal the deal". William brought up his last reserves of cavalry, whilst James committed the French infantry.

The centre is open and ready for exploitation, who would grab the initiative?
King James calls forward the French to push the rebel centre from the field and claim victory
The rebels play their next card and exploit dissension in the Royalist ranks.
The garrison commander in Lavington throws in his lot with
Williams forces taking half his brigade over to the rebel cause.
The centre of the field which had seen the heaviest fighting gradually moved in favour of the French infantry forcing the Rebels to consider other options. It was then that the Royalist lines were thrown into confusion as rebel sympathisers within their ranks threw in their lot with William's cause. The colonel commanding the Lavington garrison went over to the enemy taking half of his brigade with him and secured Lavington for the rebels.

However the loyal Royal forces were able to prevent any link up with the Rebel left flank and this cancelled out any advantage to William's army.

The final throw of the dice for the rebels, with their right wing attempting to get across the Lavington brook.
The final assault by the Rebels came with an attempt to force the Lavington brook on the Rebel right flank an roll the Royalist line up from their left. King James had kept a cavalry brigade back to cover any such attempt, and as the rebels came across the stream disordered, they were met by a furious cavalry charge that routed and chased the majority of them back.

Thus ended the Battle of Lavington. Prince William withdrew to Bristol unmolested, the Royalist army being too exhausted to follow up, and sailed for Holland in the January 1689. King James II secured the throne for the Stuarts and the course of British history was changed forever.

The rules used were Barry Hilton's "Under the Lilly Banners" which were new to many of us, but gave a fast moving game and were greatly enjoyed.

Thanks to Chas, Nick and Vince for supplying the figures and setting up the game . Great fun

Jon