Labels

Sunday, 14 October 2012

Bey vs Mountbatten, November 1940

After originally planning to run an Age of Sail naval scenario using my "Clear for Action" computer rules, I was having problems saving my game scenarios. So with one day to go before our club meet and not wanting to not have a game ready to go I turned to a very reliable set of rules namely "Shipbase III" which after a bit of fine tuning, halving the gunnery to allow for battle conditions, always give a fun game. Admittedly this wasn't going to be Age of sail, but instead of frigates we had destroyers in action.


The scenario above is my adaption of the scenario created and available on Len's Naval Warfare page for his rules "Fire on the Water"

http://fireonthewaters.tripod.com/index.htm


HMS Jersey (Early in the war)

KMS Karl Galster
This scenario recreates one of the early clashes between the Royal Navy and Kriegsmarine in home waters, and being a Devon based club we are very familiar with the conditions that can occur in our home waters. This action happened on a murky moonless night off Cornwall, with the Royal Navy force sailing towards the gun flashes observed as the German force was getting stuck in to some armed tugs. In this game we were running our add on command and control and night fighting rules.

Both forces were on set speeds and courses until the enemy was spotted. Then forces could react according to their standing orders. Only then could either Bey or Mountbatten start to signal to their respective commands to adopt different sailing and gunnery tactics. As this was a dark foggy night with primitive signalling techniques compared to modern times, things were likely to go wrong!!

This was going to be a "knife fight" of a battle as the ranges were often only one to two thousand yards, and as wargamers we were not just going to shoot and scoot, things were likely to be bloody.
HMS Jupiter having turned after launching her torpedoes is spotted by Karl Galster and is badly hit

We had the RN force on alert and they duly spotted the KM ships before the Germans knew they were there. Jack and Charlie standing in for Mountbatten had opted for fire star shell and launch torpedoes as their reaction to spotting the enemy. As the KM destroyers cruised on their current course a star shell was observed on their port side and HMS Jupiter launched 5 torpedoes at the German ships. The Jupiter only launched half her possible strike of 10 fish and at slow speed setting they would take two turns to cross the KM course by which time the RN force was spotted.
The German reaction was swift, with orders to open fire on first contact, increase speed to 30 knots and turn across the enemy. Sadly for the Germans only the third ship in line, Hans Lody, reacted to the new order, with her two consorts sailing on in line ahead. However the gun barrage from Lody at HMS Jupiter was devastating at about 2000 yards causing 60% damage and three fires, forcing her out of the line limping along at 6 knots.

Admiral Bey in KMS Karl Galster leads KMS Richard Beitzen as a star shell is observed to port (top left)
The RN torpedo's all missed and both sides were well aware of each others presence and desperate to bring order to their reactions. Both sides had ships out of formation and command and so had to fight with what was available. Both sides opted for a combination of gunnery and torpedoes to settle the affair and after thee turns of action, two RN destroyers Jupiter and Kashmir and KMS Hans Lody were sunk.

At this stage discretion would normally have been the better part of valour, and with the ranges increased and the darkness re-enveloping the forces our respective commanders may well have withdrawn to lick their wounds. We however are wargamers keen to try out our rules to destruction, and so we turned towards our respective foe and armed the torpedoes.

The survivors of the first round turn in for the final clash
As both sides charged towards each other on opposite tracks the night grew lighter and visibility increased. Three RN destroyers vs two Kriegsmarine with signal lamps flashing to order launch remaining torpedoes, fire the guns and take evasive action.

At one stage there were 26 torpedoes in the water and that was going to hurt at 2000 yards. The first ship hit was the Karl Galster, two torpedoes broke her back and she sank fast. However her six torpedoes caused five hits sinking the two rearward RN ships and having a dud hit the lead. The gunnery from both remaining ships was ineffective and they were both limping away when the final salvo of British torpedoes found their mark. KMS Richard Beitzen had avoided nine fish but it only took one to seal her fate.

The RN force (nearest) charge in for the final pass with their KM foes
With daylight approaching HMS Jackal limped away at 3 knots badly damaged but afloat and keen to avoid the Luftwaffe on her desperate return to Blighty, but that as they say is another story.

Thanks to Jack and Charlie for a very enjoyable afternoons gaming.

Warfare in the Back of Beyond


Baron Von Ungern-Sternberg


A big thank you to Chas for running a really good game today. Haven't enjoyed a bash like that for a long time.

We took to the Mongolian steppe to refight a strange little war from the early 1920's. An Austrian Baron called Von Ungern-Sternberg decided he had not seen enough slaughter in the First World War and fighting for the Russian army, so raised an army to fight for Mongolian independence (as you do).Needless to say the Bolsheviks had something to say about this, not least when he invaded
Russia.


Andy B, Clive and myself took the mad Barons men. Chas and Andy C played the Reds.

The scenario saw a red convoy being attacked by the mad Mongols, Chinese and assorted bandits. The Reds had to get their main man off the table, with his car laden with Mexican silver destined for the pay chest (or perhaps a nice Dacha).

Our infantry flanked the road and moved towards the convoy. The reds deployed a number of infantry units and our Chinese infantry started to feel the pain. Red cavalry rushed out to cover the other flank.


Our Mongol cavalry horde rushed on from the rear of the convoy and ran straight into the marksmen of the Siberian infantry. The Russians must have been panicked, as soon the Mongolian "Spoons" squadron was amongst them with two more Mongol horse units following up.

The rest of our cavalry broke right and flashed up the flank. The Russian armoured car and an HMG unit stopped to cover the threat.

The Red army cavalry clashed with the Baron and his bodyguard. It was the last thing they did. With the Baron there are no survivors.


Despite Andy B's best efforts, the weight of fire forced some of the lesser units back and a couple decided to go home.

With his force engaged, Chas decided it was time to get his car off the road and make for safety.

Our infantry were starting to go to ground, but a unit of Chinese peasants knew no fear and to a cry of "Big swords", they burst over the crest of a hill and into the elite Cheka.

With Mongolian horse rampant in his rear, Chas deployed his last fresh infantry unit to cover his escape. What could go wrong ?

At that moment the Baron and his bodyguard charged into view. A volley from the reds failed to stop them, but it looked like they would fall just short.


 The Baron used his special rule to force an extra few inches out of the charge and the Russian commander fell beneath their whirling sabres. The last thing they heard was a shout from the Baron, "No prisoners."

A good outing for the "Setting the East Ablaze" rules and nice to see such a varied collection of 28 mm figures on the table. Most of the units were of very poor morale and fighting quality, but I've rarely seen such a mix of abilities, nationalities or weapon types on the same table !

Played in the usual easy going style, a good time was had by all.

Vince

Saturday, 8 September 2012

Siege of Turin 7th September 1706 - Beneath the Lilly Banners


Our second game at this months club gathering saw a 28mm scenario using "Beneath the Lilly Banners". I have played these rules previously and know they work very well for the period covered.
Our scenario set during the War of Spanish Succession had the Imperial forces under Prince Eugene advancing to attack the French forces under Marshal Marsin laying siege to Turin.

The Bourbon forces were caught napping with their line of circumvallation still incomplete when the Imperial Army attacked. To reflect the surprise and effects of the siege on the French, their morale checks became subject to a negative modifier the closer the Imperialists came to their camp just behind the siege lines.

In addition they had to contend with a potential sally from the Turin garrison.

The following pictures give a flavour of the game showing the French coming out of their camp to meet Eugene's forces, with the subsequent fight in the middle of the table braking the French army and the siege.


September Games - Normandy to Turin

Hi all,

The autumn season was kicked off with a couple of games covering action in the boacage using "Kampfgruppe Normandy" and the Relief of Turin in the War of Spanish Succession using "Beneath the Lilly Banners".


The opportunity came up today to have a go at the KG Normandy rule set from the now defunct Warhammer Historical stable. As a confirmed WWII and "I aint been shot mum" fan, I was looking forward to see how these rules play. We had a typical Normandy scenario with the Yanks trying to push down a narrow bocage festooned road supported by lots of artillery and a few Shermans. They were faced off by a similar group of German infantry supported by a couple of PzIV (Tigers).

US Recce and Artillery OP survey the road ahead
 I have to say that first impressions are positive, with a straightforward IgoUgo play sequence based on command points to allow unit activations. The combat and morale is all d6 based and we found the game was easily learnt and sped along well. The core of the system lies around the morale management of your force. As a force suffers losses and suppressions, the commanders have to decide when to rally suppressed sections or vehicles to take up the fight at the risk of losing army morale points which will eat away at your forces will to continue the fight. In the end both sides were forced to not rally sections because they couldn't run the risk of a big loss of morale. This forced both sides to rely on the final combats being done by their remaining fresh units.

GI's in the bocage


"Move out"
"Achtung Amis!!"
Scratch one Ronson
The recce up the road comes under fire
Payback - scratch one Tiger?
Another panzer brews up
US armour closes in as the Germans prepare to bug out.
Our game swung away from the German force as soon as both their Panzers were lost and the resultant drop in morale. This with multiple unit suppressions left them teetering on retreat, and with the failure of the last remaining fresh section unable to take out a US Sherman with Panzerfausts, the resultant return fire ended all German resistance.

Two observations from our game was that we felt that Panzerfausts were not as representativly destructive as their historical counterparts proved to be. This could easily be remedied by altering their strike factor. The other is with the mechanic around using fire to suppress the enemy being rather to predictive. ie The US would brassup the German hedgerows but not advance until they could see that all or most sections were suitably suppressed. Quite sensible really, but not very realistic. One alternative would be to indicate potentially suppressed units but not confirm their status until they wished to activate thus keeping all sides uncertain about their state.

A very enjoyable afternoons wargaming, thanks to Nathan, Jason, Gus, Martin and Ian.

Saturday, 14 July 2012

Battle of Klock's Field 1780 - Maurice

 
Background
In the fall of 1780 Lt. Col. Sir John Johnson, illegitimate son of the famous Sir William Johnson and commanding officer of the Kings Royal Yorkers, lead a raid into New York with the express purpose of razing the ripening crops in the valleys of the Schonharie and Mohawk rivers.  Joining him on this raid was his half-cousin Joseph Brant with his Mohawk followers, and Lt. Col. Walter Butler with his Rangers.  With the addition of some British regulars, Hessian jaegers and small independent companies, the total force numbered somewhere between almost 900 men.

New York Province was by no means universally in support of the rebellion.  In fact it is questionable if there were ever much more than half the population that could be counted as “patriots”.  Thus Johnson knew he could rely on Loyalist (a.k.a. Tory) sympathisers for information, supplies and even recruits.

Arrayed against the raiders were the various militia units of New York.  Training and uniforms were scarce for these men, but when they fought in a natural skirmishing style they performed better than their senior officers would have given them credit for.  They chased Johnson and his men up and down the valleys, in a deadly game of cat and mouse, gaining strength in numbers all the while.  This game came to a head at Klock’s farm late in the afternoon of October 19.

Van Rensselaer’s militia skirmished with Johnson’s force as it drew up behind a stream.  The better trained Loyalists stopped the Rebels in their tracks but were too distracted to detect a flanking movement through the wooded highland on their left.  The Tyron County militia, sneered at by Van Rensselaer, came pouring out of the bush and sent Johnson reeling back.  Darkness and exhaustion from constant marching prevented an effective pursuit and the Loyalists slipped back up the valley, their strategic mission of denying supplies to Washington’s army accomplished.

The Game Set Up
Rather than a standard deployment the nature of this battle was more of a chase.  The Loyalists aren’t interested in hanging about or advancing.  They need to be off with as much booty as they can carry, and burn what they can’t.  Accordingly, the game is played along the length of the table with the Rebels deploying within 12” of the eastern edge and Loyalists setting up anywhere within 2/3rds (48”) on from the western edge.  Just to ensure the Loyalists don’t just dash off the western edge, the victory points are determined by booty and destroyed foodstuffs.

Each barn burned (the large structures on the map) is worth 2 dice to the Loyalists.  Each razed house is worth 1D6.  The rebels get the same dice if the structures remain untouched.  To burn a house or a barn the Loyalists must commit a full unit and have them in contact for a full turn.  (Does it take unit to burn a house?  No, but it forces the Loyalist commander to make some hard strategic decisions.)

If you have the figures, throw in some of cattle that require herding.  (Pigs require herding as well).  Each animal requires a herder and both would move at the speed of infantry in line.  Escaping with a herd is worth 2D6, killing them is worth 1D6 and a recaptured herd is worth 2D6 to the Rebels.  Try the same thing with a waggon.

“Fort Nellis” is a stone house in which the local farm families have barricaded themselves.  They can’t shoot out but they can defend themselves.  Assume they are a Garrison.  (The Mohawks tried to storm a similarly fortified house down the valley and lost some men in the effort.)

Other structures cannot be occupied.  They provide wood protection to units behind them but otherwise don’t affect line of site.  (Unless you have very small models, these buildings will be way out of whack with the ground scale.)

US
Commander = Brig. Gen. Robert Van Rensselaer
9 Conscript Regular = Militia (32)
1 Irregular (Tyron) Militia (3)
National Advantages
Skirmishers – All irregular units may re-roll failed evasion attempts, may fire up to 6BW (9)
Notables
Col. Abraham Cuyler (Sir Theodore Creasey
44 points

British
Commander = Lt. Col. Sir John Johnson
3 regulars = Butlers, Converged Bn., Royal Yorkers (18)
1 gun (1)
1 irregular = Indians (3)
National Advantages
Steady Lads –All regular infantry re-roll combat die when defending (9)
Notables
Lt. Col. John Butler (Thomas Burgess)
Joseph Brant (Lavrenti Duklevich)
31 points

The battlefield with the Americans setting up on the right of the map
 This was our third game of Maurice and I wanted to try out the "Notables" section of the rules and see how flexible the game could be with a small scale scenario. Over the years I have collected various scenarios off the web and from other sources and so "dug out" one I had played previously with other rule sets and found gave an interesting game. The scenario by Mike Manning was originally designed for "Age of Reason", but I have rejigged the orbats to suit "Maurice".

To add some spice I decided to use some of the Notables to represent some of the junior commanders who led forces during the battle.

The set up with the American militia formed by the road along the first stream
 As you can see in the picture above the Americans massed their forces by the road intent on slowing the Loyalist Waggon train and hopefully turning the flank and cutting the Loyalist regulars off from their exit route back to Canada.

Colonel Butler commanding the regulars, busily burning down barns!
The Loyalist commanders were keen to amass points by destroying and capturing as much booty as they could before "bugging out". The way Maurice calculates the morale of a force based on the number of regular units it contains, the Loyalists could not afford to take many casualties, with only 4 morale points vs 8 for the Americans. In addition the card play only allows the commanders to carry out limited choices during their play and so the decision to rally units, move units or burn barns became critical as the game progressed. We played that a Loyalist unit had to declare it was burning a barn by remaining stationary during a march move next to the target building.

The New York and Albany State Militias prepare to advance with the Tyron irregulars operating in the woods
The American Commander found himself using up cards to close as quickly as possible on the Loyalists to stop their destruction and to slow their withdrawal down. Having to cross disordering terrain also caused occasional stops to re-dress the ranks.

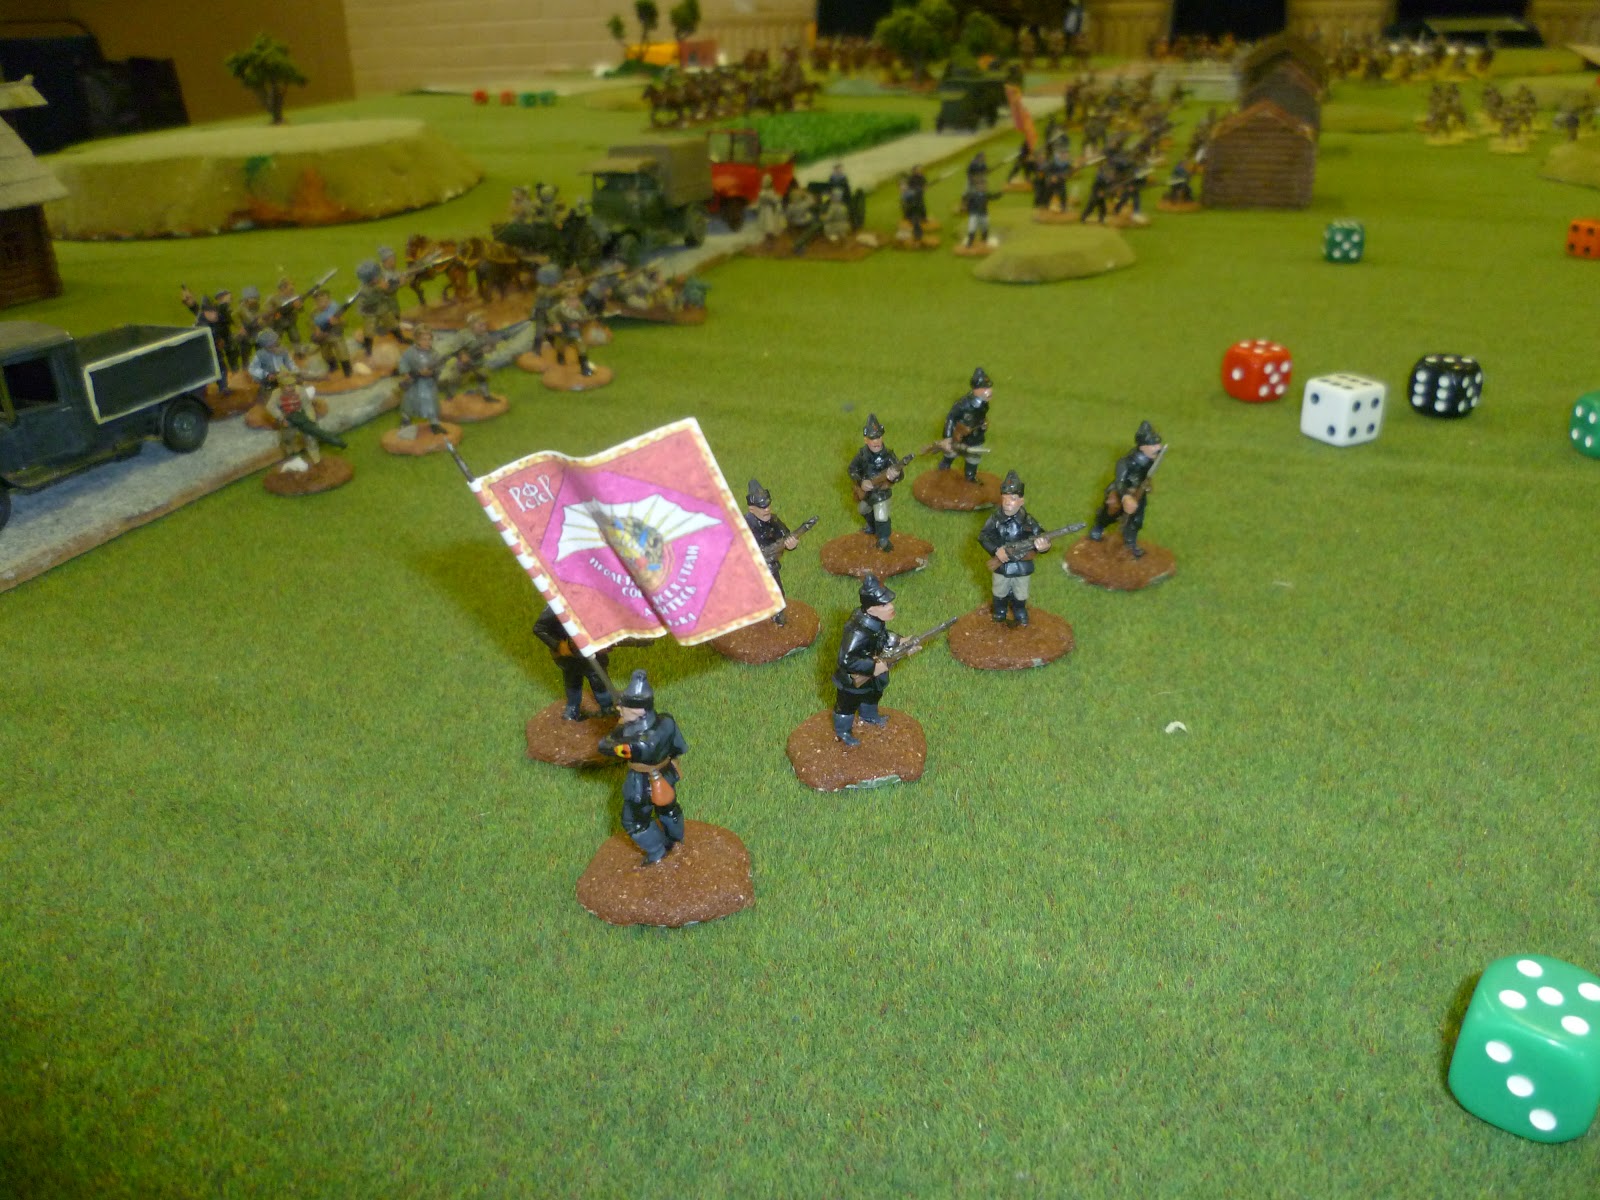
Lieutenant Colonel Sir John Johnson oversees the Artillery and Indians also busy destroying barns
 Eventually the first decision point arrived as the militia closed in on the Indians and Artillery drawn up amongst the buildings near the road. The Loyalists had concentrated their card play on the regular infantry force and suddenly found their other group threatened. As they attempted to depart the militia let rip with couple of well aimed volleys wiping out the gunners and crippling the Indians under Brant before they could flee to the woods.

The militia close in for the kill
On the militia flank two units turned to line the fence facing Colonel Butler's units. The three Loyalist battalions moved immediately to deal with the threat and with Butler's ability to move his force in difficult terrain without the being disordered allowed his line to threaten to disrupt the militia advance.

Colonel Butlers forces prepare to engage the Rebels from the flank
However the militia were not to be intimidated for long, and after finishing off Brant's Indians, they let off another punishing volley against Butler's Rangers causing three disrupts and forcing a rally move by the Loyalists. With the destruction of their gun crews and Indian allies the Loyalist forces morale was reduced to one point. They needed to leave quickly.

As the musketry hots up the Loyalists prepare to depart whilst destroying field crops along their route
Colonel Butler ordered the withdrawal, but with his Rangers carrying a further three disrupts he arranged for them to lead off and sprinted for the table edge leaving the British combined battalion and the New Yorkers to bring up the rear. 

The race is on between Van Renesslaer's militia and Johnson's regulars
The race to get clear of the enveloping militias was on, and with both sides down to only a couple of cards in their hands, it was unclear who held the advantage. However as the first deck of cards was reshuffled and three new cards issued to the Loyalists who were forced to pass because of having used all their last hand, the Americans closed the retreat route off. The Brits would have to fight their way clear.

Cornered!!
The Loyalist infantry were carrying disrupts from their struggle to break free from the fields previously so were in bad shape to face off the militia. The first two volleys from the Americans sealed the game and with the destruction of the British combined battalion, Johnson's force broke.

The Loyalists prepare to fight their way out
This proved to be an intensely interesting and fun game with two well matched adversaries. The destruction points were close at 12 to the Loyalists and 16 to the Americans. If the Artillery and Indians had evaded destruction the Infantry could have put up more of a fight, and had the Indians fallen back earlier they may well have had a chance to be more destructive to property. Everyone really enjoyed the rules, good game.

Thanks to Martin, Andy, Ian and Steve for a fun afternoons gaming

Jon