Labels

Sunday, 10 February 2013

American Civil War using Civil War Battles Rules

At the Devon Wargames Group we pride ourselves in always trying to run at least two games a month to cater for all tastes.

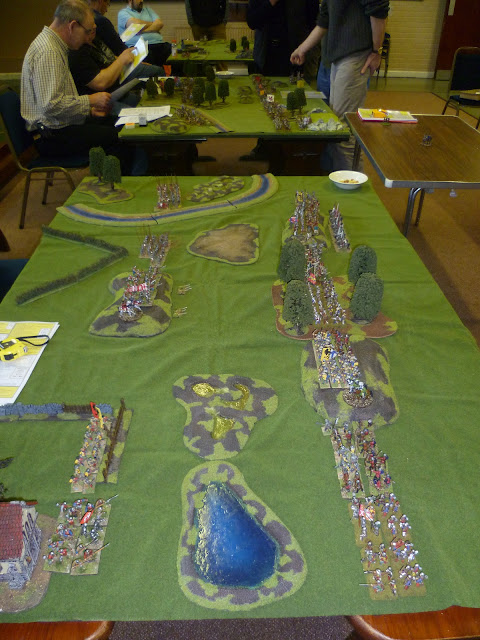
In addition to the game I ran, Steve H set up a 15mm ACW game using the Peter Pig Rules "Civil War Battles. I have played these rules before and though not involved in yesterdays battle, know that they are a fun set to play.

During a lull in the fighting in the Indian Ocean I was able to wander over and admire some lovely models "Strutting their stuff in Dixie" and took a few shots of the game.

Civil War Battles by Peter Pig


After Action Report

Every wargamer has a story about bad dice, well here’s another one.
In Peter Pigs “Civil War Battles” both sides during the set up allocate 60 War Point dice to decide the attacker and assorted small perks spread over a further 9 topics , all you have to do is throw 5 or 6 , deduct the two totals and look up the effect . The Union chose to have 18 attacker dice and achieved a magnificent two 5/6’s , the Confederate player had allocated the minimum 10 dice as he wanted to defend  and then managed to get eight 5/6’s . But the Union wasn’t going to stop there, in CWB the defender now has to throw for each unit and either remove bases or move off board as reinforcements or both, the severity of the dice rolls depend on how much he lost the dice roll (6 is really, really bad) however each gun only has to roll once and if it is a 5 then it becomes a reinforcement, a 6 and its gone for good. Somehow out of 8 rolls he managed to get 6 sixes.
So it looked a bit grim for the union, a third of its forces gone walkies plus most of its guns, the thin blue line looked desperately thin as the vast hordes of Confederates made their first move.


There was one thing in their favour, if they could hang onto the rear objectives until the game ended in around 6-8 turns then they might just grab enough victory points to win. Because the Union had lost the roll off by the worst possible score then they already had a guaranteed 12 D6 VP rolls, prevent the Confederates getting 9 VP rolls for the rear objective and they might just do it.


The Rebs throw everything they could down the left hand side , 7 units would surely sweep away 2 flimsy weakened Union Brigades and despite them heroically standing for long after the time when I would have been halfway to Washington it looked  all over once they crumbled before the Reb Bayonets . (In CWB the “Falter Test” is taken prior to combat, generally the attacker starts with a score of 3-5 and the defender 2-3, add 2D6 and if the attacker wins he gets in. If he wins by +5 then the defenders rout off table. The Union Right wing commander in line with team orders throw double 1). However reserves were coming on from all sides plus the centre units swung across to somehow stem the tide. In what looked like a scene from Zulu the Union forces stood back to back as the Rebs tried in vain to force their way through to the Road entrance objective.

Meanwhile the centre of the Union was down to 1 Raw brigade against 6 so you don’t need me to tell you what happened and it was actually this sector which would see the  not unexpected Union Collapse however with poor terrain and poor command rolls the victory advance became a victory crawl .( each brigade must pass its roll to move, add the generals rating 0-3 to the units rating 1-3 plus 1 point for every 3”from the general and 1 for terrain /units ; throwing under this total or a natural 2 or 3 is a fail and everyone only gets 1 Action Point ) .


The left wing for the Union side was however a rousing success and didn’t lose an inch of ground , good dice rolls for base removal at the start had left them with almost full sized brigades and they managed to throw back the Rebel attack which was not helped by their best units being left behind by yet more bad command rolls . This only got worse as each turn they got further and further back as their attacking comrades raced forwards , do you stop your the attack and wait or do you push on and hope for the best. This time it didn’t work and the Union Forces held their ground along with the important side road objective. 
It was about now I realised the pub was open so called a halt to the game and started to add up the VP ‘s  , the cunning Union game plan suddenly kicked into life and a torrent of high rolls on the VP dice saw a change in Confederate expressions from smirking to worried . By the time the swarm of Blue coated bases in the dead pile were added in however the final score was +10, a Small Confederate Victory.

CWB is a defender biased game if you play with the “War Points” and set VP scoring and given average dice rolls for base removal you are not going to force your way throw the defence in 6-8 turns. I must have played this game 20 times mainly as the attacker and despite being at least in my own mind a brilliant wargamer I doubt that I have won more than 2-3 times. Make your own scenarios and victory conditions if you don’t like it, but those War points, their so damn addictive.

Battle of Sadras - 1782

By 1782 the American War of Independence had spiralled out of British control and had developed from a small problem in the thirteen colonies to a world conflict involving other European powers seeking to take advantage. British forces were becoming stretched to their limits in defending their interests throughout their other possessions.

This struggle naturally came to India where three of the combatants had holdings namely the British, French and the Dutch. 


Captain Pierre Andre de Suffren

Between February 1782 and June 1783 the fleets of French captain Pierre Andre de Suffren de St. Tropez and British Vice-Admiral Sir Edward Hughes fought a series of naval actions along the Indian Coromandal coast in what has become one of the most popular campaign settings for wargamers of the age of sail. Five actions, all largely inconclusive and fought between fleets that were relatively equal in numbers, were fought on the Coromandal coast, at Sadras, Providien, Cuddalore, Negepatam and Trincomalee.

Vice-Admiral Sir Edward Hughes , pictured here as a captain
Battle of Sadras map - Three Decks, Warships in the Age of Sail
Yesterday's game was a recreation of the first of these encounters, the Battle of Sadras. This engagement poses an interesting challenge for both fleets. The French have the wind, a slight numerical advantage and the better commander. The British are in line of battle with better crews.

The rules used were a combination of the card play taken from "Kiss Me Hardy" (KMH) by the Too Fat Lardies, and the freely available App "Eight Bells" to handle the combat and sailing stats for our model ships. All the players had to do was draw a card and decide on their actions.

Eight Bells Napoleonic Naval App

Kiss Me Hardy

For a more detailed description of how these rules worked I have put up a post on my blog.
JJ's Wargames


The French fleet with the wind in their coat tails bear down on the British line
The French fleet bore down on the British line deciding where the blow should fall and by what means. Both forces were forced to use the tactics of their historical counterparts. Thus, unless ordered otherwise, doctrine would have the British shooting at the hull, whilst the French would aim for the rigging. In addition Suffren would not be applying the "Nelson Touch" here by penetrating the British line and thus his options were to parallel the British line or to double it, which is what he attempted on the day.

The British being downwind and in line decided to blaze away as the French fleet approached, however deciding to shoot at the French rigging.


As the range closes, both commanders signal their fleets
We were using the signalling rules from KMH that appeared in the Lardies Winter 09 Special. This places cards in the deck for each commander, one for Hughes and two for Suffren. When the card appeared the respective commander could make one order change to his fleet provided his flagship or the repeater frigate was in view.


HMS Exeter prepares to give the French a warm welcome
As the French closed in Admiral Hughes signalled to "Engage the Enemy", note the repeater frigate to the rear of the British line, allowing his captains to choose their targets and fire off the appropriate shot. However at long range the British were forced to load ball that did little damage when fired at French rigging.


The British line opens fire
The French lead ships were little damaged as they closed in on the rear of the British line. Admiral Suffren was signalling that he wanted his three most rearward ships to follow him around the back of the British line to double their opponents. This move was tried in the actual battle and for one reason or another the French messed up and their force fell into confusion. Would our table top fleet have the same problem?


Fire as they bear
Admiral Hughes was also experiencing problems manoeuvring his ships, and only being able to signal one order at a time (Hughes was rated as a poor commander) was not helping. The Eight Bells App has a movement system that randomises the ships speed based on the roll of three dice and the attitude to the wind. As ships sailing in formation start to try and form up or change direction this can really mess up the neat lines us wargamers like to form, a bit like real life really!

So as Hughes' flagship attempted to tack around and lead his lead ships back to support his rear, the random speed settings together with damage from French fire caused his line to lose formation and become ragged.

The British firing continues as they are led into a tack by the flag ship, now facing into wind.
The second ship in line has had to take avoiding action as his Admiral's ship is "in irons" standing into wind.
The frigate to the right is signalling the tack to the rearward ships.
Likewise Suffren was attempting to bring his ships into a double line and as the rigging started to fall under the British barrage, the formation started to loose cohesion.


The French, on the right, fall in with the British rear attempting to "double" them


The French van fired at the British rear aiming for the rigging
The rearward ships in the British line were bearing the brunt of the French attack, and it was fitting that being the Devon Wargames Group it should be, as in the real affair, HMS Exeter of 64 guns in the thick of it trading broadsides with Suffren.


The British start to lose masts and spars under the close range barrage
As the damage inflicted on each others rigging and the corresponding breakdown in formation occurred both commanders realised the change in situation and signalled "Fire as she bears" allowing the respective captains to place their ships alongside that of the enemy and get stuck in.

As the French go for the British rear the British van double back on them
As the "scrum" of ships developed the French found themselves numerically superior to their British counterparts, with the three, so far unscathed, lead British ships desperately tacking back to help their comrades. It would have been here that French discretion would have been the better part of valour. They were close to taking two of the rear most British ships in boarding actions, and a general withdrawal may have been the better move at this stage.

However the wargamers need to battle it out to the end took over and the French tried to contest every action, which led to the British crew superiority to gradually take effect. As the British reinforcements arrived on the scene the battle swung back their way as three French ships struck their colours in quick succession.


The final melee - yellow markers showing three French strikes
And thus ended our re fight of Sadras, which if this had been part of a mini campaign, forcing our tabletop admirals to be as conservative as their historical counterparts would have given a similar outcome with both fleets forced to withdraw and lick their wounds. Now that's a thought "Mini Campaign".

Once again, thanks to my fellow Devon Wargamers, Jason, Gus, Ian, Ollie and Jack for a very entertaining days gaming.

JJ

Sunday, 13 January 2013

In the Kursk Saliant - Battle Group Kursk

Yesterday at the club we played a game of Battlegroup Kursk. I had been looking forward to playing this set of rules since their release late last year and having played an earlier reincarnation Kampfgruppe Normandy.


Our game set up was a "Meeting Engagement" with two forces composed of infantry and tanks approaching the battlefield from opposite corners of the table. The set up has four objectives identified which, possession of, determines victory and impacts the overall morale of the side that does not have control of them.

The initial set also takes into account the amount of recon assets each side possess to determine the how far on the two sides can advance their lead units. The German force having a platoon of armoured cars and recon infantry in half tracks dominated the recon of the position allowing the Germans to occupy three of the objectives at the start of the game.

The German recon victory had immediate consequences for the Russians as the three objectives now occupied plus their loss of the recon move meant they had to draw four chits. These chits generally have a number on them from 1 - 5 plus a few with special events such as air attacks, vehicle breakdowns etc. The number on the chits indicate that number of morale points lost to that side. These chits are also drawn when units are destroyed, when unpinning friendly units or when an objective is lost to the enemy. Thus the end of battle is predicated by the events of battle and the Russians having just lost 14 points were off to a bad start.

The Battlefield - Komsomolets State Farm and the workers settlements
The success of the German recon also meant that the Russians would be advancing into an ambush zone set up by those same recon units, supported by German pre-registered artillery fire. In the end, as the T34s advanced on to their corner, it was the artillery that caused the first losses of a couple of T34s plus several pinned tanks. This was swiftly followed by an air attack from bomb armed FW190s who screamed in to add to the mayhem caused by the artillery.

The Russian tanks reeling under this barrage of fire responded as best they could by knocking out the armoured car platoon to their front. These pyres burned throughout the battle on the front line.

German Recon occupy the front line - the SdKfz 231s burn in the background as German artillery falls on the Russian tanks
The rest of the German recon infantry resolutely awaited their support units and watched as the Russian armour struggled to regain its composure to recommence their approach to the Farm. They were able to choose their moment to strike, as being recon units in cover made them difficult for the Russians to spot and gave them multiple ambush opportunities.

Ambush position on the main road
As the T34s now supported by infantry and T70s closed in on the Farm complex the first German reserves started to arrive led by a formidable Tiger platoon.

Enter the Tigers
Urra - The Russian Horde closes
It was now time for the Russian artillery to enter the battle and they reserved their greeting for the Tigers. The Russian CO obviously had connections as he calmly picked up the field telephone and requested support from Army. The big Russian guns responded promptly and large calibre shells started to drop around and on the Tigers in the fields close to the main road, knocking out one of these leviathans. The mayhem caused was compounded by the Germans having put Panzer Grenadiers on the decks of their Tigers who were now scrambling for cover in the barrage and getting themselves pinned just when their support was needed.

The Tigers are welcomed by the "God of War"
Despite the success of the Russian artillery, events were moving to stifle their advance. The German reserves were coming on thick and fast to consolidate the gains made by the recce. The Panzers and Panzer Grenadiers were spreading out to deal with any threatened Russian penetration of the front line.

German Reinforcements
Panzer Grenadiers in the wheat
The artillery fire rained down in the forward area
The Grenadiers move in to consolidate the position
Panzer IV's and a Flamm Panzer approach the Farm Complex
The Germans abilities in command and control were enabling them to build up their front line force quicker than the Russians could theirs, despite the distance across the table that the German units had to travel. The Russian force needed to break in to the German line quickly to regain the initiative or the front would solidify around the German positions.

Panzer Grenadier Kompanie HQ with AA protection
The Russians having now got a solid group of armour and infantry up to the farm complex now commenced their main attack. Their initial preparation consisted of firing along their front to pin the German infantry and tanks prior to their assault. Then using their special tactics of "Stal Stal" allowing their armour to pretty well move en masse they threw it in at the recon elements occupying the Farm Complex.

This attack resembled the tanks rolling into the buildings occupied by Sgt Steiner's men in that classic Russian Front movie "Cross of Iron". The fighting was close up and personal, but this time the Germans held. Throwing in dice and chits to unpin their supporting units, the Germans were able to throw back the Russian infantry following up their tanks.


The Panzer Grenadiers who had come up with the Tigers launched a counterattack on the Russian infantry throwing them out of some workers houses, before they themselves were thrown back by more assaulting Russian infantry.

"Where the Iron Crosses Grow"
The Russian armour was held and as the German armoured cars continued to burn with the occasional pop of 20mm ammunition, the smoke of battle started to shroud the carnage.

Russian Reserves
Thus ended our Battle at the Komsomolets State Farm on the road to Kursk.

My impressions of the rules and game:
I really enjoyed the flow of the game. These rules played faster as we got our head round the mechanisms and, with the chit draws, give a lot of the "unexpected" that many "IgoUgo" games seem to lack. As signed up members of the Too Fat Lardies IABSM club, the unexpected has now become the expected, and so these rules ticked a box. There is an element of the old school systems of recording ammo amounts for individual vehicles and ticking off usage that is slightly cumbersome, but I stress slightly. This is counterbalanced by the author including the use of replenishment vehicles and rear area support units such as medical teams and wire laying groups that can add "spice" to any scenario.

I suppose my only quibble having sat back and thought about these rules is the orbats themselves. The use of   three tank platoons particularly for the Germans and 5 man sections with one light machine gun nags at my historical simulation gene. I understand these are mechanics to make the game system playable, particularly with the German machine guns. Apparently two of these weapons in a section are not workable in the rules.

Would these be my turn to set of WWII rules? Definitely not. I'm afraid IABSM still hold that position.
Would I happiliy play this game system again? Definitely Yes. The rules give a fun game that seems to capture that movie element to WWII and I will get a copy of my own to play. I think for the Russian front these rules have some distinct advantages particularly when there are numorous units on the table.

I will certainly be awaiting the launch of the Normandy module (which is more my own personal interest area) with great interest.

Great game, good fun. Thanks to Andy, Jason Nathan and Gus for a fun day

Saturday, 29 December 2012

Robin Hood - Escape from Nottingham

The year of 2012 was rounded off with an annual get together in North Devon at Chas's. Our New Year's Eve games tend to be light hearted affairs and this years scenario was one of the best.

It was just another day in Nottingham, but King John and the Sheriff had laid on a feast of entertainment for the good people of the city. Not only would they get to see the Sheriff take the Lady Marion as his wife, to be married by the Bishop of Nottingham, but also as a little starter to the days celebrations, they would get to see Robin Hood executed by losing his head on the block. What fun, what joy!!

The Bishop of Nottingham on his way to marry the happy couple,The Sheriff and Maid Marion
The Bishop had to make his way to Nottingham through the forest road to Trent Bridge, just by the cricket ground, a new game invented by the peasants. Now that Robin Hood was in custody no trouble was expected, and the Bishop even travelled on foot to be able to swap pleasantry's with the locals he met on the journey.

Nottingham is on guard as the outlaw Robin Hood is due to be executed before the wedding.The road at Trent Bridge is heavily policed by the Sheriffs men.
The town was tense with expectation, surely Robin Hood would be able to stop this, surely something had to happen, but what?

In the centre of town King John, the Sheriff, Gisborne and the guard await Robin Hoods meeting with the axeman.
As the King and the Sheriff awaited Robin Hood's arrival in the square, the city guard became aware of large groups of peasants moving in the nearby forest. Were the natives restless? Was there a plan to rescue the outlaw? surely not!

But wait, is there a hint of trouble!
Then it started. The crowd that had gathered in the city square suddenly turned ugly. Robin's men had infiltrated the towns folk and were now attacking the guard. Someone threw a sword to Robin and the fight was on.
Robin makes a break for the wall supported by his merry men disguised as townsfolk
Robin Hood's men were desperately fighting to hold of the Sheriffs crossbows and spear men as they tried to fall back to the south tower. Equally the Sheriff was desperate to make sure that Hood would be recaptured, nothing would be allowed to spoil his day.

Little John leads the foresters in an ambush on the Bishops convoy
Meanwhile the Bishops guard was assaulted by a hail of archery delivered from the forest edge that decimated a unit of his crossbowmen. The remaining guard closed up on the Bishop's coach as Little John led a charge from the forest by the Merry Men.

Will Scarlet and Friar Tuck take the wall by the south tower to enable Robin's escape
At the same time Will Scarlet and Friar Tuck led a coup de main party to take and hold the south tower curtain wall and thus enable Robins small band to get away from the city. The plan seemed to be working like clockwork, or was it?

The fighting is fierce on the road between the Bishop's guard and Little John's men
All of a sudden things started to go wrong. The Bishops men gave as good as they got and as soon as the Merry Men closed in hand to hand the armour and swords of the Bishop's guard started to take effect. The guard was badly mauled, but the Bishop was on his way into town. He would have made a useful hostage for any future bargaining.

The Bishop's coach makes it into the city walls but only just
As the Bishop came careering in through the city gate, his carriage looking like a porcupine on wheels with all the arrow shafts sticking out of it. The Sheriff and King John's men started to win the battle in the town and on the wall.

Friar Tuck was struck and seen to fall from the battlements landing in a heap of straw and dung, that was fortunately well placed!!.

Robin's men were either captured or cut down as the fugitives fell back to the south tower and made their escape through the Trent to the safety of the forest beyond.

With Robin recaptured, Marion decided to rescue herself. Girl Power
And what of our hero, well he was last seen diving out of the way of the Bishops coach that got between him and the pursuing Sheriff's men. When they finally clambered over a rather shaken and distraught Bishop the outlaw was nowhere to be seen. Like wise the lady Marion deciding discretion being the better part of valour quietly armed herself and slipped past the guard at the gate to make her way into the forest.

The King and the Sheriff had won the battle, but, perhaps, not the war!

Thanks to Chas for setting up a great days entertainment, and to Ian, Clive, Nick, Steve and Vince for getting into character.

Happy 2013 to everyone
Jon

Sunday, 9 December 2012

The Battle of Whipton Cross - Wars of the Roses

It is a common misconception that the far south west was a quiet backwater during the Wars of the Roses when one considers where the major clashes happened. The battle of Whipton Cross, a hamlet just outside of the City of Exeter must rank as one of the major clashes of this dynastic struggle between the Houses of Lancaster and York.


The Devon Wargames Group have a tradition of pulling together an annual Xmas game to include all club members, and this years event was our fictitious Wars of the Roses clash, where all members were asked to contribute at least one unit of troops and align themselves with one house or the other. The rules chosen to run our big game was Peter Pigs "Bloody Barons", and yesterday saw the two forces fight it out on a three table battle set up with hundreds of colourful troops flying banners for the various factions.

The Lancastrian left with the village of Whipton bottom left
The Centre table
The Lancastrian right - the quiet sector!!
The tables were set up as illustrated and with no apology from the author, captioned from the point of view of the Lancastrian House whom God has favoured.

"An army marches on its stomach"
As with all major campaigns it is really important to make sure your forces are well provisioned, and with the festive season well under way, a good supply of nibbles and mince pies were made readily available to commanders throughout the days battle.


Whilst the terrain was arranged the various troops of each faction were organised into Household, Retinue and Levy contingents, with the die rolls made to determine late arrivals on the field.


The commanders set up their respective forces and then the skulduggery and double dealing was sorted out. Bloody Barons has a set up procedure where the commanders can spend points on various aspects that might influence a Wars of the Roses campaign such as bribery, spying, route of march, supplies etc. depending on what priority the commander gives to these various aspects may give his forces an advantage over the enemy.

Well it seemed that the Yorkists were on their game as my commander none other than the Earl of Warwick found himself away from the field of battle when it all "kicked off". In addition several of our units who were ordered to take up strong defensive positions were led to the wrong parts of the field and found themselves out of position. Oh the fickle Gods of War!!

The forces arrayed on the left
With the forces set up, the battle swung into action. The Lancastrian plan was to hold the wings and smash the centre. The Yorkists went for holding their right, contest the centre and destroy the Lancastrian fores on their left at Whipton Cross moving to support the fight for the centre.

The centre set up
The clash in the centre when it came was fierce and bloody with the advantage swinging one way to the other, but eventually with gaps appearing in the Lancastian line the Yorkist pressure started to take control.

The hard pressed Lancastrian right - they shall not pass!!
Whilst both forces merely skirmished and scowled on the Lancastrian left, Warwick on the right faced an onslaught of Yorkists keen to take advantage of his troops poor dispositions and his apparent absence from the field. However as their forces closed on the Lancastrians they were met by a hail of well place arrows and crossbow bolts severely mauling the lead units.
As his forces were one by one overwhelmed, Warwick finally appeared receiving a roar of approval from his remaining troops. With defeat staring the Lancastrians in the face, honour demanded one final effort of resistance. 

The Yorkists prepare to assault Whipton Cross
The gallant Lancastian garrison of Whipton - Warwick's retinue with mercenary crossbows in support 
Warwick and his Household troops
Gaps start to appear in the Lancastrian centre as the Yorkists close
Desperate defence around Whipton as the Yorkist seek to crush all resistance
With threats of disloyalty and treachery breaking out across the front - we had a simple die roll to test to see if any commander wished to change sides at this point in the battle - Warwick seized the initiative leading his mercenary pikemen in one last desperate attack to dispute the crossing of the Whipton Brook by lead elements of the Yorkist left as they turned to support their comrades in the centre.
Warwick places himself in the front rank as he leads a crashing charge by his mercenary pikes which smash the leading Yorkists as they attempt to cross the Whipton brook.
The fighting here became desperate and bloody as men struggled in the slippery muddy brook to maintain their footing whilst trying to kill the man in front. Warwick plunged into the mass of enemy bill men cutting a swathe through them with battle axe in hand until the Yorkists had had enough and broke in rout to the safety of their side of the brook.

This was but a minor glorious interlude in what turned into a crushing victory for the House of York. Lancastrian resistance in the South West was at end. The field would be left to Henry Tudor to contest, but that as they say is another story.

The day was a great feast of wargaming. Bloody Barons gave a good account of itself when used to run a large club game with over 12 players on three tables attempting to stay in sync with each other as the battle evolved. The club really did itself proud with all members making a contribution to the days fun and our big game provided an excellent close to our games for 2012. We are all looking forward to going bigger and better in 2013.

A happy and safe Christmas to all .