Labels

Saturday, 30 January 2016

Germantown 1777 – ‘Black Powder’


Got the chance to put on the above at the club on Saturday, having purchased my good friend JJ’s AWI collection last year.


I’d always admired the collection, so when the opportunity came up to grab a bargain, I couldn’t resist!

Map illustration from the Black Powder AWI Supplement - I think that should read "Smallwood" at right 

Jon’s figure collection is quite old (Original Polly Oliver in the main, JJ ), and he says his painting style has changed a lot, but I like them.

http://www.pollyoliver.co.uk/ 


As a club, we’ve played with most variants of the Black Powder (BP) rules; ‘Hail Caesar’ quite recently last year, ‘Pike and Shot’ earlier last year and BP with a few house rules for  Balaclava in the Crimean, our summer game ‘big bash’ in North Devon a few years ago 


I’d put on a game using the ‘Albion Triumphant supplement for the Waterloo period a few years ago, and that’s been the only time the club felt they hadn’t really worked.


I’d picked up the ‘Rebellion’ AWI supplement previously, so was keen to try them out. I think it’s a really good supplement, loads of information on the period; historical background, details of the forces involved, a short piece on weapons and tactics and an overview of the main commanders ‘of note’. Over half the book though is made up of scenarios, nineteen in all, featuring all the major land engagements of the war, plus others.

Looking though the scenarios, and comparing them with the forces I had purchased, I settled on Germantown, 4th Oct 1777. This sees Washington develop an elaborate plan to march five columns of troops, over different roads, to arrive at the encamped Allied force simultaneously. Needless to say, historically it didn't work (hindered even further by thick fog) and not surprisingly, that was repeated in our game!

I used all the detail from the ‘Rebellion’ supplement to generate the scenario. I like the different stat lines attributed to each unit, which can reflect their ability to melee, shoot, recover morale (saving throw) and become shaken (stamina), plus the ‘added extras’ to reflect increased morale, better shooting or hand to hand qualities. All these can be ‘tinkered with’ if you don’t like the author’s interpretation!


Each commander is also allocated a ’staff rating’, which is basically their ability to get things done, rolling equal to or less then their rating on 2D6. Again, if you don’t like them, change them! In this scenario, all commanders were rated as ‘7’, which is pretty average, but presented a few challenges for the rebel/patriot forces (depending where you’re from!)
These are ‘as is’ from the book and also show the ‘order of battle’ for each force.

So how did it play? On the day, due to the other games going on, it was down to another long standing war game mate Vince and I to give it a go.

Things didn’t start well, when Sullivan failed his first command roll! In the scenario, all his force must be ‘on table’, before Greene & Armstrong can start to arrive, and only when they’re all on can Stirling and Smallwood attempt to enter.

Once Sullivan is on, and engaged with the British front line, then the forces of Knyphausen and Grant can start to react. Cornwallis is available once British units become destroyed or ‘shaken’. This never happened!


Sullivan and Greene managed to get all their troops on in fairly good time, but Armstrong was clearly affected by the fog! This was to be a factor throughout the game! 

In the meantime, the 40th Foot had occupied Chew house as they did historically, and there they stayed! Again historically. Knyphausen moved the remainder of his force up in support of the 40th, pushing the jagers out to his left flank to delay the militia with the long range of their rifled muskets. Grant moved to deploy between the woods in support of the 1st Light infantry. The 2nd were left to fend for themselves!


Eventually, all the rebel force entered the table, although Armstrong was still affected by the fog and there was a similar story on the other flank with Smallwood! Sullivan attempted to force the issue by charging Chew house before the supporting forces arrived, knowing he was being a bit rash, as the defenders were bot suitably depleted. This proved to be the case, as although the first round was a draw, he was thrown back in the second.

This was the ‘high water mark’ of the rebel forces, as it became pretty much a shooting match with Sullivan facing Knyphausen and Greene facing Grant,  a match the rebels were unlikely to win! Not helped by the fact that yours truly had deployed in ‘double lines’ not allowing the superior numbers of rebels to come into action (too much Carnage & Glory JJ!!)


So with rebel units starting to disappear at an alarming rate, and the British force only carrying one or two casualties per unit, we agreed that it was time for the Rebels to withdraw, pretty much as they had historically!!

I enjoyed getting my ‘new’ figures out on the table and thought that the scenario gave a good game. Vince and I are old adversaries, but the game was played in good spirit, with reference to the rules when required, which usually gave the answer.


I must note that I didn’t cater for the fog in the scenario; there is the ability to introduce variable ranges based on a dice roll and potentially have the rebels shooting at each other (which happened historically.) I’ve also seen a scenario where the British are required to roll on their command rating to raise then from their slumber, which may make for a more interesting slant.


I would definitely play this one again; it’s very much suited to multiple players

Sunday, 10 January 2016

Augustus to Aurelian Play Test


Rules review and play-test by JJ and Mr Steve

Another Roman army disappeared in the German Wald yesterday as the DWG play tested Phil Hendry's rule set "Augustus to Aurelian" (AtoA) published by the Too Fat Lardies back in 2012. 

I got a copy of the rules back then when I listened to Phil's interview with Neil Shuck on the Meeples Podcast, where he discussed the design principles behind the rules.


The rules are card driven, like many of the Lardies own sets, and the cards determine when commanders and their units get to do things in the game. I know that is not to everyone's taste, but I personally love games where that "friction" is built in to stop players having a totally unrealistic control over their army.

Having had the rules in my library for several years now and in the process of constructing a 28mm Dacian Wars/ Germania collection of figures as well as trying out sets of rules that might "tick the boxes" for me as far as what I want in my ancient games, I have been looking forward to giving AtoA a run out.

Over the Xmas break Mr Steve sorted out his 15mm collection to organise some forces that would cover the period I am interested in whilst I got the cards and various markers together to give them a run through yesterday.

Simple laminated cards created to drive the game

I should stress that this game was played very much as a "test game" and in the spirit of seeing what the rules can offer plus how easy were they to play with a group of us who hadn't played them previously. Please don't get too concerned seeing figures that aren't quite what they represent as Mr Steve is not really in to Romans or Principate Romans for that matter and so we have them on table as stand ins.

So the table below shows the game set up at start with the Romans (left picture) and the Germans (right picture and nearest camera).

German warband division set up in woods bottom left using their "Forest Fiend" attributes.


"Carpe Diem" cards allow the commanders to try and take action at specific points in the game

The various troop types in the rules and army lists come with special attributes that can differentiate the various armies. The table was set up to offer the Germans the best possible kind of terrain they would choose to fight in and so were able to choose one of four "Forest Fiend" attributes. Mr Steve the willy German commander chose "Mist and Rain" which presupposes the Germans have made full advantage of the poor visibility and conditions prevailing in the German wald to manoeuvre one of their warband divisions through the trees on to the Roman right flank after the Romans had set up

The Roman Legionaries bottom right were too far away to support the auxiliaries to their right and had little impact in the game - well it was a test game and we won't do that again!

In addition as "Forest Fiends" the Germans found moving through the thick German forest easier than the drilled Roman troops which only added to Roman problems.

For their part the Romans would try to take advantage of the "Triplex Acies" rule that enabled them to fight more extended and to support front rank units with rear rank units in combat, whilst making good use of their "Pila" rule where casualties inflicted would count towards the hand to hand total of casualties and thus impact on results in those combats, plus their "Gladius" rule giving them an extra die role in hand to hand combat in the second round of fighting.

The "Meridiato" Cards of which there are two determine a reshuffle of the deck
 and  start the hand to hand combat phase in the game

As you can see the orders of battle in AtoA are similar to "Hail Caesar" and designed around ideally divisions of four or more units, known as formations in the rules, each under a commander with a general commanding the army.

The level of these commanders determines what they can do, with army commanders able to change the orders of formations under their command and within command range, whilst formation commanders are concerned with the management of their individual units and trying to make sure they are in the right place at the right time to oversee and potentially aid combat whilst watching over units that are close to becoming shaken, or disordered.

The order that the opposing commanders get to do things, like moving and charging their respective units is determined by when their commander card appears from the deck. To help identify respective commanders I produced some little picture profiles of each commander that was placed by the respective models and you can see them on table.

The German Commanders had their set up issues as well, as this powerful warband division was to far away from the Commander to have their orders changed from "Hold" for most of the game - remember "test game"

Each individual commander has a command rating from 1 to 3, that determines how many cards with their face on gets put in the deck. This means the more cards the more likely that commanders card may appear first and the more likely they will get to do multiple tasks during a phase, bearing in  mind that the units under their command can only do one type of action one in a phase.

The range of actions available to a formation commander are;
  • add a d6" of movement to a unit that he is attached to, known as "Follow me lads".
  • add a die to a reaction test.
  • increase a units Combat Dice by one die for that round of combat if accompanying the unit.
  • remove disorder marker
  • remove a casualty once from an un-engaged stationary unit, usually done to prevent the unit from becoming shaken and thus forced to take a reaction test.

The Legionaries with attached artillery and skirmishers had limited impact on the game 

As well as the commander cards, the players each were given "Carpe Diem" cards designed to allow the respective sides to attempt to interrupt the card play from the deck and take the initiative before the opposing player could react. These cards were held in hand, to begin with but once played went into the deck to be shuffled and would allow activation of a commander from the respective side when later drawn from the deck.

The various commanders had differing numbers of cards in the deck
with their portrait that allowed them to activate them and their "divisions"

To simulate the better command and control of the Romans vs the Germans they received seven
Carpe Diem cards to the Germans five, based on one card per formation, plus the Roman bonus.

The main German attack moves in against the Roman Auxiliary division ahead, set up unprepared facing straight ahead

The final cards in the deck consisted of two Meridiatio cards which with the first card drawn warn players that the phase is close to ending and with the second ends the phase of play by concluding the outcome of any hand to hand combats that have occurred in prior movement, allowing unactivated units to shoot and react. Once done the pack is reshuffled and a new phase of play begins.

German light and Noble cavalry cover the open ground in the centre

As indicated at the set up, the Germans took full advantage of the terrain which aided their initial placement and attack and did nothing to allow the Romans to make full use of their manoeuvring advantages.

The first attacks when they came caused the Romans to have to expend their advantage in Carpe Diem cards as the auxiliaries fought to keep the German division at bay.

Tribesmen - fousands of em!

With little option left but to fight, the plight of the auxiliaries gave us ample opportunity to try out the combat system as cohorts slammed into warband and the mayhem began.

The combat process is very straight forward with each troop type given a combat attack (CA) factor with the auxiliaries on a 3 and the warbands with their size of unit advantage on a 4. This basic factor is used to find the column on the Combat Attack chart and aligned with the row that corresponds with the enemy's armour. Thus the Germans with no armour gave the auxiliaries a basic chance to hit of 6 or less on a D10 whilst the Germans against the auxiliaries medium armour were hitting on a basic 5.

This hit number can be adjust up or down according to circumstances, for example flank or rear attacks, winning previous round of combat, first round if Romans had thrown pila, plus others. Each unit would then get to throw a set number of D10 determined by size of unit thus the warbands were generally throwing four dice to the auxiliaries three. Again the dice thrown could be adjusted with attached commanders able to add a die and Romans in second round of combat getting an extra die for their "Gladius" special rule.

The number of hits were then recorded with the micro dice and an eye kept on the total hits suffered, as once the unit's outlook number was equalled by the hits taken the unit was deemed Shaken, severely impacting its ability to fight and increasing its chances of breaking.

The Roman Commander's card. His head was last seen atop a German spear,
disappearing among the trees


Roman Auxiliary infantry with Roman Ala cavalry top right

The indication of how straight forward the combat was, was how quickly we started to roll through the stats to resolve it, not without a few mistakes along the way, but that's why you play test games.

The first unit on Roman Auxiliary infantry charges in trying to hold up the impending German attack

Shooting attacks were conducted similarly to combat with the added factor for range and shield etc.

The whole idea is to degrade the enemy with hits quicker than they you and thus break units and then complete formations to gain a victory.

Commanders and Carpe Diem cards become critical as the action intensifies, and the ability of commanders to influence the larger battle degrades as they get caught up trying to do multiple tasks at the same time.

Lots of Germans closing in on the Roman right flank

In our game the Roman forces were under growing pressure to win combats forced upon them that commanders were forced to add their extra combat die effect by attaching to units but then running the risk to themselves.

The German centre moves in as the battle on the Roman right flank develops

The reaction tests that followed required the rolling of 2D6 and looking to roll lower than the morale rating for the unit to be ok, thus auxiliaries were testing on 7 and warbands on a 6. To the dice roll were added or deducted situational factors, such as excess casualties suffered compared to the enemy, being attacked in flak or rear, already shaken, deductions would include rear and flank supports, the general attached etc.  

If the morale rating was exceeded then the size of the excess determined the severity of the reaction ranging from disorder to disperse with a result of 5 or more in excess.

More fighting and push-backs as the battle on the Roman right develops


As our battle unfolded, it became more and more obvious that the Roman position was untenable and given our focus of throwing units into the fray to see how the rules worked, it was little surprise when with two Roman generals killed, the auxiliary division broke, leaving the Roman cavalry and legionaries to face a fast approaching horde of German warbands intent on sealing the deal.

Meanwhile without new orders the German right flank holds its ground

The accompanying pictures reveal the progress to this invertible defeat.

So what did the game demonstrate other than not to put your legionaries so far away from your auxiliaries and take extra care on a table covered in German forest? Quite a lot I think.

The game rolled along really well with lots of entertainment and drama generated especially in the combat. The game is not complicated and with plenty of scope for tailoring units and scenarios by adjusting the various stats and set up options.

I now know what markers are needed to make the game more attractive and easier for players to monitor the status of their commanders and units.

I know we made mistakes in the game and that some were spotted as we went along and others with reading and checking the rules after the game, but nothing major and only confirms my thinking that these are a straight forward set of rules to play with no major quirks revealed.

After just one play I have to say I really like them a lot and I want to play them more regularly and am now thinking about what I need to create in the way of stat cards for units and other table top markers that will be easy on the eye.

So lets see what Mr Steve thought?

Casualties mount - the little red marker dice record the hits taken and will determine who has to take a Reaction/Break test

First up I would like to say that my collection of ancients is sadly lacking much in the way of any Roman figures therefore when Jon asked me to supply armies so that he could try out this set of rules it was looking a little bit tricky. For Imperial Romans I substituted some old Marian period figures I found in a dusty box and which one day might be used to fight the Pontic army currently under construction and the best I could do for Auxiliaries was to use various Republican Romans and any odd Thorakitai I had available. Apologies therefore in advance .


I will let Jon cover the actual events of the game itself to preserve my modesty so let’s get onto the rules themselves with the usual proviso of course that after just one play through any subsequent game would be much smoother and be more likely to follow the rules properly (and play all those rules we had missed out). 

With the Roman right flank in disarray, German cavalry move up to take advantage

The randomised movement is of course in line with the majority of other Lardey games so it wasn’t anything new to us, did it work for an ancients game? I think it did; if we played it correctly then you have the possibility of getting two activations per commander which you can then use for one movement activation and then for some other things like boosting fighting or morale/disorder recovery etc. how and what you can do depends on your leaders level of course. Formations/commands get a group order which they must follow until changed and whilst I play this sort of thing in other eras I am still undecided on whether I am for or against it in these rules .


One thing I wasn’t sure on was if you could move your leader in both of his activations , this point arose after I remembered that only the General can amend orders and that mine was miles away over on the left flank and that my right flank leader was stuck with hold orders. There was some discussion later that evening on whether a leader would just sit there and not attack by using his initiative; we decided that you could see various points arguing for and against this happening so as it’s in the rules then that’s what you play to.

The Roman auxiliaries fight a losing battle as they try to stem the German attack

I didn’t see much disadvantage for the Germans in unit control or movement as I had been promised beforehand ; admittedly the Romans could utilise their special advantages to allow them more space between their units and theirs commanders but as long as the Germans maintained a battle line then their much smaller command radius wasn’t a problem, I guess if we had a few broken units falling out then getting them back might have been harder but the beauty of Barbarians is that there are always more tribesmen waiting to take their place.


Fighting is straight forward, you cross reference your attack skill against the opponent’s armour rating , then throw a quantity of D10’s relevant to your unit. However when this takes place wasn’t immediately clear (i.e. we cocked it up), even with my exceptional brightness it took us some time to grasp that we were doing it at the wrong time in the move so perhaps a better layout of the turn sequence is required (my point, I guess, is that however clearly its explained in the rules, we didn’t spot it or get it right for several moves and the majority of us weren’t drunk nor are totally senile yet).

German and Roman cavalry clash (left) that saw the Roman commander killed whilst attached desperately trying to stop the rot, whilst a mixed unit of German light cavalry and skirmishers charge into the rear of an auxiliary column!!

I found it really helps to be a large unit when fighting (any armour helps as well) as you will get more dice to roll and usually a combat can last for several rounds which is as it should be, however as the Roman legionaries were so disgracefully lead we never got the opportunity to try out either the Pilum rules nor their own combat abilities on barely clothed Germans; this may have been much more devastating than what the medium sized auxiliaries units could dish out. I think making all the German units large may have been a mistake but I suppose it was some compensation for being classed in the worst possible defence class.


Most units can only take 4 hits before the next hit shakes them and thus requiring a morale test to be taken against their rating (combat losers always test as well), non fighting supports help in morale so the positioning of troops is important and there are lots of special abilities which is always fun as long as you can remember them.

With the Roman cavalry engaged in the centre with the German opposites the legionaries just in shot bottom move up to oppose the supporting warbands

So let’s run down the key points of any rule set one by one.

Movement: Works Ok, although I must put in a general gripe for all rules to include both 28mm and 15mm measurements covering shooting ranges as well, in this day and age surely it cannot be too difficult to have two versions of the QRF on-line (see Fire and Fury). The variable move works as does the sudden ending of a turn. You also move by formation (i.e. commands) activation which is both speedier and more realistic, units do/can move individually if they wish but all their friends will also get to move as well at the same time . 

Fighting/Shooting. Also Ok.

Simple to do and has enough differentials to cover the Ancient era. I liked the method that fighting is carried out after all movement (eventually!)and as you are not sure when the move will end then units get fed in bit by bit with one side really hoping that the next card up stops the turn.

The battle reaches a full crescendo as two Roman commanders go down in the fighting

Morale. Ok.
Not too many +/- to work out but enough to make it interesting. I would like the results table to be a little better in its meanings and applications and we also spent some trying to work out what happened after combat in all possibilities.

We managed to kill two of the Roman leaders and whilst it is clear what to do when junior generals get their just deserts we couldn’t find out what to do when the Big Cheese himself runs out of breathing privileges.   

Personal Hobby horses addressed:
No points list for army calculation although there are general army lists and unit stats available. I didn’t think our game was very balanced but as I was German I wasn’t the one crying in my beer. 
Obviously not relevant for those who hate army lists.    

Skirmishers, not really effective in their purpose of screening but handled better than in some other rules which I am no longer allowed to mention.

Charge Moves: I have some unease about just doubling your normal move to become its charge move as it is in this set , I think I am probably in the camp of allowing  a little bit extra , say 50% on top of normal but its really not that terrible I suppose.  

The auxiliary division (top left) is broken and the legionary division beyond will be lucky to make it out of the debacle

Overall, Not Bad,
I would strongly suggest that you make up a lot of different markers beforehand to help remember what’s going on or what’s been used etc but definitely a set worth having a go with I would say.

Thank you to Steve L and Ian for joining in the fun and for thoughts from a guest who joined us during the day, another gentleman called Steve, but who we have called Bruce, because we now have a ban on anymore Steve's coming to the club as the older members find it to confusing.

Sunday, 13 December 2015

Battle of Chancellorsville, Fredericksburg and Salem Church May 4th-6th 1863 - Regimental Fire & Fury


This month saw our traditional end of year big game at the Devon Wargames Group where all members present take part in a single game. The club wheeled out its large collection of 28mm American Civil War figures with three members fielding their collections on the table amounting to just over two-thousand figures.


The scenario selected modelled the fighting towards the end of the Battle of Chancellorsville just outside Fredericksburg in May of 1863 as General Lee moved his Confederate forces to attack and destroy General Sedgwick's VI Union Corps astride Marye's Heights. Our battle was constructed around twelve generic Confederate brigades and eight Union brigades each of three, eight base regiments with an attached two gun battery (Confederate) or three gun battery (Union). All troops for convenience were classed as Trained, all guns were treated as "light rifled". Each Division had an eight base cavalry regiment attached.

https://en.wikipedia.org/wiki/Battle_of_Chancellorsville

The Confederate Army of North Virginia was:
McLaw's Division with Wofford's, Kershaw's, Semmes' and Barkdale's brigades.
Anderson's Division with Wilcock's Mahone's, Wright's, Posey's and Perry's brigades
Early's Division with Gordon's, Hoke's and Hays' brigades

The Union VI Corps was:
1st Division (Brooks) with Brown's, Barret's and Russel's brigades
2nd Division (Howe) with Grant's and Neil's brigades
3rd Division (Newton) with Shaler's, Browne's and Wheaton's brigades

The rules used for the game were Regimental Fire & Fury which always give a fun game with, some might say, the occasional extreme swing of fortune, but are easily picked up and allow a large game like this to played fairly seamlessly. As you can see, we adopted a generic approach to the scenario that allowed the rules to perform even better with minimal complexity, with the simple mechanism of standardising all regiments at eight stands making the process of identifying "Fresh", "Worn" and "Spent" troops a quick process for noting the condition of the various units.


http://www.fireandfury.com/products/desc_rff.shtml

The picture below shows the parameters of our battlefield, with the Union escape route off table, centre top. The blue lines mark the set up positions of the various Union divisions with a corresponding Confederate force set to enter the table from the three approach directions.

The scenario was a straightforward withdrawal in the face of the enemy whilst holding ground to enable that withdrawal to happen - perhaps never straightforward!

Table set up with the troop dispositions indicated
As your roving reporter I took on the role of commanding two of General Early's brigades, ably supported by Nathan taking the other brigade of infantry and the attached divisional cavalry. Our Union opponents for the day were the two Steve's, Steve M and Steve H, commanding the brigades of Howe's 2nd Division.

Playing in a game of this size whilst stopping occasionally to do circuits of the table, snatching conversation with commanders on other parts of the battlefield and catching pictures of the action makes reporting on a game like this an interesting exercise in memory management. It makes you appreciate the job of the senior commander in any sizeable action of the period having to write a report home to his political masters attempting to do the same thing, pretty much, only on a much larger and even more complicated scale with often greater consequences for not capturing the essential details.

So what I propose is to give an over view of the day's game coupled with examples of the battle as seen by this general officer in the Confederate ranks (note the implied bias)

Players arrive and are briefed by Chas our "Gamemeister" for the day. Plenty of festive snacks are available on the table far right
The briefing over, time for the opposing sides to decide their tactics for the day
The Union Command team, otherwise known as that famous boy band, "The Three Steves"
The first Union defenders are placed on table by Jack and Charlie, as Brooks' division sets up on the road to Scott's Ford
With the briefing concluded the Union team was invited to set up it troop dispositions, followed by the advance on to table by the lead Confederate brigades.

Nathan and myself were commanding General Early's division attacking the Union left flank, and our plan was simple; drive the blue bellies from the field, capture and hold the road to Scott's Ford and let the the other chaps round up the prisoners. I like a simple plan, it makes it so much easier to explain it to the men.

With General Howe's Union Division set up and a skirmish line pushed forward, General Gordon leads forward his Confederate brigade, two up one back with his guns in support
 I therefore boldly lead on General Gordon's brigade and awarded my command figure his special attribute ticket that announced, when the time was right, that my character was known as a "Flamboyant" Southern Gentleman, well turned out in a magnificent uniform and feathered hat, which made me a rather obvious target in the heat of battle and gained me a +1 on the "Fallen Leader" table, but given the inspirational impact I had on the men also implied a +1 to any "Manoeuvre" Test my chaps were required to take.

These attributes allowed my General Gordon to pull off some nifty marches across the table resulting in some well timed charges but inevitably lead to my character taking a light flesh wound from some ill-directed Federal musketry. All the players had selected other such chits before play and added that little spicy piquant to our game during the day. A piquant that matched the Madras spicy peanuts that accompanied the early play.

Red Butler and Scarlet O'hara look on from the Union line
The battle on Early's flank began with some initial exchanges of musketry between the opposing forward infantry groups with honours fairly even, but my artillery boys came up trumps early on with a bit of cool gunnery that knocked out one Union piece, disabled another and severely reduced their fire as my infantry advanced with great dash across the open ground.

General Gordon raises the "Rebel Yell" as his brigade advances into the battle 
On reflection I think our infantry had slightly less ground to cover than did our comrades in arms on the other fronts which enabled our men to close with the enemy before any of the other Confederate divisions.

Howe's skirmish line prepares to confront Early's advance
That said the Union gunners managed to return the earlier compliment paid them by my gunners by rolling a ten and firing at full effect with their remaining pieces in their next fire phase, but thus putting them out of ammunition that allowed my infantry a little more breathing space amid the open ground between our respective lines.

It was then revealed that Steve M, my Union opponent for the day had the option as his special attribute to make the occasional re-roll of firing and combat die rolls. In the end he decided to stick with the damage inflicted on my ranks and hastily summoned an ammo wagon to replenish his stocks. He was less fortunate later in the day when cancelling a well hit shot with another ammo busting ten die roll, re-rolled a two!!

Grant's and Neil's Union brigades hold the front line as Early's Confederates start the advance
As I set off on my first patrol around the other battle fronts I could see that, like us, the Confederate forces were taking casualties in their early advances but closing on the Federal lines never the less.

Brown and Barret's brigades line up astride the main road to Scott's Ford
With the Union guns in some disarray on our front, Gordon's men scrambled over the picket fence, adding their musketry to the artillery fire now brought to bear on the open order Union infantry closest to our intended advance. The gunners kept up their well aimed fire and its heat soon had the Union regiment falling back on its supports as out infantry drew ever nearer.

Grant's brigade look on as Gordon's rebs move up to the first fence line - steady lads!
Howe's cavalry are held in reserve ready to plug any gaps, and snatch the odd pig given any opportunity
The other Union line is Newton's Division held by the men of Saler, Browne's and Wheaton's brigades
My word, now that is a big gun!
The forward elements of Brown's and Barret's brigades, supported by Brook's divisional cavalry and brigade artillery
The wagon behind Newton's line is the ammunition wagon, not just for show but often needed to replenish units that fired off their last shots in desperate attempts to stop the attacks.
The rear area of the Union lines consisted of reserves and units preparing to leave
Newton's Division en mass with the divisional cavalry nearest to camera
The view south towards General Brooks line, with Newton's reserves closest to camera
As Gordon's brigade advances on the right General Early masses his guns and sends in his third (Hays') brigade, as the Union skirmish line is driven in
The first infantry clash was when the open order Union infantry held its ground for one move to long and was caught by my able commander's +1 manoeuvre ability raising the 7 rolled to 8 enabling a double quick rate and contact.

Two regiments slammed into the Union open order line using cold steel to add emphasis to the attack. Amazingly the Federal troops won the first contact and my men recoiled three inches in surprise.

The front units of Gordon's brigade suffer the first casualties from the Union lines, as the Confederate guns help drive off the Federal skirmish line
Not to be undone a second time the next attack had the opposite result, driving the Union line back to just in front of the Union held picket fence, as General Hoke moved his men up quick time in field columns before deploying into line close behind Gordon's men.

Grant's brigade hold their ground as the first units of Gordon's brigade contact their skirmish line and close with the bayonet.
Hoke's brigade can be seen following up top left.
The bayonet fight as Gordon's men close on the Union open order line using "cold steel"
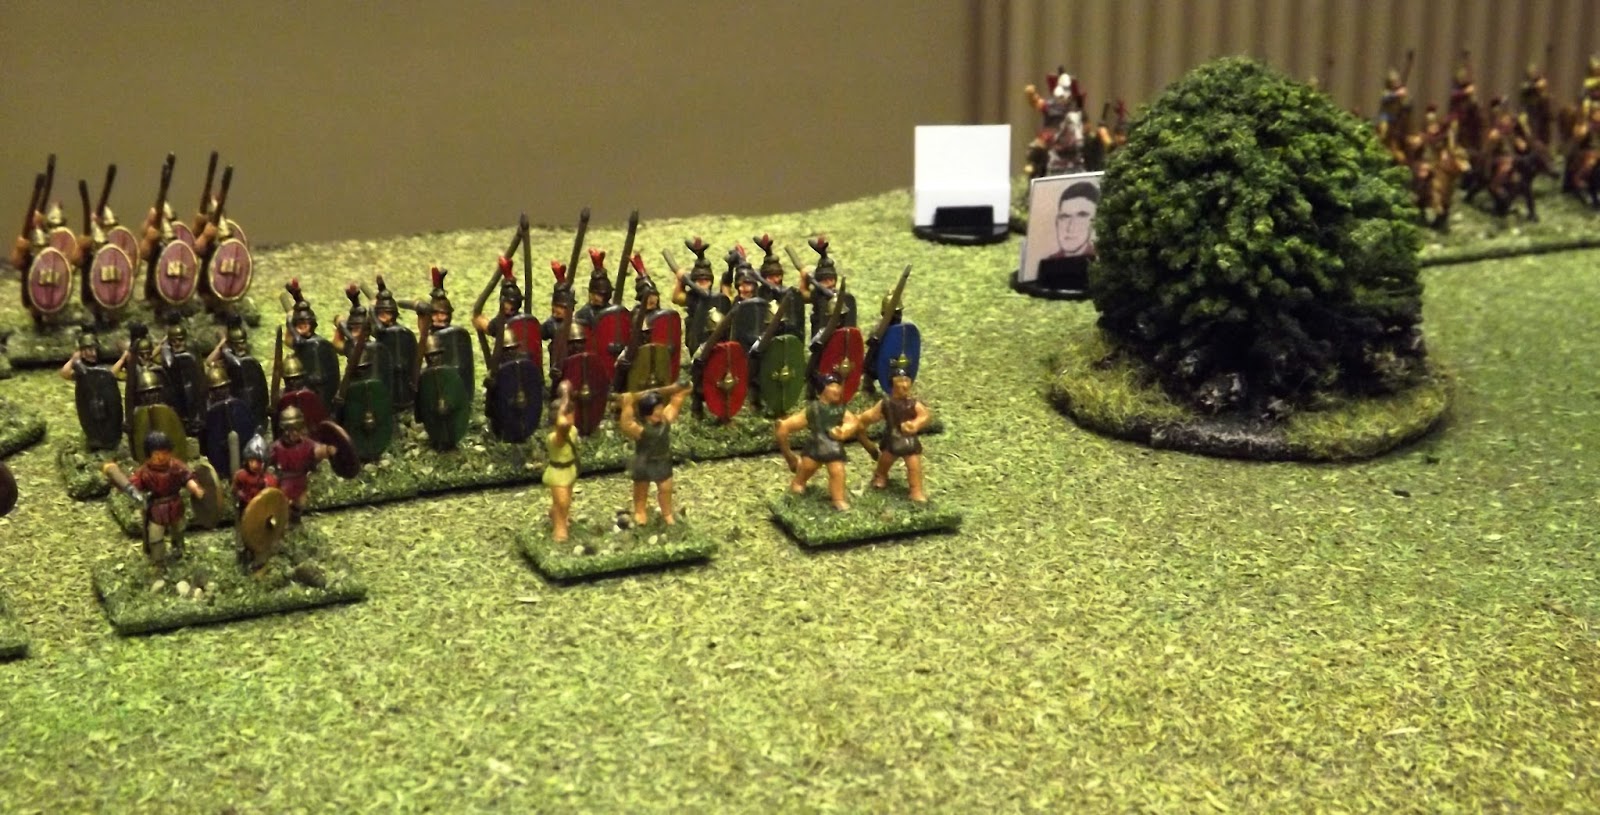
Anderson deploys en mass as he moves on Brooks' Union line
The view of the Union line as Anderson gives the order for Wilcocks' brigade to advance
On the left flank of Early's attack Hay's brigade was caught up in some hot bayonet work as both sides struggled to gain the upper hand. A gap in the Union line allowed the Confederate cavalry to attack the gun battery supporting the Federal infantry and the gunners were clearly unsettled at being attacked with pistols and shotguns at close range.

General Early, closest to camera oversees his left as Hays' brigade closes with the Union line supported by the divisional cavalry. Scarlet O'hara watches in amazement and Red turns away proclaiming that frankly he doesn't give a damn!
The remnants of two regiments in Gordon's brigade keep up a ragged fusillade as Hoke's brigade move up to maintain the momentum and drive in on Grant's Union troops holding the fence line ahead
An overview of the battle as the pressure builds on the Union left, top left whilst the other two lines top right and nearest camera have not yet come to grips.
Overview of Early's attack as Hay's brigade can be seen pressing hard top left and with Hoke's men, nearest camera about to hit the fence line to their front.
Hoke's brigade accompanied by Gordon's reserve regiment sweep the Union guns off the fence line as other units in the brigade hit the forward skirmish line as it attempts to close on the fence ahead.
With the two brigades of Hoke and Gordon up on the Union fence line, the struggle reached a higher intensity as Gordon's reserve regiment cleared the Union gun line and carried the position. Their left flank turned and the infantry occupying the wooden shack to their right succumbing to the attentions of the massed fire of the Confederate guns, the Union regiment in the centre fought like tigers managing to draw their struggle with the two shot up regiments from Gordon's brigade in the first combat and narrowly winning by one point the second fight to hold their position.

The Reb attack looks irresistible especially with a bit of atmospheric gun smoke provided by Nick "vaping" over the figures as the camera timer clicked. No effort spared to entertain at the DWG
The writing was well and truly on the wall for Grant's brigade or rather what was left of it and deciding on discretion over valour made their escape back to the next fence line and the last before the Scott's Ford road.

The decision was taken to draw the Confederate attack closer together to enable better support to both wings and thus a rather unique event occurred that in all my years of wargaming and playing the odd ACW game I can't remember seeing, namely a successful charge in the saddle by cavalry.

Meanwhile Anderson's Division push in the forward elements of Brook's Division
Breakthrough! The lead battalion of Gordon's brigade follows up its victory over the Union guns by moving into the woods beyond as Hoke's brigade smash into the rest of Grant's line on the fence just as General Early arrives to oversee the attack of his right wing.
With Union resistance collapsing in front of Early's division, the cavalry move forward looking to exploit any gaps and opening up with pistol and shotguns on a nearby Federal gun battery.
Mr Steve can be seen performing some sort of shuffling movement, not strictly covered in the rules, as the first Confederate attacks hit his Union troops on and around the fence nearest to camera.
Anderson's Confederates close on the Southern Union line as the pressure starts to build
The picture below caught the action just at the critical moment as Steve M can be seen measuring out his planned withdrawal back to his next stop line as the Confederate infantry can be seen taking the position on the fence line prior to the decision to bring Holk and Gordon's troops closer to the centre road via the cover of the wood to their front loosely held by a regiment of Union infantry and dismounted cavalry sniping from the edge of the tree line at Hay's advancing brigade.

As Hoke's Brigade clear the fence of Union troops(centre right) that tape measure being used by Steve M. indicates him working out if he can get Grant's remaining regiments out of the way
Again the Confederate troops managed to manoeuvre with elan as the lead unit from Gordon's brigade charged into the back of the dismounted cavalry closely supported by the nearest fresh regiment from Hoke's brigade, whilst another regiment pinned the Union infantry to its front by advancing on it.

At the same time Early's divisional cavalry slammed into their dismounted enemy who were broken and swept from the position. In the subsequent breakthrough charge, they then slammed into the flank of the Union infantry behind sweeping them away also.

As if to rub salt in the wound, the Union troops in reserve attempted to fire on the victorious Confederate masses on the edge of the tree line but due to another well timed special attribute were persuaded not to when the Confederate commander revealed himself as the gentleman who had saved the Union brigade commander from a very embarrassing incident during their time at West Point.

Now here is something you don't see often in American Civil War games - a successful mounted cavalry charge
A hard battle as the Union division under Newton puts up stiff resistance to the advance of McLaws division
The close proximity of Early's division to the Union escape route seemed to inspire even greater resistance from Union troops as Hay's brigade was subjected to an all out counter-attack by Neil's brigade. This assault forced the Confederates back from the fence line they had fought hard to occupy.

The rear area of the Union position as the battle grows in intensity. Civilians gather all their prized possessions, like the odd cannon on their roofs? Well it is the former colonies! Only joking, it is Xmas 
On both the other fronts progress was slow and difficult and although Sedgewick's Corps was battered and had given ground it was decided that they would be able to pull out over night and so honours were even. Just as it should be.

Brooks' Union troops fall back behind the stream as Anderson's advance becomes irresistible
Confederate cavalry victorious in routing two Union regiments are cheered on by Gordon's regiment as the Union line drops back.
The club line up; Front seated left to right Ian, Chas, Steve L,
Centre standing JJ, Jack, Charlie, Nathan, Steve H and Mr Steve. Back standing Steve M and Andy
As always, the end of year game was great fun with lots of banter and played in a great spirit and a round of applause was given to Chas for pulling the whole thing together and herding the cats that make up our club membership. There were some significant absences from this year's line up and they were missed, so I hope this report makes fun reading.

Highlight of the day was surprisingly not the Confederate cavalry charge, but the discovery that Mr Steve does bake exceedingly good cakes as he turned up with a prize winning coffee sponge that went down very well with a mug of tea in the afternoon.

So that is it for another year at the Devon Wargames Group. We all wish everyone a very happy Xmas and lets pray, a more peaceful New Year and we will be back in January with a play-test game of Dr Phil Hendry's Ancient rule set "Augustus to Aurelian", "Chain of Command", Battle of Mirbat 19th July 1972 and "Black Powder" AWI.

JJ