Labels

Sunday, 12 September 2021

Fort William Henry Massacre 1757 - Black Powder

The Last of the Mohicans 1992 - Wes Studi as 'Magua'

Mr Steve M dug out his 28mm collection of French Indian War troops to entertain us with a rendition of the Black Powder scenario loosely recreating the events of the Fort Henry massacre of 1757 and vividly portrayed in the 1992 film, The Last of the Mohicans; as Colonel Edmund Munroe attempted to evacuate his sickly force from the fort under the terms of a negotiated withdrawal with French General Montcalm only to see the British column attacked by French allied Indians along their withdrawal route.

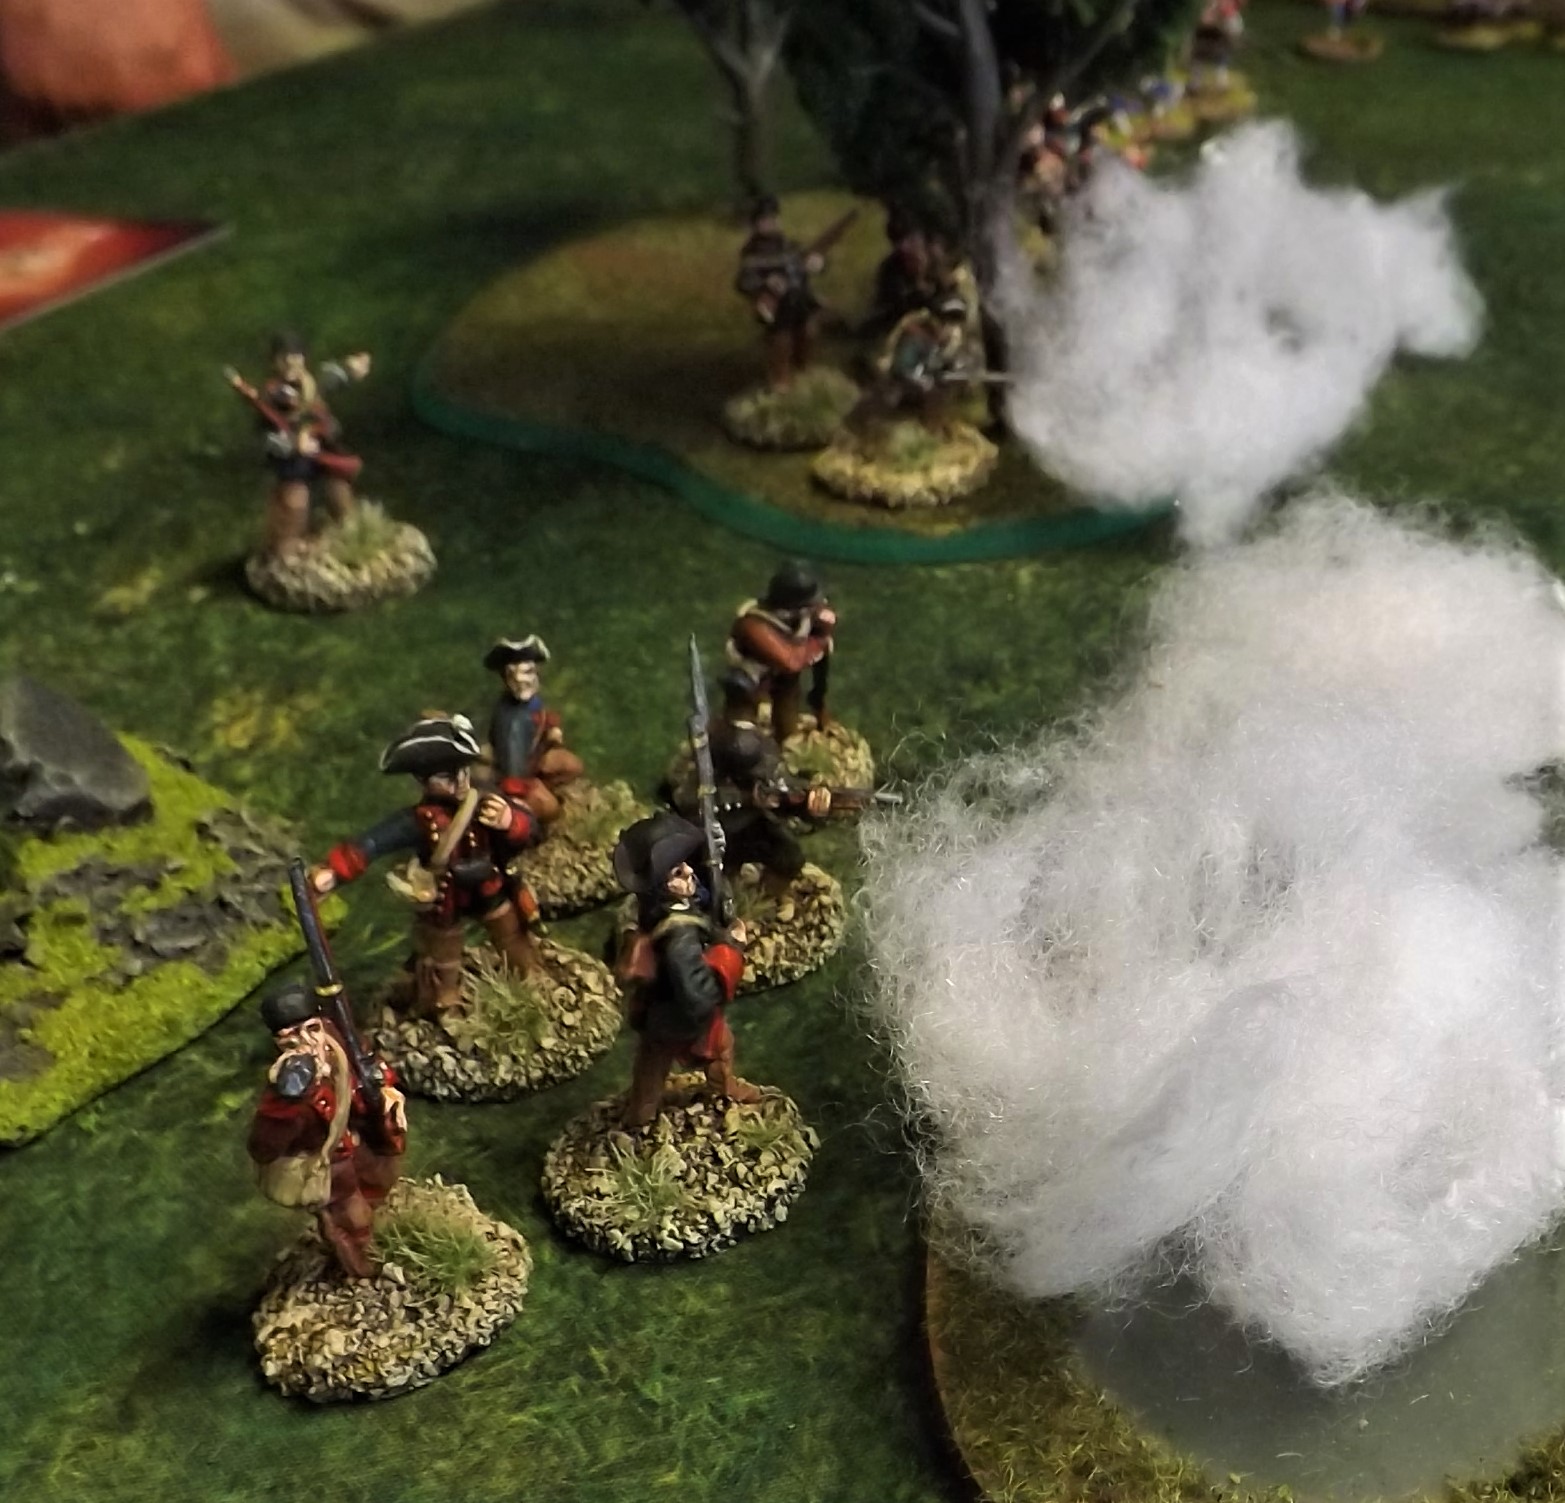
The table below is set up for the start of our game with several British infantry groups ready to attempt to reach the other table end and sanctuary or with the canoe representing a possible escape route over the river for one of our nine groups.

The French unit of regular troops represent another alternative for our beleaguered redcoats, as possible guarantors of safety should they be appealed to on route. 


Below, can be seen our nine British groups loosely arranged in slow moving back to back platoon squares, with their activation dice arranged and each group of three having two baggage/distraction points available to be distributed about the table on our route of march, hopefully to distract groups of attacking Indians in one, two or three turns of baggage looting instead of redcoat scalping.

In the end, Lawrence, Paul and myself opted as British commanders to spread the distractions markers out equally across the table to give all our units as much cover as possible, however as play would demonstrate it may have been more advantageous to have given Lawrence the weight of that cover as his units were closer to the tree line on the side opposite the river which would be a constant source of Indian attacks throughout our game.


Simon took command of the Indians, adorned himself with war-paint, and assumed the role of Magua as the dice were rolled for each group of redcoats to make their perilous march to the opposite end of the table.


At first the game was seemingly looking rather straightforward as the activation on a score of eight or less with 2d6 seemed very gettable and the rapid movement rates in Black Powder of twelve inches had our huddles of soldiers advancing up the table.


Not only that but the distraction markers were starting to take effect as Indians changed direction in favour of a bit of easy looting rather than tangling with the soldiers and with a few musket exchanges thrown in for good measure the first Indian groups were soon recoiling from where they had come.


However the learning curve was relatively short lived as both sides started to appreciate the benefits of massing musketry on the same target, with the Indians taking advantage of the nearest cover to start to administer hits and disruptions on the British clusters, with three hits not saved causing the groups to become shaken and eligible for an Indian charge to contact.


Thus the progress of the British started to slow as discretion meant that faster moving groups had to wait for stragglers to catch up to combine their fire, and the occasional halt needed to remove hits and disruptions, with ever more groups of Indians appearing from practically all corners of the table, making retreats and halts ever more perilous.


My particular column seemed to have the easier route, marching along the bank of the river which gave respite from attack from at least one direction, so much so that my two lead groups rapidly made it to the canoe allowing one of them to use it to make its escape, the only group as it turned out that did so.

This minor victory was two edged in that my firepower was reduced by a third and when the groups became separated as was inevitable they were easier targets to be attacked piecemeal, despite valiant efforts by Paul's centre column to lend a hand.


On the tree line flank the battle was very much different as Lawrence soon had his hands full with multiple groups of Indians pouring on the hurt from the cover of the trees and despite some excellent return fire from his redcoats, driving off a couple of groups in shaken disorder, Simon had the Magua touch and constantly managed to save two and three hits on multiple occasions that brought the British advance to a halt as movement individually and without support of the others became very risky.


As the Indian resistance to the British advance grew, the battle on the river bank and the centre grew in intensity as the redcoats attempted to force a passage with Paul managing to cause a couple of groups to disperse after failing morale checks.


On the river bank, my lead group managed to get within three or four inches of the table edge but multiple hits and disruptions stopped the group for getting off the table and they were eventually charged by the Indians in their sector, beating off two such encounters in hand to hand fighting only to fail a subsequent casualty check and end up dispersing off the table - so close and yet so far away, as the song goes.


As the pub beckoned and with space opening ever wider between groups of redcoats, as groups dispersed and with others now teetering on two and three hits apiece amid seemingly never ending hoards of native warriors we called it a day having had a very pleasant day, at least for us, on the shore of Lake George.


Black Powder does what it says on the tin, and is a good set of rules for the game they were designed for, namely to get a few chaps around a table rolling bones and having a laugh while doing so and, though not a rigorous modelling of black-powder warfare, do just that, and we all had a good afternoon playing with Steve's handsome collection of figures.

In addition, I am at the moment building a Mohawk Valley AWI collection of Perry figures for Sharp Practice and am keen to play the modification outlined by Simon Walker in his excellent Lardy Special article looking at George Washington's Indian War; which changes Indian forces into the force that, to my understanding, they should be, namely small groups of skirmishers able to move rapidly and disrupt formed enemies before closing to contact for the coup de grace using musket butt, and tomahawk.

This type of representation in in distinct contrast to the large warband portrayal, fighting in a style similar to a Zulu regiment, that does not seem to match historical accounts, and this Black Powder game seemed to model the skirmish group look to their fighting very well.

Thanks to Steve, Si, Paul and Lawrence for a very fun game.

JJ

Saturday, 28 August 2021

Sikh Wars at the DWG using General d’Armee


Late at night the British commander finally received the message he had been waiting for, it was the details for all the Sikh forces movements in the next few days. It told him that a detachment would be sent out to secure a small well in a nearby village; he therefore put together a strong force to intercept and destroy them.


On arrival they discovered that the Sikhs had already secured the village and were now advancing onto the nearby high ground to confront the advancing British column, the British forces deployed into battle order and prepared to attack.


Using General d’Armee rules you get an agreed number of ADC chits each turn which can be used for various activities, you then have to roll to see how many are available for that turn. Usually at the start of the game the main use is for encouraging units forward and later in the game you might decide to instead add some to the artillery to enhance their firing or to the infantry/cavalry to give a bonus to melee etc. I gave the British six chits and the Sikhs only five to reflect the disloyal commanders and reluctance amongst the non-Sikhs.


With the heavy Sikh guns deployed on the hill there was quite an understandable reluctance for the British and their sepoys to advance which was reflected by my frequent ability each turn to throw a 1 or a 2 for the relevant brigades orders which classed them as hesitant (each turn you roll for each brigade a 3-6 means obey orders, a pre-allocated ADC chit will allow a re-roll), my adding an ADC just meant me throwing another 1 or 2 so I decided give up and instead to try and blast them off the hill with my 9-pounders. 


Two ADC chits will give you two extra dice that each has a 50% chance of an additional hit (no saving throws in this game). When using the firing table any really low rolls on your two dice will not only cause no casualties but will result in either fatiguing your guns or making your infantry fire become ragged; by enhancing your artillery firing, as I tried to do, you run the risk of inflicting even greater fatigue on your guns with a poor roll; queue a combination of rolls of 3’s 4’s and 5’s (with a -2 for shooting at guns not helping).


It wasn’t all bad, the Sikh guns whilst causing serious damage to some units had apparently forgotten to bring any ammunition with them as a series of double ones by my opponent were thrown on numerous occasions which meant a low ammo result for the concerned unit as well as fatigue, on each instance this was met with typical British indifference and absolutely no-one ran around the table with their shirt pulled over their head. 


On the left of the British attack the cavalry smashed through the Sikh irregulars and the Akali Fanatics who were holding that sector, plus overrunning the attached gun, and the whole brigade was destroyed (loss of ADC chit).


On the right a lone British 9-pdr potted away at a very reluctant Sikh cavalry wing that were clearly waiting to see who the winners were before plundering the losers. Inside that a couple of brigades advanced on what they hoped was a slightly weaker sector of the Sikh line whilst keeping a wary eye on the cavalry. The Sikh gun in this area was also unfortunately low on ammo but were backed up by a brigade of regulars who despite teetering on the edge of breaking flung back all the attempts to break through, with both sides casualties now getting close to having to take units off the table, one of the Sikh gunners suddenly remembered that he had some extra cannon balls in his spare jacket (2 ADC chits) so the British fell back.


To their left a lone Sepoy regiment attacked up the hill were there were no guns or Sikh regulars, this was the high water mark of the British attack, stopped by a Jagadari brigade (local warlords semi-trained troops) they tried to shoot them away, charge them away (“not to keen on that Sir”) and then looked hopefully over their shoulders for any support. None was coming!


Meanwhile the Sikhs having seen their right flank collapse countered this by redeploying another irregular brigade to stem the British cavalry and finally convinced the Sikh cavalry to get involved and so moved them behind the front line to the other flank. Some half- hearted charges combined with yet more hesitant rolls by me saw the British Cavalry threat disappear.


Suddenly the word “PUB” was heard from the flanks, looking around both players realised that they were the last game playing so a draw was quickly agreed and rapid packing up commenced however the British were in no real state to have pushed the Sikhs off the hill so they would have withdrawn anyway.


I have been looking for some time to find rules suitable for Sikh wars and out of the many, many sets tried these are the best yet. I liked that I could fit in all the relevant units from the Sikh wars to the terms used in the rules without too much trouble, I also liked the way that unit effectiveness degraded as casualties mounted or by increasing fatigue/hits if artillery. 


Having played and owned the ACW version, Pickets Charge, I was already familiar with and liked the use of ADC chits, movement and the command methods, I recall that I wasn’t convinced at the time about the way firing and melee was done when I played the ACW set, now, after a couple of games using the very similar Napoleonic version, my only remaining concern is about the melees but cannot tell you why so don’t bother asking.

Thanks to Dave for playing and for throwing so many double ones.

Figures: 1/72nd Newline Designs
Cloth: Zulu mat from Tiny Wargames
Trees: Woodland Scenic’s
Buildings: Hovels
Rules : General d’Armee available from Two fat Lardies

This has been a Mr Steve production.

Sunday, 22 August 2021

Muskets & Tomahawks - Version II


It is late July 1755 and four battalions of Troupes de terre which arrived at Quebec in June are being used to resist the expansion of British settlers into French held territory. The scene is a heavily wooded area surrounding an abandoned farmhouse/log cabin. Clearly these British settlers had been warned of the imminent arrival of the French and their Huron allies. 

For our game Mike was using Muskets & Tomahawks II, their premiere showing at the club
and receiving a very favourable response from the chaps involved.

The French force arrives resolved to slaughter any British settlers and take the farmstead. However, the French quickly realise this is to be no easy victory. Not only have the settlers vanished, but the British have sent out a strong force to intercept the French and frustrate their ambitions. 

The scene is set. Let battle commence:

 
The French are the attackers and they send forward a unit of Coureurs De Bois (CBD) who advance onto the farm and take cover in a corral in front of the house in the centre. The British counter this threat with two units of Rangers supported by an elite unit of Grenadiers on their left flank. Meanwhile there is movement on the French left flank as two units of Huron warriors move into the woods and a unit of Compagnie Franche de la Marine (French Marines) moves up to support the CDB in the corral.
 
Now things are starting to hot up in the centre and there are exchanges of fire between the British rangers and the CDB in the corral. There are some losses on both sides, but morale holds and there is an impasse. That is until the British Grenadiers turn their fire on the corral forcing the CDB to recoil leaving only a determined (or foolish) officer behind.


Unhappy with this turn of events, a unit of elite French regulars appear opposite the British Grenadiers together with another unit of CDB who take cover on a lightly wooded hill. A fire fight ensues and the rangers having driven off the CDB from the corral are able to support the Grenadiers. There are small losses on both sides, but it is clear that at long range (and presumably some damp powder judging by some dice rolls) shooting is not that effective.
 
Back on the British right flank, two units of Mohawk move into cover to prevent the Huron from flanking the British. The Huron recognise their old adversaries and charge the Mohawk throwing tomahawks as they close on them. Two Mohawk are killed and the rest of the unit turns and flees. Clearly they had no stomach for bloody melee. One unit of Mohawk are left to hold the British right flank.
 

Back on the British left flank, a unit of British regulars arrive and fire on the CDB on the hill killing one and causing them to recoil. The French Marines position themselves behind the corral and they and the British Grenadiers form up and exchange volley fire. There are losses on both sides, but morale holds and the business of rapidly reloading starts.
 
On the French left flank the Huron advance through the woods towards the Mohawk. The fleeing Mohawk unit has rallied and returns to the fray. This time rather than charge, the Huron fire on the Mohawk. After several exchanges the Mohawk flee and the British right flank is exposed. The Huron run from the trees towards the British Rangers and Grenadiers in the centre.

 
Although the long range shooting exchanges have not been that effective, they have definitely taken their toll and although morale has remained firm on both sides, all units are looking depleted with some down to near half strength on both sides.
 
As the Huron charge towards the British, their confidence boosted from their victory over the Mohawk, they do something that it is not usually in their nature to do; they run across open ground towards a unit of enemy who have loaded muskets. The British Rangers fire on the Huron and, to cut a long story short, the British right flank is secured.
 

The intense fire fight continues in the centre with both forces now down to half their original strength. Shots from the British cause casualties on the French regulars and this is the straw that breaks the camel’s back. The French have now lost the stomach to continue and quickly withdraw; leaving the field (and the farmstead) in the hands of the British.
 
 
Mike

Sunday, 15 August 2021

Target for Tonight, Op Seven, Hannover


This weekend at the club saw the resumption of our Target for Tonight (TfT) Battle of Berlin Campaign series of games, recreating the attack on Hannover by 678 Mainforce bombers of Bomber Command on the night of 27th-28th September 1943.

The campaign was left back in February 2020  delicately balanced on a draw as the Nachtjagd have recovered from the shock of the early attacks made in the wake of their disorganisation following the summer 1943 firestorm bombing attacks on Hamburg and with just two games to go leaving things all to play for.

The target map for Hannover

Our mission looked very promising for Bomber Command with a target at relatively short range for a quick in and out flight coupled with broken cloud and light winds over the target aiding better bombing. These factors combined with 75% of the strike group of twenty aircraft composed of veteran and two second-op elite crews all carrying a very-heavy bomb load out to make full advantage of the short trip to the target.

Hannover, raided earlier in the campaign and set to receive its second visit, makes a welcome change from the deep raids into Germant to Berlin, Nuremberg and Mannheim

As in previous game reports the full series can be followed on JJ's Wargames where you will also find a full report of how this game played as well and showing how it has left the campaign with just one game to go.


If you would like to know more then just follow the link below