

Followers of the blog will have seen that David has been very busy building a gorgeous collection of 18mm Napoleonics for the Russo-French conflict in Poland in 1806-07, complete with snowy terrain mat, buildings and other assorted table top terrain designed to capture the look of this very interesting Winter War fought between the two great Empires of France and Russia during Napoleon's rise to making himself master of Europe, before things started to go wrong.
I have to admit that being more of a Peninsular-War man myself, that, apart from the Battles of Eylau and Friedland, my knowledge of this campaign is rather superficial, and so it was that I found myself improved with some background reading when David invited players to take part in his Battle of Mohrungen game using Carnage & Glory computer moderated rules.
The map below helps set the scene illustrating the early movements of Bennigsen's Russian army, keen to grab the initiative by launching a winter offensive by moving north into East Prussia with seven divisions before turning west to attack Napoleon's left flank and Bernadotte's I Corps; with the aim of discomforting the French enough to force a withdrawal behind the River Vistula in preparation for a planned Spring offensive seeking to drive the French back still further beyond the River Oder.
 |
| https://commons.wikimedia.org/wiki/File:Eylau_Campaign_Map_1807.JPG |
The Russian advance guard had its first clash with troops from Marshall Ney's VI Corps on the 19th January 1807 after the French general, against orders, had let his troops move forward towards Schippenbell in search of food and provisions only to be pushed out of the area by massed columns of advancing Russian troops and thus alerting Napoleon to the Russian movement.
At noon on the 25th January the forward elements of Major General Yevgeni Ivanovich Markov's advance guard arrived at Mohrungen with some 9,000 to possibly 16,000 troops, depending on which source you believe, to be met by all three of Bernadotte's I Corps divisions, some 12,000 men already in occupation of the town.
 |
| Carnage & Glory in the Grand Manner during one of my own Talavera Games JJ's Wargames- Carnage & Glory II, What's it All About Then? |
So to our game recreating this clash in the snowy Polish countryside in 1807 and for me another chance to renew a love affair with perhaps the best way of playing Napoleonics in my very humble opinion, Carnage & Glory (G&G) written and designed by Mr Nigel P. Marsh a gentlemen and a scholar, who I have spent many occasions chatting to via email when engaged with my own Talavera project back in 2017.
If you want to know more about C&G then follow the link above to a description of the system originally posted by Nigel on the old Yahoo Group back in 2014 that succinctly encapsulates why this way of playing a wargame is so satisfying.
 |
| IO-Group - Carnage & Glory II Carnage & Glory II - Webpage |
In addition you might want to check out the IO-Group, in the link above, where folks get together to share their ideas on playing the system and Nigel is readily on hand to answer quires and questions, providing a superb support group for players and game organisers, additionally you can also find out more about the series of rules for this and other eras on the C&G web page, see link above
 |
| The Battle Management screen can be seen here as David sets up the laptop in preparation for our game |
Not unexpectedly the system continues to be developed and upgraded and I know Nigel now has a fantastic campaign system that adds yet more detail and fun to this very clever system that gives a granularity to the way armies fight that paper and dice rule sets cannot hope to match without a level of complexity that would likely remove the fun in the attempt.
Needless to say I was very much looking forward to playing them again and to enjoy being in the player/commander role with all the drama of trying to manage my forces without never knowing exactly how the men were doing and if they would keep doing what I needed from them - great fun.
My usual seat behind the laptop screen would be occupied by David who had, in addition to producing the game, set up the orders of battle and prepared the units ready to fight, with their identifying command labels so we could easily announce who was doing what to who for the computer to crunch out the results.
The two armies are presented below, as per the C&G system showing the various commanders, their command range in paces and their current orders, and the units under their direct command with their identity number, unit name, numbers of troops, lost/ready for battle, quality (C+) etc, their skirmish abilities, and their current formation at the start of the battle.
The French Army Order of Battle - Morhungen 25 Jan 1807
Army Jean Baptiste Bernadotte
[ 101] Marechal d'Empire Jean Baptiste Bernadotte - Active B- [1300 paces]
FA [ 101] 7/2em Artillerie a Pied 0/ 200 [ 8] C Limbered
Brigade Pierre Dupont - Attack
[ 102] General de Division Pierre Dupont - Active B- [450 paces]
LI [ 102] 2/8em Régiment de Legere 0/ 800 C+ Esk+ Division Col.
LI [ 103] 1/9em Régiment de Legere 0/ 800 C Esk+ Division Col.
LI [ 104] 2/9em Régiment de Legere 0/ 815 C+ Esk+ Division Col.
HI [ 105] 1/32em Regiment de Ligne 0/ 825 C+ sk+ Division Col.
HI [ 106] 2/32em Regiment de Ligne 0/ 820 C sk+ Division Col.
HI [ 107] 1/96em Regiment de Ligne 0/ 830 C+ sk+ Division Col.
Brigade Jean-Baptiste Drouet - Attack
[ 103] General de Division Jean-Baptiste Drouet - Active B [450 paces]
LI [ 108] 1/27em Régiment de Legere 0/ 800 C+ Esk+ Ext.Order 275-550
HI [ 109] 1/94em Regiment de Ligne 0/ 845 C+ sk+ Platoon Col.
HI [ 110] 2/94em Regiment de Ligne 0/ 855 C sk+ Platoon Col.
HI [ 111] 3/94em Regiment de Ligne 0/ 820 C sk+ Platoon Col.
HI [ 112] 1/95em Regiment de Ligne 0/ 800 C+ sk+ Division Col.
HI [ 113] 2/95em Regiment de Ligne 0/ 845 C sk+ Division Col.
Brigade Jacques François de Tilly - Attack
[ 104] General de Brigade Jacques François de Tilly - Active B- [450 paces]
LC [ 114] 1/2em Regiment de Hussards 0/ 140 C Esk+ Sqdn.Column
LC [ 115] 2/2em Regiment de Hussards 0/ 140 C Esk+ Sqdn.Column
LC [ 116] 1/4em Regiment de Hussards 0/ 140 C Esk+ Sqdn.Column
LC [ 117] 1/5 Chasseur a Cheval 0/ 140 C Esk+ Ext.Order 100-200
HC [ 118] 1/17me Regiment de Dragons 0/ 150 C+ Esk+ Sqdn.Column
HC [ 119] 1/18me Regiment de Dragons 0/ 150 C+ Esk+ Sqdn.Column
HC [ 120] 1/27me Regiment de Dragons 0/ 150 C+ Esk+ Sqdn.Column
HA [ 121] 3/2em Artillerie a Cheval 0/ 150 [ 6] C+ Limbered
Strengths:
losses/active
0/ 9855 Bayonets
0/ 1010 Sabres
0/ 350 Artillerists
0/ 14 Cannon
0/ 11215 Total of all arms
12 Colours present
 |
| The French set up map showing the initial dispositions and arrival points |
The Russian Army Order of Battle - Morhungen 25 Jan 1807
Army Yevgeni Ivanovich Markov
[ 501] Major General Yevgeni Ivanovich Markov - Active C [1200 paces]
FA [ 501] Artillery Battalion Nr. 3 0/ 300 [12] C Limbered
Regiment Rostoff Potaski - Attack
[ 502] Colonel Rostoff Potaski - Active C [200 paces]
LC [ 511] 1 Sotnia (Cossacks) 0/ 180 C- Esk+ Ext.Order 125-250
LC [ 512] 2 Sotnia (Cossacks) 0/ 180 C- Esk+ Ext.Order 125-250
Brigade Ivan Petrov - Attack
[ 503] Brigadier General Ivan Petrov - Active C+ [400 paces]
LI [ 502] 1/5 Jäger 0/ 800 C Esk+ Man.Column
LI [ 503] 2/5 Jäger 0/ 810 C- Esk+ Man.Column
LI [ 504] 1/7 Jäger 0/ 790 C Esk+ Ext.Order 275-550
HI [ 505] I Btn Pskov Musketeer 0/ 850 C Platoon Col.
Brigade Karl Fedorovich Lowenstern - Attack
[ 504] Colonel Karl Fedorovich Lowenstern - Active B- [400 paces]
LC [ 506] 1Sq Elizabehgrad Hussars 0/ 180 C- Esk+ Sqdn.Column
LC [ 507] 2 Sq Elizabehgrad Hussars 0/ 180 C- Esk+ Sqdn.Column
LC [ 508] 3 Sq Elizabehgrad Hussars 0/ 180 C- Esk+ Sqdn.Column
LC [ 509] 1 Sq Soumy Hussars 0/ 180 D+ Esk+ Sqdn.Column
LC [ 510] 2 Sq Soumy Hussar 0/ 180 D+ Esk+ Sqdn.Column
HA [ 513] Horse Artillery Btn Nr. 1 0/ 300 [12] CLimbered
Brigade Alexeev Anrep - Attack
[ 505] Brigadier General Alexeev Anrep - Active B- [450 paces]
LI [ 514] 1/25 Jäger 0/ 800 C Esk+ Ext.Order 275-550
LI [ 515] 2/25 Jäger 0/ 750 C Esk+ Ext.Order 250-500
HI [ 516] 1 Btn Ekaterinoslav Grenadier 0/ 850 B Platoon Col.
HI [ 517] 2 Btn Ekaterinoslav Grenadier 0/ 850 C+ Platoon Col.
HI [ 518] 3 Btn Ekaterinoslav Grenadier 0/ 850 C+ Platoon Col.
Strengths:
losses/active
0/ 7350 Bayonets
0/ 1260 Sabres
0/ 600 Artillerists
0/ 24 Cannon
0/ 9210 Total of all arms
8 Colours present
 |
| Similarly the Russian set up map showing their initial dispositions |
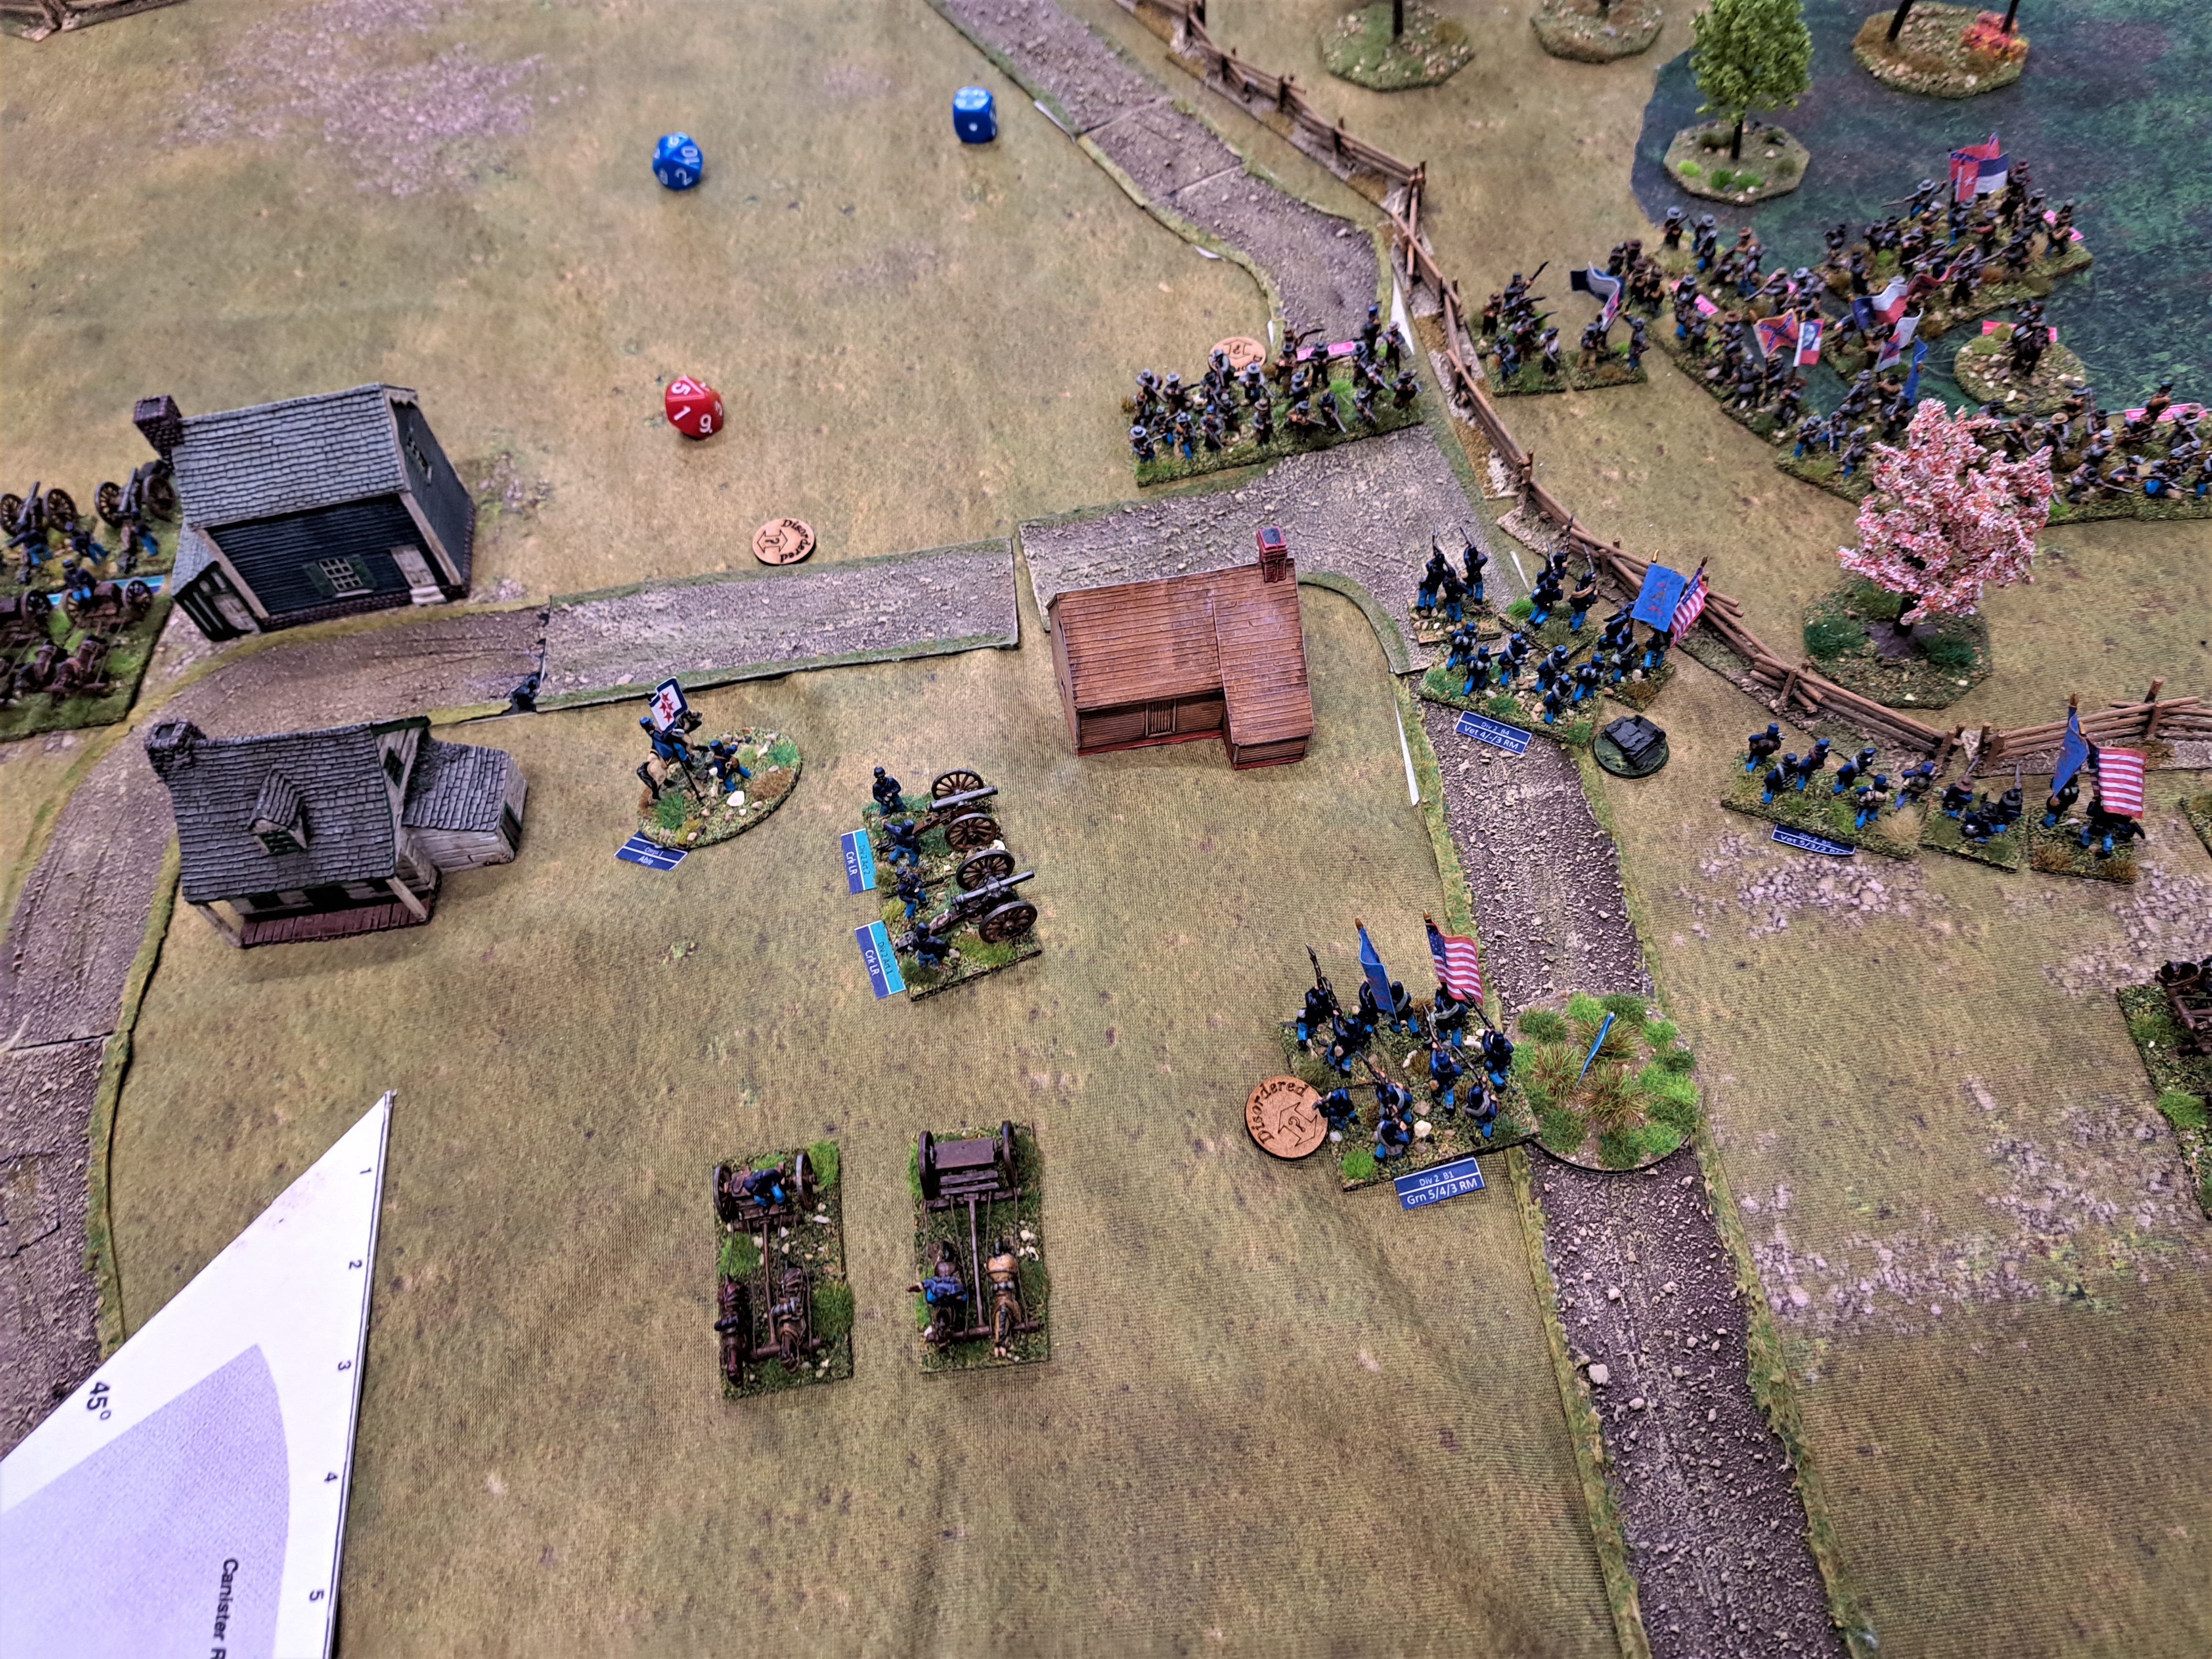
With our table set up as below and with me commanding the Russian forces as Major General Yevgeni Ivanovich Markov, ably supported by Liz who took the command of Brigadier General Alexeev Anrep covering the Russian left flank with the two battalions of the 25th Jager Regiment in the woods and the three battalions of the Ekaterinoslav Grenadiers in support on the slopes beside the village of Pfarrersfeldchen.
The rest of the Russian positions would see troops coming into Pfarrersfeldchen from off the march and would have the 5th and 7th Jager Regiments, three battalions detailed to hold the village with the Pskov Musketeer battalion advanced out onto the Russian right flank to support the massed guns of the Russian artillery quickly deployed to meet the oncoming French infantry and cavalry exiting into the lower plain from Mohrungen, with the right flank of our troops further covered by the iced up frozen lake ably policed by the Sotnia Cossack Regiment.
 |
| The Russian line firms up around Pfarrersfeldchen to the left as Bernadotte's French deploy out of Mohrungen in preparation to attack. |
 |
| General Markov oversees the deployment of his troops in and around Pfarrersfeldchen as the French 'Pas de Charge' beats out in the valley below. |
 |
| Horse Artillery Btn Nr. 1 unlimbers close to the frozen lake, supported by the Pskov Musketeer battalion |
The battle got going with a determined push against the Russian left flank as the columns of the 94em and 95em Ligne marched into the forest heights to be met by the 25th Jagers starting a spirited exchange of skirmish musketry that saw the French numbers gradually force the Russian troops grudgingly back.
 |
| The 94em and 95em Ligne push into the forest on the Russian right flank |

 |
| The French press the Russians in front of the village. Note their lead cavalry has advanced in squadron column with Russian Hussars in line ahead of them, about to unleash a charge whilst Potaski's Cossacks can be seen hovering on the French left flank on the iced up lake shore line. |
 |
| The Ekaterinoslav Grenadiers left, hold the exposed slopes on the Russian centre-left, observing the battle developing about them. |
 |
| The Russian gun line and cavalry start to go to work on the advancing French |
 |
| Cossacks were a constant threat to French units trying to press forward |
 |
| A fearsome line of Russian guns dominated the centre of the battlefield |
 |
| The Russian Jagers in the forest on the Russian left are forced back as General Anrep rides up to rally them back into line |

Suddenly the French cavalry managed to overcome their Russian opposition, breaking through on to the Russian gun line, and catching the Horse gunners limbering up to change position to face the threat of Dupont's columns arriving on the extreme Russian right flank; not before the combined fire from theirs and and the guns of Artillery Battalion Nr. 3 had shredded the lead battalions of the 8em and 9em Legere advancing on Pfarrersfeldchen, only to suffer the ignominy of then getting caught by a charge from the Elizabehgrad Hussars, converting a fall back into a rout and taking an Eagle in the chase.
 |
| Back to back cavalry as the various regiments ride through each others ranks in a swirling mass of sabres |
 |
| The Ekaterinoslav Grenadier Regiment administer the coup de grace to French attempts to eject them from their position. |
The Russian officers coolly barked out their orders as massed muskets were levelled and the order to fire was given at seventy-five paces and back went the French lines as white markers indicating no further advances started to appear across the French line as divisions of men indicated their reluctance to press the attack to their officers, preferring to fall back and reorder their ranks rather than close with the enemy.
 |
| The Russian horse gunners did a magnificent job but suffered terribly when caught later limbering up by French cavalry that broke through the Russian cavalry to fall upon the gunners to wreak terrible revenge. |
That said the fatigue was starting to take its toll on the Russians with their cavalry shot as a fighting force and the Jagers on the left barely holding their ground when we called the game in favour of Markov's Russian advance guard, having successfully held their ground.
The butchers bill of dispersed and routed units together with the 1,700 odd casualties suffered by Bernadotte's men amply demonstrate the dangers of advancing under Russian artillery fire, with the Russians escaping with just under a thousand casualties themselves but able to console their losses with a French Cuckoo.
French Army Casualties/Losses, Morhungen 25 Jan 1807, As of Game Turn: 7
 |
| The French 94em and 95em Ligne fall back before the massed volleys of the Ekaterinoslav Grenadier Regiment. |
Army Jean Baptiste Bernadotte
[ 101] Marechal d'Empire Jean Baptiste Bernadotte - Active B- [1300 paces]
[ 101] 7/2em Artillerie a Pied 0/ 200 [ 8] C Formed ( 4) Average Tired
Brigade Pierre Dupont - Attack
[ 102] General de Division Pierre Dupont - Active B- [450 paces]
[Y][ 102] 2/8em Régiment de Legere 324/ 476 C+ [sk+] Rout Broken Acceptable
[D] [ 103] 1/9em Régiment de Legere 389/ 411 C [sk+] D'persed Broken Tired
[ 104] 2/9em Régiment de Legere 3/ 812 C+ [sk+] Disorder Good Acceptable
[ 105] 1/32em Regiment de Ligne 0/ 825 C+ [sk+] Formed Good Fresh
[ 106] 2/32em Regiment de Ligne 0/ 820 C [sk+] Formed ( 1) Good Fresh
[ 107] 1/96em Regiment de Ligne 0/ 830 C+ [sk+] Formed Good Fresh
Brigade Jean-Baptiste Drouet - Attack
[ 103] General de Division Jean-Baptiste Drouet - Active B [450 paces]
[ 108] 1/27em Régiment de Legere 0/ 800 C+ [sk+] Formed ( 4) Average Tired
[W] [ 109] 1/94em Regiment de Ligne 47/ 798 C+ [sk+] Formed ( 5) Good Exhausted
[ 110] 2/94em Regiment de Ligne 67/ 788 C [sk+] Formed ( 8) Good Fresh
[ 111] 3/94em Regiment de Ligne 24/ 796 C [sk+] Formed (14) Ex'lent Tired
[ 112] 1/95em Regiment de Ligne 124/ 676 C+ [sk+] Formed ( 6) Average Acceptable
[D] [ 113] 2/95em Regiment de Ligne 535/ 310 C [sk+] D'persed Broken Tired
Brigade Jacques François de Tilly - Attack [No Advance]
[ 104] General de Brigade Jacques François de Tilly - Active B- [450 paces]
[W] [ 114] 1/2em Regiment de Hussards 6/ 134 C [sk+] Disorder Good Exhausted
[D] [ 115] 2/2em Regiment de Hussards 74/ 66 C [sk+] D'persed Broken Fresh
[W] [ 116] 1/4em Regiment de Hussards 5/ 135 C [sk+] Disorder Good Exhausted
[W] [ 117] 1/5 Chasseur a Cheval 25/ 115 C [sk+] Disorder Average Fresh
[W] [ 118] 1/17me Regiment de Dragons 6/ 144 C+ [sk+] Disorder Good Tired
[W] [ 119] 1/18me Regiment de Dragons 12/ 138 C+ [sk+] Formed Good Fresh
[D] [ 120] 1/27me Regiment de Dragons 50/ 100 C+ [sk+] D'persed Broken Exhausted
[ 121] 3/2em Artillerie a Cheval 69/ 81 C+ Shaken Broken Tiring
Strengths:
losses/active
1513/ 8342 Bayonets
178/ 832 Sabres
69/ 281 Artillerists
6/ 8 Cannon
1760/ 9455 Total of all arms
11 Colours present
1 Colour lost
Legend:
[D] Denotes dispersed
[Y] Denotes In rout
[R] Denotes halted in disorder, in retirement or retreat
[W] Denotes no advance unless accompanied by officer
[D] Denotes dispersed
[Y] Denotes In rout
[R] Denotes halted in disorder, in retirement or retreat
[W] Denotes no advance unless accompanied by officer
Russian Army Casualties/Losses, Morhungen 25 Jan 1807, As of Game Turn: 7
 |
| French Legere have their ranks played upon by Artillery Battalion Nr. 3 as the 5th Jager garrisoning the village look on. |
Army Yevgeni Ivanovich Markov
[ 501] Major General Yevgeni Ivanovich Markov - Active C [1200 paces]
[ 501] Artillery Battalion Nr. 3 1/ 299 [12] C- Formed ( 6) Good Exhausted
Regiment Rostoff Potaski - Defend
[ 502] Colonel Rostoff Potaski - Active C [200 paces]
[R] [ 511] 1 Sotnia (Cossacks) 14/ 166 C- [sk+] Shaken Average Tired
[ 512] 2 Sotnia (Cossacks) 44/ 136 C- [sk+] Formed ( 4) Average Fresh
Brigade Ivan Petrov - Attack
[ 503] Brigadier General Ivan Petrov - Active C+ [400 paces]
[ 502] 1/5 Jäger 0/ 800 C [sk+] Formed Good Fresh
[ 503] 2/5 Jäger 0/ 810 C- [sk+] Formed Good Fresh
[ 504] 1/7 Jäger 0/ 790 C [sk+] Formed Good Fresh
[ 505] I Btn Pskov Musketeer 21/ 829 C- Formed ( 3) Average Fresh
Brigade Karl Fedorovich Lowenstern - Defend [No Advance]
[ 504] Colonel Karl Fedorovich Lowenstern - Active B- [400 paces]
[R] [ 506] 1Sq Elizabehgrad Hussars 14/ 166 C- [sk+] Shaken Broken Tired
[W] [ 507] 2 Sq Elizabehgrad Hussars 2/ 178 C- [sk+] Disorder Ex'lent Exhausted
[D] [ 508] 3 Sq Elizabehgrad Hussars 23/ 157 C- [sk+] D'persed Poor Tired
[R] [ 509] 1 Sq Soumy Hussars 6/ 174 D+ [sk+] Shaken Average Exhausted
[W] [ 510] 2 Sq Soumy Hussar 0/ 180 D+ [sk+] Disorder Good Fresh
[R] [ 513] Horse Artillery Btn Nr. 1 188/ 112 [ 1] C- Shaken Poor Tired
Brigade Alexeev Anrep - Defend [No Advance]
[ 505] Brigadier General Alexeev Anrep - Active B- [450 paces]
[R] [ 514] 1/25 Jäger 76/ 724 C [sk+] Disorder Poor Exhausted
[D] [ 515] 2/25 Jäger 262/ 488 C [sk+] D'persed Broken Exhausted
[W] [ 516] 1 Btn Ekaterinoslav Grenadier 0/ 850 B Disorder Ex'lent Fresh
[W] [ 517] 2 Btn Ekaterinoslav Grenadier 148/ 702 C+ Disorder Good Acceptable
[W] [ 518] 3 Btn Ekaterinoslav Grenadier 104/ 746 C+ Disorder Good Acceptable
Strengths:
losses/active
611/ 6739 Bayonets
103/ 1157 Sabres
189/ 411 Artillerists
11/ 13 Cannon
903/ 8307 Total of all arms
8 Colours present
Legend:
[D] Denotes dispersed
[Y] Denotes In rout
[R] Denotes halted in disorder, in retirement or retreat
[W] Denotes no advance unless accompanied by officer
[D] Denotes dispersed
[Y] Denotes In rout
[R] Denotes halted in disorder, in retirement or retreat
[W] Denotes no advance unless accompanied by officer
Thank you to David for a thoroughly absorbing game and to Liz, Mike and Nathan for making it another fun game of Carnage & Glory, with all the romance rekindled with this very enjoyable set of rules.
As far as our game components were concerned, I know the mat is from Tiny Wargames, the figures are mainly AB 18mm range, and I'm sure David can provide answers to other queries about other items seen, posted here on the blog.
JJ
.jpg)


.jpg)