Labels

Friday, 14 July 2023

A Typical Day at the Devon Wargames Group

 
Well we are well and truly into summer and you would think things would be a bit quieter at club, with folks away on holiday or out with friends and family enjoying the balmy summer weather of God's own country Devon, oh and there is a reason why our county name rhymes with 'Heaven'!

However not a bit of it, the club has been growing leaps and bounds in recent months and it is not unusual for us to be hosting four or five games at a meeting, with anywhere between twenty and thirty happy wargamers indulging themselves doing one of the most fun things you can do with your clothes on - wargaming of course, and this month was no different with the club hosting five games and the room full of contented babble and banter as everyone got down to having fun.


As your regular editor on the blog, I am however busy with lots of projects, one of which sees me traveling up to Cardiff this weekend with friends from the DWG to meet with friends from the Penarth and District Wargames Society to host a two day marathon game recreating the Battle of Trafalgar using Kiss Me Hardy, which I will be reporting on JJ's Wargames later this month.

So I thought as a change from our usual once a week after action report and to cover for me while I'm away I thought I would post a short video capturing the feel and atmosphere of a typical day at club these days, with a look at the games run last weekend, Saturday 8th July 2023, at which the following games were run.

O-Group in 15mm hosted by Steve L.

Frostgrave, 28mm Fantasy, hosted by Mike R.

Cold War Battles, Arctic Confrontation hosted by Tom

Sharp Practice II in Old Mexico hosted by Colin

Lion Rampant II in the Crusades, hosted by Mike C.

As you can see we enjoy a varied diet of eras and genres at the club as well as good social atmosphere where friends are made and bonds cemented over a beer or two after the dice have been put away and the following short video clip will I hope capture some of that spirit together with some more pictures of the games and collections we had on show.


I hope you enjoy this little cameo of our day and I look forward to sharing some more AAR's on my return from Cape Trafalgar via Cardiff.

More anon
JJ

Saturday, 8 July 2023

Frostgrave


Despite an inevitable bit of ribbing from JJ, we defied tradition and played Frostgrave, the first game in a short campaign designed to try and teach the rules to new players. My hope is to infuse the notion of magic throughout the club, so that JJ has to adapt his rules to play 'Kiss me Elfy' or 'Orc's practice' someday.


The Warbands began on opposing corners of the silent village, with three skellibobs on the table from turn one to stop complacency. One Wizard was an Elementalist, the other a Chronomancer.


With a cautious start from the Elementalists - using the houses as cover - they split into smaller groups and began trying to break doors down in search of treasure. One group, led by the apprentice, were notably feeble and took a good number of turns to even get through the door (fair play to Mark for his persistence there).


What they found was a good number of armoured skeletons which, despite their numbers were easily despatched over and over again. This served to delay the progress of the Elementalists who only went to houses further afield later in the game.


Meanwhile, the Chronomancers sent their Barbarian to knock down the nearest door. Alas, the oak in this part of the world must be infused with stone, as it took him an embarrassingly long time to get in to, despite his burgeoning musculature. 

Unfortunately for the Barbarian, it was a ghoul that he found first, having 10 health to the skeleton's 1. Nonetheless some cool dice rolling despatched it and secured the treasure in short order.


Towards the centre of the table the Chronomancer wizard was leading a small band of undesirable types from door to door, securing two more treasures in fairly short order. Tactical use of two bow-equipped soldiers allowed several shots onto the Elementalists, but a series of natural 20's kept them from piercing. Indeed, the tables turned as the Elementalist wizard cast mind control onto the Chronomancer's ranger, using their own soldier against them for several turns.

Saturday, 1 July 2023

French and Indian Raids along New York’s Oswego River 1756 - Rebels & Patriots


Introduction:
My inspiration for the game came from Osprey’s Raid publication “Montcalm’s Crushing Blow. French and Indian Raids along New York’s Oswego River 1756”.


In essence Major-General Louis-Joseph de Montcalm enjoyed a great deal of success attacking and taking key strategic fortifications in the Oswego River area using his French Light Infantry and large numbers of allied native Americans. His forces made excellent use of Bateaux (singular Bateau) to navigate waterways through what would otherwise have been very challenging or even impassable terrain, to take them within striking distance of their objectives. The Bateaux were considerably larger than a canoe, 30 feet four inches (9.2m) long, six and a half feet (1.9m) wide and two feet ten inches (0.8m) deep. The British Regulars garrisoning the forts struggled to deal with the light infantry tactics employed by the French and their allies.

Game One
Scenario
The British have started the construction of a fortified position beside a tributary of the Oswego River. They have erected a block house, two gun emplacements and an ammunition store. The objective for the French is to take and destroy the fort and guns.


At the start of the attack the garrison comprises a unit of Regulars, a unit of Grenadiers (shock infantry) with an officer, a unit of Rangers (light infantry) with an officer, a unit of Mohawk skirmishers (upgraded to sharp shooters) and two units of Artillery men who having finished polishing and attending to the maintenance of their guns are reposing in the block house. Reinforcements are available from a camp approximately a mile from the fort. The sound of gunfire will alert them.


Initially the French force is much larger, but the defenders do have two cannon and the protection of hard cover. This means that when targeted by the enemy, the French will require four hits to remove one figure and this will increase to five hits if the target is over 12” away. Most units hit on fives and sixes, although the sharpshooter upgrade increases the shooter’s range to 24” hitting on four pluses. 

The French force comprised four large units of native Americans (18 figures per unit instead of 12) this meant that each unit could lose nine figures before becoming permanently disordered, rather than the usual six. These units, being classed as natives do not have the fire action which means they only throw six dice when firing (yes, even with an 18 figure unit). However in hand to hand they hit on fours rather than the usual six, or five for shock infantry. 

In addition to the Indians, the French had a unit of Regulars with an officer, two units of marines and a unit of Coureurs Des Bois skirmishers upgraded to sharp shooters.

I felt that with such large forces on both sides (don’t forget the British get reinforcements)that the game should have lasted several hours. How wrong was I!


The French had first activation as they were the attackers. As a light infantry force, they made speedy progress across the table. Two groups of natives on each flank were the first to reach the defenders as they were not slowed by the river or wooded areas. One unit of them took some casualties, but all four units reached the British position with well over half their strength or at full strength. 

The British musketry had little real effect. One unit of artillery men, just didn’t seem all that interested in leaving the creature comforts of the block house and were content to wave their comrades off as they ran to man one of the canon.


On the British right flank, the rangers were charged by a group of Indians, but failed to get the roll they needed to perform a skirmish action (i.e. shoot and scoot). They did get the bonus for defending an obstacle, but the ferocity of the Indians who when charging get a plus one on their already impressive four plus fighting, meant they were hitting on threes and the Rangers needed sixes. 

Needless to say the Rangers were driven back. The Indians leapt the defensive wall and were able to follow up because they had won the melee and had no disorder marker. The Rangers took more casualties, became disordered and retreated further.


In the British centre, the Grenadiers couldn’t quite make up their mind whether to support the left or right flanks. In the end they settled for their left flank. As they made their way over to the left, a large unit of Indians overran the left flank gun emplacement, more or less wiped out the artillery unit manning it and then turned their attention onto the Grenadiers who had just arrived. 

While all this was going on, the French marines and skirmishers contented themselves with hanging back and taking the occasional pot shot while their native American allies worked their hand to hand magic. 

Although the British reserves arrived promptly, they were simply no match for the Indians in hand to hand. Even a fresh unit of Grenadiers and two more units of regular and a unit of Rangers, were unable to repel the attackers. The Rangers were unlucky with their dice rolls and just didn’t behave the way they should with shoot and evade.

The battle was decided in about one hour thirty minutes with the British side conceding.

Game Two
Scenario
The French and their allies have taken possession of the fortified position, but can they hold it? Now the British are attacking. The French sensibly deploy their native American allies outside of the fort and near or in woods on both of their flanks. The marines, Regulars and sharpshooters take positions behind hard cover to the rear of the blockhouse and await the British.


This battle was far more intense than the first and there was a lot more manoeuvring and substantial losses on both sides. The British Regulars acted as more of a deterrent to pin the Indians on their right flank. The Grenadiers definitely held their own in the centre driving off a unit of Indians and causing casualties amongst the French marines before their own losses forced them to pull back or risk losing their officer. 

Over on the British left flank, two units of Rangers had finally found their Mojo and their was intensive fighting in the woods. The Rangers consistently skirmished and put fire into the attacking Indians before retreating a half move. This time the Indians definitely didn’t get it all their own way; they took losses and became disordered, but were really good at rallying and getting back into the fray.


Just as it appeared the British might be getting the upper hand, the Rangers on their left flank could no longer keep out of charge distance of their Indian foes and they took heavy losses in the ensuing hand to hand fighting. Both sides were now close to reaching half of their original force strength and had lost the stomach to continue with the fight. 

The French would spike the guns as they retreated back to their Bateaux and set fires where they could, but the British who would retake possession of the fort had learned a salutary lesson. Don’t underestimate the power of a fast moving light infantry force. You’re not safe even in a fortified position. The second game was a draw.


Post game reflection:
As an umpire clearly an important goal is to ensure that each side at least has a chance of winning and achieving their objectives. I feel that in some ways I may have over-egged things in favour of the French. 

Firstly I gave all their units the first fight/fire bonus in order to represent the surprise nature of the attack. Perhaps this was a little too much over compensation. The native American units were like steam rollers in the first game. With hind sight I would have just one large group of 18 and three normal sized groups of 12. This would make their discipline a little more brittle and once down to half strength or less they would receive a permanent disorder marker.


I thought it interesting how the first game played out and was pretty accurate historically, however once the British Rangers got their act together in game two, they were at least a match for their French and Indian enemies.


I would like to thank all of the players who were consummate gentlemen and were magnanimous throughout the games even when the action got really intense.

Many thanks
Mike

Saturday, 24 June 2023

O-Group in the Desert III - Beda Fomm 1941

Beda Fomm - Brian Sanders

My third foray into the desert again saw three out of the four players with limited/to no knowledge 
of  O-Group. Putting on three games in the first half of the year is a bit of a first for me, but there’s no better way to get to know the rules.

Map illustrating the retreat of Italian forces along the coast route in the Western Desert and the inland route of the Empire blocking force that would cut off their retreat at Beda Fomm

This time I used the desert scenario from the author, Dave Brown, based on the battle of Beda Fomm in 1941, published in the latest Lardy Magazine. 

https://toofatlardies.co.uk/product/lard-magazine-2022/

This pitted a large, retreating Italian force from their 10th Army, trying to force its way through a smaller, British blocking force, called Combeforce, named after its commander Lt Col John Combe.


The map was mistakenly left out of the magazine article and subsequently published on the Lardy Forum and reproduced here should you wish to give the scenario a go.

Stephen & Tom took the attacking Italians, leaving Colin and brand new wargamer Ben with the defending British.


The British battalion is ‘worn’, having only two companies available. This does mean they take no further casualties from any 1’s rolled during the attacker’s initial dice roll (p18 in the rulebook). 

They are supported by two sections of 2-pdr anti-tank guns and A13 & A10 tanks.


The Italians have one regular company of three platoons and two 2nd line companies of two platoons
each, with two tank platoons on table and a further two arriving on turns 4 & 6.


In this scenario the Italians must either get the British to take three FURBARS or capture and hold the BUA at the end of turn 12. The game is extended to 14 turns if the British take their reserves.

The limited ammunition rule is used in this scenario, requiring a roll of 8 to achieve a ‘zeroed in’ result for the mortars.


The British gain a minimum of two ambush sections from their deployment roll, regardless of dice rolls.

All reserves arrive automatically on the turn stated.


Initial dice rolls saw the British gain a number of Combat patrols (CP’s), with one further ambush unit, so the 2-pdr anti-tank guns were indicated to me as being in ambush, one on each low rise. With an infantry platoon in the rough on the left flank The Italian roll also saw a number of CP’s available, plus three platoons deployed on table.


Stephen & Tom took a company on each side of road, holding the regular company and antitank rifle off table. The first two tank platoons arrived on the road.


The Italians advanced, with no indication of where the British were, apart from a few CP’s. The speed of their advanced hampered by rolling three consecutive ‘hesitant’ companies!


As the Italians pushed their infantry forward on their right, a multiple platoon target presented itself to the British FOO, who had some success causing shock on both platoons and tying up that Italian flank for a number of turns as they struggled to rally off shock and/or move, while also prioritising their attacking options.


As the Italian armour advanced down the middle, both antitank guns deployed from ambush, hitting absolutely nothing! They then became ‘bullet magnets’ next turn and subsequently vanished, having contributed little to the British defence!


Numerous infantry fire fights were going on at this time, with shock being applied and ‘rally’ actions
attempting to recover.

With the British armour appearing on their left flank and a further Italian armour platoon arriving on the road, the scene was now set for a long-range armour battle, which dominated the centre of the table for a number of turns.

The A13/A10’s are fairly evenly matched, with both having an AT of 5 with the M11/39 on 4 Front armour is 4 & 5 for the A13/A10 respectively and 5 & 4 for the M13/40 – M11/19.


The British had also deployed their reserves on turn 5, choosing to take a 37mm portee (I know, it’s a 2pdr portee!) over a Vickers Mark V1, thus extending the game to 14 turns.

As both sides banged away, first blood went to the British, as an M13/40 brewed up and another took shock, both M11/39’s were also taking some damage.

On the Italian left flank, the other M13/40 squadron was fighting back, with the A13 soon destroyed and one of the A10’s taking damage. The portee continued to chip in with further damage to the M11/39’s but was unable to find that killer blow.


The tank battle was only likely to end one way, with the anti-tank guns not in play and not helped by Ben’s shooting dice! With 7’s required to hit and 2 tanks firing, Ben managed to roll double 1, double 2 in the British turn, followed by exactly the same roll in the react phase!! The writing was on the wall for the British Armour!

In between the ongoing armour battle, the Italian infantry and been slowly pushing forward, forcing the British to deploy theirs to counter. And although the Italians were starting to make progress, they were approaching two FUBARS, with the British on one.

As we approached turn 12, with two turns to go and the Italians on two FUBARS due to ongoing infantry losses adding to the armour, Stephen was heard to say, ‘let’s call it a day, I don’t think we can win’.


With time still left in the day and a possible outcome either way, we decided to play on. The Italians launched an infantry assault on their left and a British platoon evaporated. The British then counterattacked and pushed the victorious Italians back. The Italians counter attacked again! the game hang in the balance!

With a final devastating round of fire, the Italians inflicted two further FUBARS on the British, victory
to the Italians!!


Historically, the Italians were unable to break through and surrendered en mass, once elements of 7th Armoured Division started to appear.

I felt the scenario played well, with the outcome in the balance right to the end. The map for the scenario appears to suggest playing width ways, but we played length ways on a 6 x 4. I think the game would have been over quite early otherwise, with more of a predicted win for the Italians. I’d certainly like to play it again length ways to test my theory.


Mistakes? As per usual there were a couple. I treated soft skins as being able to hold shock, when, in reality, for each hit, a KIA roll is made, with a 5+ knocking out a section (p60) so the portee may not have hung around as long as it did!

I didn’t penalise the ‘2nd line’ companies by deducting 1D6 if they fired and moved, or make the rout test 5+ (p14).

Finally, and this could have been a game changer, re reading the scenario as I wrote this, I’m not sure I made the two 2nd line companies only two platoons each!! Oh well, it made for a good game. 

Thanks to Stephen, Tom, Colin and Ben for playing in a good spirit and waiting while I looked up the rules, or while Stephen and me had a lengthy discussion on interpretation!!


It wouldn’t be a wargame otherwise!

Next up, either a refight of the scenario, or I’d like to do more of a tank company battle.

Infantry figures are a mixture of Flames of War, Peter Pig & Skytrex. Armour mainly Flames of War, with the M11/39’s from Butlers printed models.

Steve M

Saturday, 17 June 2023

The Battle of Waterloo June 18 1815 Braine l’Aleud - Changing History


Editors Note:
With the two-hundredth and eighth anniversary of the Battle of Waterloo, fought on the Sunday 18th June 1815, what better way to commemorate this very significant famous battle than a post from David covering his game, run this month at the club, and focussing on one of the Allied contingents that formed the army commanded by the Duke of Wellington, namely the Dutch-Belgians.  

. . . . . . 

The first army I ever collected in the mid 1980’s was an 1815 Dutch-Belgium one. In my defence, in the club I belonged to then, there were British, Austrian, Prussian and Russian armies and of course, like at any re-enactment, pot loads of French with a weighty Guard component. I wanted to collect something different, so, because of my love of Waterloo, Dutch-Belgians it was. 

What I hadn’t realised in my naivety was that you fielded your own army in the club games, so I was soundly thrashed every time I took to the field. Not surprising as we were playing Peter Gilder rules (which I still have a nostalgic soft spot for) which gave a blanket -2 modifier if a Dutch-Belgian unit so much as sneezed. I was very popular with my enemy opponents and most unpopular with my Allies.

Fast forward to the present and the opportunity came to run a Waterloo themed game at DWG. I had already dusted off my Brunswickers in a previous game, Engagement at Genappe - Seig oder Tod! (link below).

Devon Wargames Group - Seig Oder Tod!.html

So I decided to let the Dutch-Belgian’s loose and see what happened.

There was no getting away from the fact that Dutch-Belgian troops were more B.S. than sliced bread. They were raw and supplied with whatever firearms were left in the arsenal. 

Their officers, however, were another matter. Take Luitenant-Generaal Baron David Hendrik Chassé for example. Chassé served in the army from the age of 10, first in the Dutch army and from 1788 in the French army, eventually fighting in Spain at Talavera and being made a général de brigade under, of all people, Jean-Baptiste Drouet, Comte d'Erlon. He fought at the battle of Vitoria and the battle of Maya and so distinguished himself that Napoleon affectionately named him “général baionette" for his fondness of the bayonet charge. 

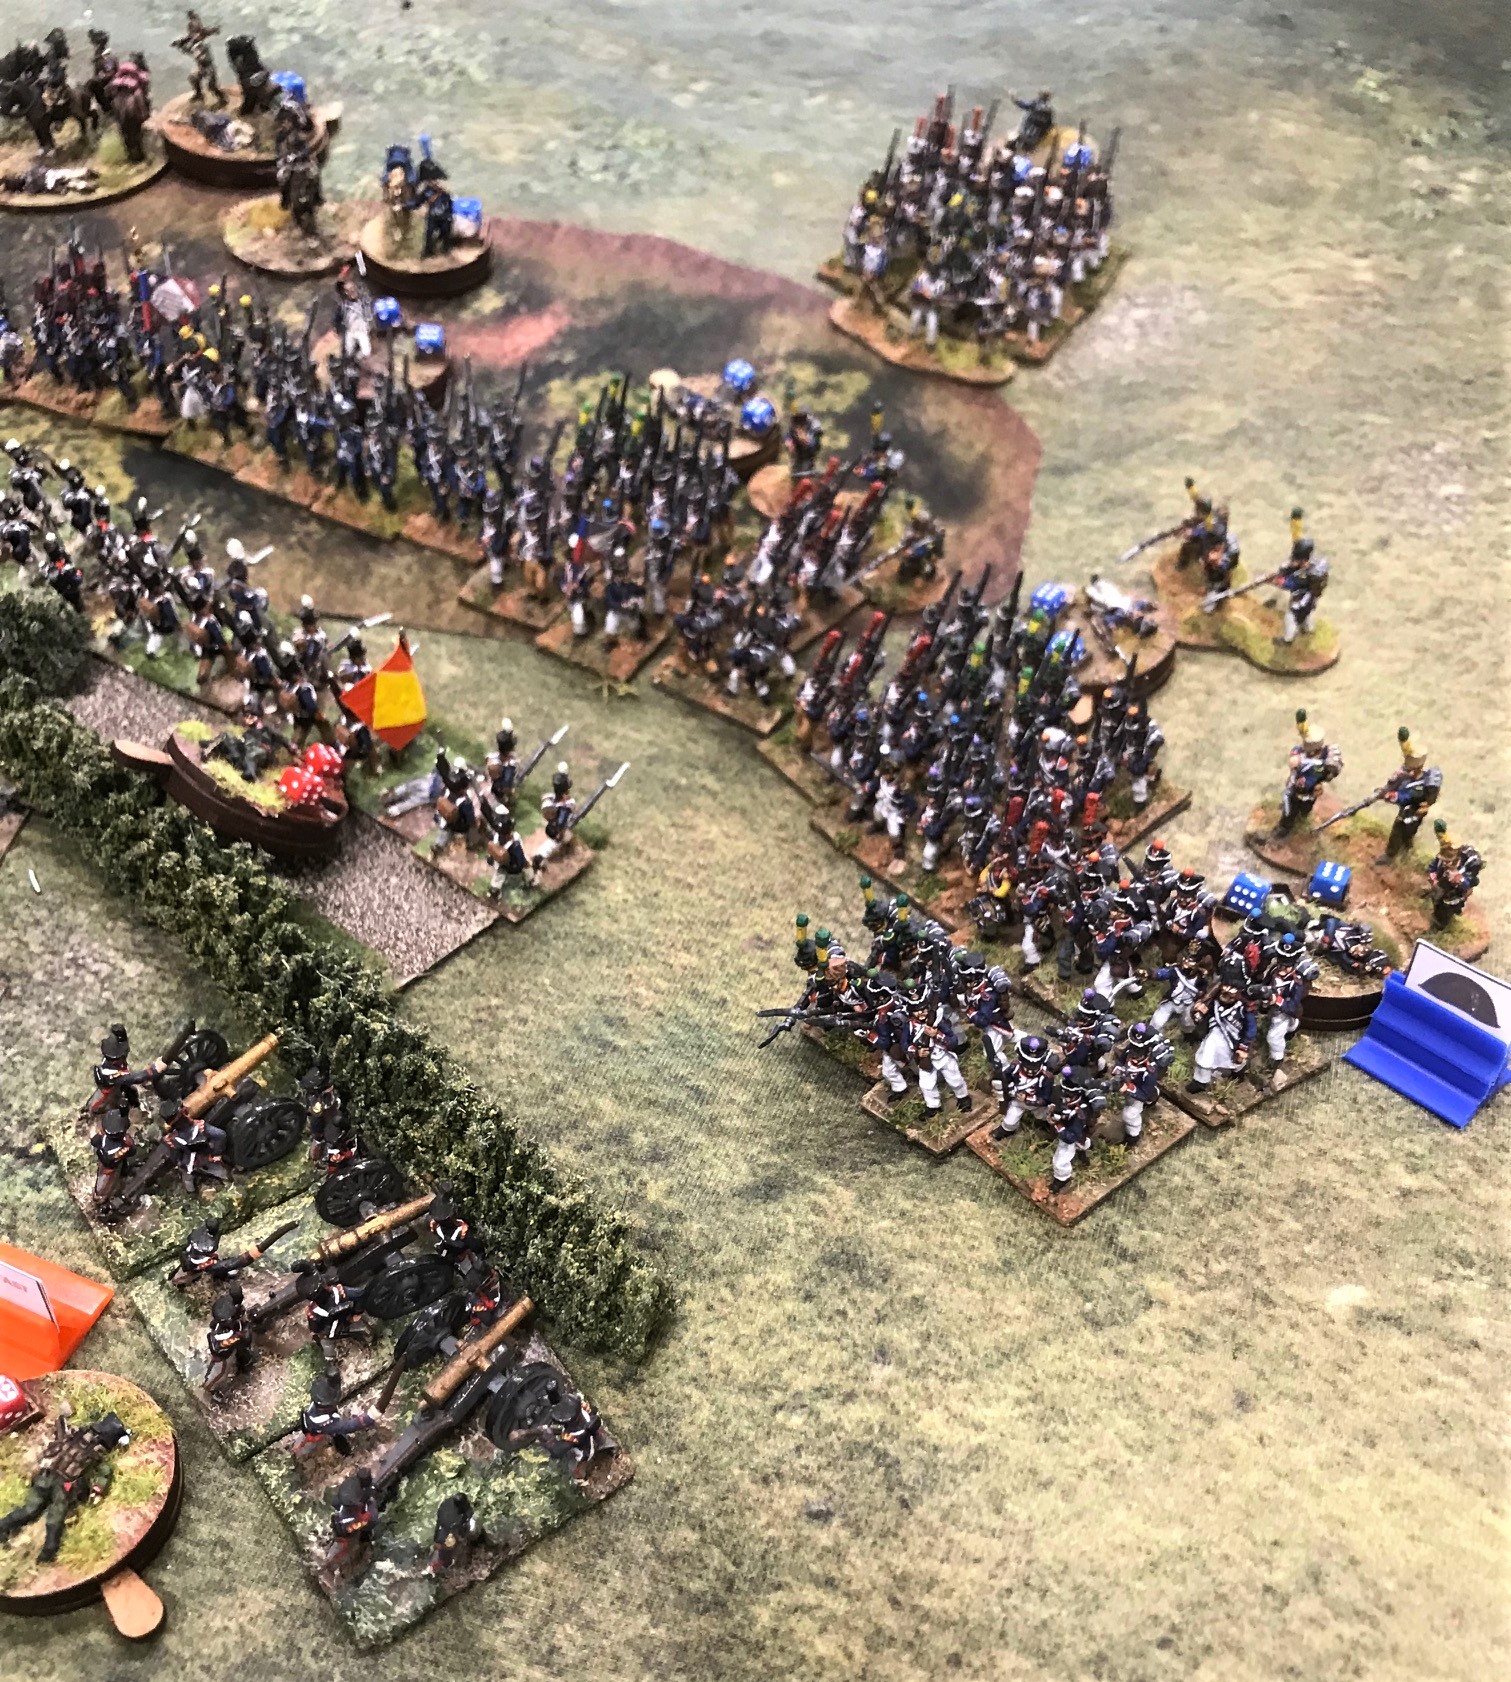
Fighting underway around Braine l’Aleud, Jerome's French VI Division v Chassé's 3rd Netherlands Division

Or the much-maligned Generaal-Majoor Albert Trip van Zoudtlandt, who led the three Carabinier regiments at Waterloo. He entered the service of the Dutch Republic in 1791, as a cadet in an infantry regiment but soon changed to the cavalry becoming a commander of a regiment of cuirassiers. 

On the amalgamation of the Dutch Army into the Imperial French Army Trip's regiment became the 14th Cuirassier Regiment. With this regiment Trip took part in the French invasion of Russia in 1812. His regiment distinguished itself at the Battle of Berezina, during the harrowing retreat of the French army from Moscow. Trip also took part in the final campaigns of Napoleon and distinguished himself again at the battle of Leipzig. 

It wasn’t only the high-ranking officers who commanded respect. Luitenant-Kolonel Wijlbrandis Augustus de Jongh, who commanded the 8th National Militia at Quatre Bras was severely wounded but ordered his staff to tie him to the saddle so he could stay with his battalion. These men demanded respect and must have generated considerable fear. Their very presence must have strengthened the resolve of the raw recruits, and it was this I wanted to test in this scenario. Could a poorly equipped raw force commanded by such officers as these stand up to a professional, experienced French Army.

I had some guiding advice from Nigel Marsh, the designer of the excellent computer moderated game Carnage & Glory. Allow ten units for each playing hour e.g. a game with thirty units would last about three hours, and make sure the sides are in effective artillery range of each other. Following this simple rule of thumb, with 34 units on the board and the players still getting used to the rules, the game lasted just over four hours and we got a result.

So having got the game length sorted, would the inspirational elan of the Dutch-Belgian commanders be enough to offset the more than questionable quality of their troops?


The scenario would be set around the village of Braine l’Aleud on the extreme west flank of the Allied army at Waterloo. It was the position taken up by Chassé’s division on the day of the battle. 

A French Division under Prince Jérôme Bonaparte would advance up the hidden valley to the west of Hougoumont and fall on the Dutch-Belgian position around Braine l’Aleud. 

During the game various routing Allied units would enter from the direction of Hougoumont, culminating in the Coldstream Guards (not routing, but ‘called away’) and finally the Old Guard would make their appearance to provide the coup de grace. 

Would the Dutch-Belgians last until the arrival of the Guard, thus gaining a moral victory, or would they yet again get a sound thrashing.

Advance of the French right

I used the excellent Ferraris map to make up the playing area and was pleasantly surprised to see that there were defensible positions as well as a potential strong point in the Church and graveyard of Braine l’Aleud. The valley to the west of Hougoumont was clearly marked as were the hedge lines and a small wood.

https://maps.arcanum.com/en/map/belgium-1777/?layers=37&bbox=473149.9823995092%2C6589064.735119662%2C498928.3701886849%2C6598026.976686099

The players received the following briefs and orders of battle.

TERRAINE – Pasture and arable with gentle slopes.
BRAINE l’ALEUD – Stone BUA with one stronghold, Max D.F.8. Present D.F.2. S.N.12
WOOD – Medium Cover
TREE LINE – Soft Cover and blocks LOS
HEDGES – Soft Cover and impassable to Cavalry and Artillery
VISIBILITY – Woods and BUA; 100mm and 40mm from their edge to units outside of them.
RIVER – No effect on Infantry movement; Difficult Terrain for Cavalry and Artillery unless crossing by ford to the west.
ROADS – No effect

d'Aubreme Brigade in front of Braine L'Alleud 

Général de Division Prince Jérôme Bonaparte
Having advanced along the hidden valley to the west of Château Goumont fall upon the enemy located in and around Braine l’Aleud.

VI DIV 1e CORPS
Général de Division Prince Jérôme Bonaparte
2e Companie 2e d'Artillerie a Pied (2x6lb 1x Med How.)

1er BDE Général de Brigade Baron Pierre-Francois Bauduine
1er Bn 1ére Régiment de Légère
2e Bn 1ére Régiment de Légère
1er Bn 3e Régiment de Ligne
2e Bn 3e Régiment de Ligne
3e Bn 3e Régiment de Ligne
4e Bn 3e Régiment de Ligne

2e BDE Général de Brigade Baron Jean-Louis Soye
1er Bn 1ére Régiment de Ligne
2e Bn 1ére Régiment de Ligne
3e Bn 1ére Régiment de Ligne
1er Bn 2e Régiment de Ligne
2e Bn 2e Régiment de Ligne

IIe CAVALRY DIV Général de Division Comte de Piré
2e Companie 4e d'Artillerie a Cheval (2x6lb)

1er BDE Général de Brigade Baron Huber
1er Régiment de Chasseurs-à-Cheval
6e Régiment de Hussars

2e BDE Général de Brigade Francois-Isidore Wathiez
5e Régt de Chevaux-légers (Lanciers)
4e Régiment de Hussars

DB occupy Braine L'Alleud

Luitenant-Generaal Baron David Hendrik Chassé
You are charged with protecting the right flank of the Allied Army and provide support when required. Your men may be inexperienced in battle but their resolve with be greatly strengthened by their officer’s Elan and Leadership.

3rd Netherlands Division
Luitenant-Generaal Baron David Hendrik Chassé

1st BDE Kolonel Hendrik Detmers
Bataljon jagers No. 35
Bataljon Infanterie van linie No. 2
Bataljon Nationale Militie No. 4
Bataljon Nationale Militie No. 6
Bataljon Nationale Militie No. 17
Batterij rijdende artillerie (H.A.) 2x6 pdr gun, 1xMed howitzer

2nd BDE Generaal-Majoor Alexander d'Aubremé
Bataljon jagers No. 36
Bataljon Infanterie van linie No. 3
Bataljon Infanterie van linie No. 13
Bataljon Nationale Militie No. 3
Batterij artillerie te voet (F.A.) 2x6 pdr gun, 1x Med howitzer

BRIGADE ZWARE CAVALERIE Generaal-Majoor Albert Trip van Zoudtlandt
Regiment karabiniers No. 1
Regiment karabiniers No. 2
Regiment karabiniers No. 3

INDEPENDENT UNIT Luitenant-Kolonel Ignance Louis, Baron Duvivier
Regiment huzaren No. 8

Dutch battery charged 

Because of the closeness of the setup, things got going pretty quickly. Both French infantry brigades threw out skirmishers and started their advance, slowly pushing back the Dutch-Belgian skirmish line There was already consternation in the Dutch-Belgian ranks.

‘There’re thousands of ‘em.’
‘Look to your front. Mark your target when it comes’. (Okay, wrong movie but massed French columns do look very daunting)

Fire-fight 

A cry of ‘Charge the guns’ rang out (right movie this time) and the 4th Hussars lead by Général de Brigade Francois-Isidore Wathiez, thundered towards the Dutch foot battery. With the war-torn features of Kolonel Hendrik Detmers looking on, they unhurriedly loaded their pieces with double canister.

Much scorn was heaped on Wathiez for the naivety of such a tactical blunder, which quickly turned to admiration for such an audacious manoeuvre when the cavalry charged home despite severe loses, which in turn changed to disbelief when the Dutch gunners stood their ground, forcing the 4th Hussars to retire and reform. A case of Dutch courage, perhaps.

French centre advances

The cavalry Divisional Commander, Comte de Piré, attempted to turn the Dutch-Belgian right flank, but repeated charges and counter charges by the Carabinieres lead by the much-maligned Generaal-Majoor Albert Trip van Zoudtlandt, kept them at bay, forcing them to retire and reform, much to Piré’s frustration.

French right outflanking manoeuvre

The French right, under Général de Brigade Baron Jean-Louis Soye, were slowly pressing forward past the tree line, but suffering from nagging skirmish fire from the 36th Jagers and the unwelcome attention of d'Aubremé Foot Battery, deployed on the high ground to the Southeast of Braine l’Aleud. d'Aubremé Brigade had formed a defensive line in front of the village. 

That’s when ‘bad things’ started to happen. From nowhere it seemed, a routing mob of soldiers in black streamed from the direction of Hougoumont and headed towards his position. He considered rallying them but was reluctant to move far from his Brigade. ‘Let them go,’ he thought. If Hougoumont fell, he was going to have his work cut out.

Pire's Division

Pressure was building on the Dutch-Belgian line as it started to become heavily engaged with units from Bauduine’s Brigade who had pushed through the woods. A close-range musketry battle developed with neither side having the will to go in with the cold steel. 

Pire tries to turn Dutch-Belgian right flank

Suddenly the stalemate broke and 3e and 4e Bn of the Régiment de Ligne charged the Dutch Horse Battery. They looked around for the reassuring presence of Kolonel Hendrik Detmers but he had disappeared and pretty soon, so had they. Their 'Dutch Courage' had deserted them, and they fled to the rear. Lacking gun support and despite Trip’s strenuous efforts, the Carabinier Brigade was at last driven back by Baron Huber’s Light Cavalry. 

Soye's Brigade

Detmers brigade was also losing the musketry duel and the Dutch-Belgian line was starting to crumble. On the Dutch-Belgian left, despite routing two battalions of the 2e Régiment de Ligne, d'Aubremés Brigade was being forced back into Braine l’Aleud. They had also lost the 36th Jagers who had become isolated engaging the French Divisional Battery. Added to this, there was now a stream of Allied routed troops flowing around his position. 


One last charge and the Dutch-Belgian line would be swept away. Detmers took up his position behind his battered Brigade, to his front, the 8th National Militia, their Lieutenant-Colonel, Wijlbrandis Augustus de Jongh, still tied to his saddle. Two Battalions of Bauduine’s Brigade lowered their bayonets and charged the thin blue line (yes, all right). The crashing volley delivered by the 8th Militia routed one unit and halted the other in its tracks. 


To their rear they heard another cry of ‘Charge the Guns’. It was none other than Prince Jérôme Bonaparte. Not having endeared himself to his men, he charged into the wood alone to find that, first, there were no guns, and second, Dutch Belgian hospitality left much to be desired.


D'Aubremé knew that the game was up when none other than a battalion of Coldstream Guards joined the tidal wave engulfing his position. They must have been ‘called away,’ he thought.

La Guard Arrive

And then over the crest, emerging from the smoke of battle, he made out the tall bearskins he knew so well, accompanied by their drums beating the 'Pas de Charge'. The end was fast approaching. But then he heard another sound. It was the band of the 8th National Militia striking up their Regimental March, ‘I’m Still Standing’.


Who says history can’t be changed.


My thanks to Ian, Mike, Gregory, Luke and Ken for playing in such a generous and good humoured way, and for their continued positivity and enthusiasm.

Mat Tiny Wargames
Buildings Hovel
Roads Fat Frank
Figures AB, Minifigs, Battle Honours, Museum Miniatures, Fizzer Johnson