Monday 20 December 2010

Queen Red, Sword Beach

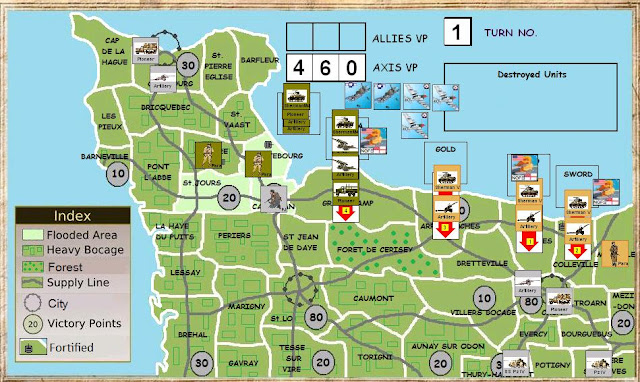
The third Firestorm Normandy game was fought this Sunday, and the British had their go at getting a foothold on the Normandy coast, following the successful landings by the Canadians at Juno and last months bloody encounter by US forces on Omaha.
The first picture shows the Queen Red Sector from behind the German positions with WN12 (Sole) in the right foreground, with the Luftwaffe radar post acting as battalion HQ for the third battalion 736 Grenadier Regiment. The hex immediately to the left of this position on the hedge lined road was the key objective for the British force. In the right background immediately on the sea front is the eastern end of WN20 (Cod) which was the strong point for the 10th Company, including a 8.8cm AT gun in the large bunker, 2 x 7.5cm AT guns covering the road off the beach, plus HMGs, Mortars and an artillery OP. In the right background are the houses of Breche de Hermanville which provided cover for a 5cm AT bunker and a tank turret bunker giving support fire to WN20. The position was supported by 15,5cm artillery and reinforcements of infantry and possibly panzers from 21st Panzer Division stationed close by.

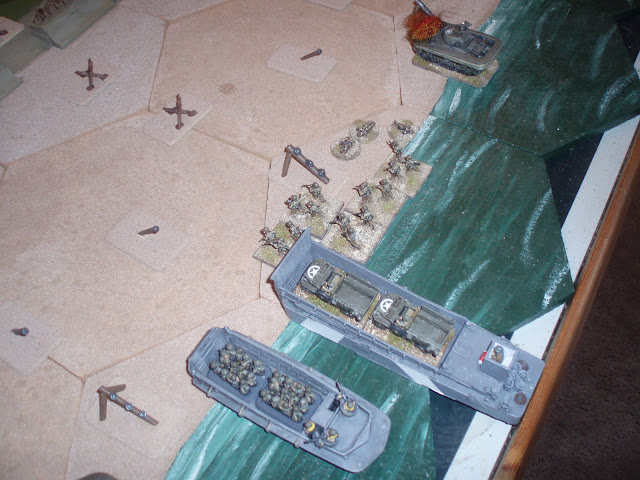
The next two pictures show the beach front gun positions interspersed with wire and mines to hold back any troops on the beach to allow them to be dealt with by the machine guns and mortars in WN20


Following the initial bombardment by the navy that managed to knock out an HMG position and a rifle group in the support trenches, the pinning effect of the bombardment allowed the 2nd Battalion East Yorkshire Regiment to take full advantage, by managing to land three platoons in the first wave and rush the sea wall and wire defences.
Because of the possibility of German tanks turning up, the British decided to break in to the defence primarily using their infantry assets bringing on the armour once the anti-tank defences had been neutralised, to help deal with the German infantry. This would help to make sure there were plenty of British tanks around to deal with any German armour.

By turn 3 the British infantry had "bangalored" the sea wall creating multiple breaches allowing them to assault and take out the 8.8cm bunker in the teeth of heavy fire from the German Infantry. The DD tanks and AVRE easily took care of the 5cm and tank turret bunkers, with the infantry and DDs smoking them off, allowing the AVREs to close the range and take them out with their Petard mortars.

By turn 6 the British infantry was able to make their final assault into COD having taken out most of the German machine gun positions, which with the reduced return fire allowed them to charge into the position and clear it with the grenade and bayonet.
This opened the "flood gates" and the Commandos of 4 Commando stormed across the salt marsh and brought SOLE under fire whilst the Yorks moved into the neighbouring field ready to take the objective.
The Germans were forced to commit their reserves of only half a platoon to try and keep the objective clear of enemy troops, even managing to take out a section of British infantry. By turn 9 the numbers of British troops were overwhelming and the victory was complete.


This time Steve Mathews took the Brits and I the Germans. We both picked up a lot of lessons from the previous games, ie the German infantry firepower is formidable in defence and a combination of mass return firepower and judicious use of smoke when available needs to be used to get in amongst the German troops. This is best done by the infantry who can deal with the AT guns that threaten the armour. The armour is then able to rapidly move inland to get round and behind any remaining resistance.
A really good game, great fun, thanks Steve.
Next game is Gold Beach in 2011

Sunday 12 December 2010

War in the Desert

Hi all,

Thought I let everyone know about the game this weekend at the club, put on by Steve Mathews who brought out his ever growing collection of FOW desert troops.

Sadly I didn't have my camera with me so no pics of Steve's collection. This month also saw a reduced turn out due to various members being away, so the Brits were played by me (JJ) and Steve Hallett vs Chas and Steve M running the Afrika Korps.

The mission was the Withdrawal mission, which had a mixed bag of 2 x German Infantry platoons supported by 3 x Panzer IIIs, 3 x Sermovente 75s, 3 x Sdkfz 222 A/Cs, a couple of PaK38s and 7.5IGs, an 8.8cm Flak gun in ambush and support fire from a battery of 105mm guns, who were tasked with holding at bay the Australians whilst gradually taking platoons off the table to simulate the rearguard. The Australian force consisted of 8 x Crusader IIs, 3 x Honeys, 2 x platoons of Australian Infantry, 4 x 2lbr portees, and a battery of 4 x 25lbrs on call. The force was also supported by Hurribombers.

Steve and I decided to focus our assault on the right flank objective whilst refusing the left flank and centre. The Crusaders led the way followed by a platoon of infantry, supported by fire from the 25lbrs. The holding force of the 2lbr portees and Stuarts formed line against probing Pz IIIs and Sdkfz 222's.

The assault rolled forward with the Crusaders racing through a platoon of Sermoventes with niether side able to inflict casualties on each other. The 8.8cm in ambush declared itself to fire at the onrushing Crusaders and promptly missed. The 25lbrs caused the 7.5IGs to pin, and with anticipation I announced to Chas that my Crusaders would assault his pinned guns, literaly inches away from the objective that could win the game for the Aussies.

Meanwhile on the other flank, Steve H had dispatched a 222 with the Honey's and caused a Pz III to bail with the Portees. It only left our Hurribombers to come roaring in and tip the balance in our favour by dispatching the German artillery support.

THEN THE WHEELS CAME OFF. The Crusader is not the best tank to assualt with, with its paltry side armour of 2. Chas took full advantage and his infantry gunners promptly unpinned and shot the Aussie cavalry out of its saddles. The follow up Infantry took on the Sermoventes and with their lack of machine guns were eventually overcome by the Infanteers only for the German Artillery to whack the Aussies with a barrage while they were still clustered round the smoking wrecked Italians. The RAF continued to put in a reluctant appearence with only one aircraft showing up on 75% of the calls.

Steve H dispatched the 222 platoon, but with the assaulting Aussie armour shot together with half the infantry and the nearest objective removed, the game was a clear cut Axis win.

Thanks to Steve M for a very enjoyable and instructive game.

Sunday 28 November 2010

Omaha Easy Green Beach

The second game in the Firestorm Campaign was fought last weekend and Omaha proved a tough beach to take.

US Forces had eleven turns to capture their objectives via the defences at WN66 and the E3 draw. The Americans had an early success with the naval bombardment knocking out the beach front gun bunker and causing fires on the bluffs overlooking the draw providing an effective smokescreen. The effect of the pinning fire also enabled the first platoon ashore to get to the sea wall and start demolition work against the wire.


Then in turn 2 the Germans woke up and let rip, with the 352nd on the bluff chucking out twenty two D6 per section of ten men needing 6's to hit. Needless to say the US troops on the beach started to take heavy casualties and only got off the beach on turn 6. The DD tanks stayed on the surf line risking drowning in the incoming tide to trade shots with the 5cm gun in WN68. The German gun eventually came out the winner with crew taking to their rifles when they discovered they didn't have any HE to lob at the US infantry.


Things were looking bad for the Yanks when the US Navy got into the battle with their AOP plane calling in a bomardment on WN66 and taking out a section. The fire from the defences slackened and the Rangers got into "Bingham's" house at the entrance to the draw. They eventually led the assault on WN68 and its troublesome gun, forcing the German commander to consider falling back on his reserve platoon and defend the last objective in the last moves of the game.


Unfortunately for the Germans the US Navey again grabbed the initiative and broke the final stand, allowing the Yanks to grab a win on the last turn of the game.

Thanks to Mike, Steve and Will for a very enjoyable game


Monday 8 November 2010

Plastic Soldier Company Ltd 15mm Rigid Plastic

Painted Plastic Soldier Company Ltd 15mm rigid plastic WW2 Soviets

Size comparisons: Painted PSC, Unpainted PSC, More Painted PSC, Painted Battlefront and the fat boy on the end with the tuck box is from Peter Pig !
Vince

Saturday 9 October 2010

October 2010 Meeting - Winter War

Chas and Steve M attempted to storm famous "Polar Bear" bunker on the Mannerheim line, in this 2500 point FOW Winter War game. Andy tried to survive long enough for reinforcements to arrive.

This was a Winter War game to the "Hold the Line" scenario in the FOW rule book.


HERE THEY COME -


Andy, keen to get in shot, poses for the camera, as the Soviet horde gets uncomfortably close to the line. Frustrated he returns to the field telephone in his bunker to check if my men have left Helsinki yet.

A LITTLE HELP HERE -

A couple of hideous turns for the Soviets see Chas and Steve remember they have left the gas on in Leningrad.


HOME TIME -


A good bash, with the Soviets getting close, but being check by accurate fire from the A/T guns in the bunkers and fire from the infantry in the trenches. That said, the Fins looked in trouble when they lost the A/T gun platoon and the HMG platoon in the trenches.
Despite it all we weren't so cocky until the landships were burning though !
I decided Andy was doing so well I would leave my troops in the box until turn 4. Glad I bothered to paint them.............
Vince

Steve M and Chas attempted to storm part of the Mannerheim line, which Andy defended whilst awaiting the arrival of reinforcements.

This was a 2500 points a side FOW game based on the Winter War fighting in Finland.

HERE THEY COME


Jon's Book Reviews

The Odin Mission by James Holland, the first of the Jack Tanner series. This is the WWII Sharp, which features Sgt Jack Tanner in a mission set during the ill fated Norway campaign in 1940. Really good read, with plenty of historical detail to capture the feel of that campaign. A must for holiday reading.


The second book in the series is now out in paperback which sees Jack Tanner and his company plunged into the Dunkirk campaign where he comes up against two villains, one German and a member of the SS and the other a senior NCO from a previous encounter during his service in India. Great read, that again follows the events of history.


18 Platoon by Sydney Jary was first published in the late 1980s following a platoon re-union, and describes the young Sydney Jarry taking command of 18 platoon of the Somerset Light Infantry part of 43rd Infantry Division in Normandy just after the division had suffered terrible casualties at Hill 112. Jarry after being told he would only survive a few days in combat went on to command the platoon to the end of the war in Germany. This is a really good description of a British infantry platoon in action 1944-45 in Europe and is reccomended reading for todays young subalterns.

Books focussing on the German Infantry forces in late war Europe at the platoon and company level are very rare, so this book looking in particular at the fusilier battalion of the 272nd Volksgrenadier Division was a great find. The book was able to draw on a unique discovery made after the Berlin wall came down of an old suitcase containing the battalion records of this particular unit that would have been kept by the company clerk. In most cases these records were destroyed at the end of the war, but remarkably these survived to enable a phorensic reconstruction of the personel that were recruited into one of the first Volksgrenadier divisions that was hastily thrown into the fighting in the Hurtgen forest.
The book follows and charts in detail the small scale actions the various companies in the fusiliers fought against the Americans allong side the other units in the division, ending with their final surrender in the Ruhr pocket.
Facinating read and reccomended for those interested in the period.

October Game, "Kiss Me Hardy" Play Test

This month gave us a chance to get the sailing ships out and playtest the rules from the Two Fat Lardies, "Kiss me Hardy". The scenario was the free one available on the Yahoo discussion group which pits four British 74s against four French 74s and two 80s. The victory conditions being who could inflict the most damage to the other side. The two forces sailed on to the table in line ahead, with movement, firing, strike tests, boarding attempts and damage checks being carried out in the move as governed by the turn of an appropriate card. I really like the card system as it removes the need to write orders, and events occur in a totally random sequence in each move. The rules are simple to follow without being simplistic, and we picked them up really quickly. We all thought they would make it easy to play with large numbers of ships on the table.


Our game ended with two British 74s badly damaged and forced to strike, and two French ships badly shot up. The photos illustrate the close broadsides being swapped and a fair amount of rigging ending up overboard.


We thought about adding some command and control rules in to govern formations that the sides could use, which should be an easy addition to make. We will run another game next month to get better acquainted with these very nice rules.

Friday 17 September 2010

New Donnigton 100 years war in 15mm at Colours 2010


Following our regular club meeting on Saturday several of us travelled to Newbury on Sunday to visit "Colours".
I have attended this show for many years and it continues to be a good day out, at an easy to get to venue, with good games and traders.

Whilst browsing the show stands at the end of the day I was attracted to the Donnington stand as I still toy with the idea of putting together a 15mm Wars of the Roses collection. It was then I spotted these beautifully painted minis and I thought you might like a look.


These models were also featured in Wargames Illustrated.

Very Nice!!

September Game, Tel el Eisa

Battle of Tel el Eisa First Alamein 1942

Steve M held a FOW desert clash between the Ausies of 9th Australian Infantry Division and the Italian Sabratha Division supported by elements of Afrika Korps.


This battle represented the crumbling attacks carried out by General Auckinleck to hold Rommel's forces in a battle of attrition, forcing him to commit his mobile armoured reserves to bolster his Italian allies.


Auchinleck attacked again on July 10 at Tel el Eisa in the north with the fresh 9th Australian Division. 89 Germans of the 621st Radio Intercept Company and 835 Italian troops that were largely part of an infantry battalion and artillery group of the "Sabratha" Division were taken prisoner by the Australian 2/48th Battalion under Lieutenant Colonel H. H. Hammer. A battalion of the Italian Bersaglieri was committed to plug the gap and initially recovered some of the lost ground at Tel el Eisa and even took 13 prisoners. According to the 2/48th Battalion diary: "[a]t approx 2000 hrs enemy tks-number unknown-and inf attacked D Coy front. They overrun posn and enemy inf forced D Coy to withdraw and occupied their psn."[18] While the Bersaglieri suffered heavy losses, it bought time to allow the Italian XXI Corps to rush in a battalion of the "Trieste" Division and L3 and M13/40 tanks of the 3rd "Novara" Armoured Group and Major Gabriele Verri's 11th Armoured Battalion to affected sector and seal off the Australian breakthrough.[19]

The picture below shows the initial Italian position upon their ridge with wire out front. As in the original action the Aussies attacked at night struggling to get their vehicles up to the ridge without bogging in the broken terrain.


The position was penetrated on the Italian left, but the leading Aussie platoon was destroyed carrying the position.The ridge was consolidated by the Crusader and a follow up infantry platoon, both having doubled to get to the ridge.


On turn 6 the German armour with Bersaglieri infantry turned up and we ended up with a historical result, with Aussies on the ridge but unlikely to penetrate the position further. However the German commander had been forced to bring up the Panzers, losing a Panzer IIIJ for his pains.


Good game Steve, a very enjoyable encounter.


Tuesday 17 August 2010

Operation Bluecoat July Game

Hi all,

I was aware there wasn't a game report for July so have included some photos and brief report on the game and outcome.

Hill 192, Maisoncelles is a scenario from Olivier Perronny and pitches Guards Armoured Division against 9th SS Panzer Division during Operation Bluecoat, August 1944. The ptwo pictures below show the three objectives of the Guards, the most important being the 88mm gun on the hill, the other two being the road junctions. The other picture shows the initial set up with Guards position in red and the SS in blue.

The Guards attempted to push into the village of Maisoncelles with their tanks supporting the leading platoons, only to come under withering fire from the panzergrenadiers in the hedgerows. The casualties on the Guards started to mount and seeing that the objectives could not be achieved after the losses sustained, the Guards attempted to make an orderly withdrawal, only to fail their morale checks and leave the field in a disordered state. (that's Guards speak for rout).


Sunday 15 August 2010

Juno Beach Nan Red

Hi all,
A report on yesterdays game at the club which launches our Firestorm Normandy campaign
Juno Beach was the initial assault and the St Aubin sur Mer stronghold WN27 defended by a platoon from II/736th Grenadier Regiment, with a 5omm bunker gun, one 37mm tank turret bunker, an HMG tobruk, Pak, HMG and mortar support. In addition two pre-planned artillery strikes were available from the 7/1716th Artillery Regiment inland at Beny sur Mer with 4 x 100mm howitzers.
The Canadians consisted of a company from the North Shore Regiment supported by "funnies" and Royal Marines from 48 Commando, with a preliminary naval bombardment and artillery and air support.
As in the actual battle, the fight was a costly affair with the Canadians struggling under AT and mortar fire to scale the 13 foot high sea wall and penetrate the only exit of the beach which was mined and wired
The initial assault by the leading platoons and funnies succeded in creating two breaches in the wall and knocking out the 50mm AT gun but at a cost of the two platoons and supporting armour. The follow up armour a nd two further platoons succeeded in exploiting the breaches using CRABs and infantry to break into the position. This was not helped when they were mistakenly attacked by their own air strike.
The Tank Turret bunker was particularly successful at disabling several AVRE's and breaking up several infantry assaults on the forward wall.


The final blows inflicted on the Canadians was a pre planned artillery strike on the beach which knocked out half a platoon, and a mortar strike which wiped out the HMG platoon from the Cameron Highlanders of Canada just as they disembarked from the landing craft.
However by turn 6 the pressure told and the final morale check by the German defenders was failed prompting the surrender of WN27 as the Sherman Crabs and infantry started to break in.
If the losses sustained are broken down in thirds Killed/Ser.Wounded/Lt.Wounded, the Canadins suffered over two platoons worth of killed and seriously wounded taking the position.