Sunday 29 April 2018

The Battle of the Plains of Abraham, Quebec 1759 - Black Powder


Having played a number of skirmish games using my French Indian War (FIW) collection, I wanted to find a set of rules that could handle more of a ‘ field battle’. I also needed to find a battle or scenario to experiment with.

Actual ‘battles’, using formed, regular troops in the FIW are quite limited. Quebec, or the ‘Plains of
Abraham’ was the obvious one but using the historic scenario & set up would not make it much of a
game!


Then, while browsing the Warlords games website, I came across a scenario from the author of the
Black Powder (BP) supplement ‘The Last Argument of Kings’ (Pete Brown) for Quebec

http://articles.warlordgames.com/french-indian-war-alternative-quebec/


I looked at our usual skirmish sets, ‘Sharp Practice’, ‘Muskets & Tomahawks’ & ‘Donnybrook’, but
didn’t feel that they’d really fit what I was after. ‘Maurice’ was another option, but the FIW didn’t
lend itself to that type of game (in my opinion!)


So, being that the scenario was written for BP, BP it was! There are a few options in the scenario;
more French troops are released from the City, reinforcements (which did arrive at the end of the
actual battle) are available immediately or turn up early, or the one I went with; dice to see which
British troops are deployed, which simulates either the French reacting quicker, or the British taking
their time to get up from the landing point. In addition, the French don’t know how many troops are
in position until they crest the ‘Buttes a Neveu’.


If you are familiar with BP, you will know that each troop type is allocated factors for firing, hand to
hand, stamina, morale etc. There are provided in the scenario, but I tweaked them slightly for the
game, with my ‘take’ on things. I also had to use what forces I had available, so again they did differ
slightly from the scenario. I gave each force one gun, that’s all I’ve got! And allowed them to allocate
that to any brigade. Just to note, the author of the scenario uses rangers on the British side and
Indians on the French, I can find no reference to either on my research, but stand to be corrected!


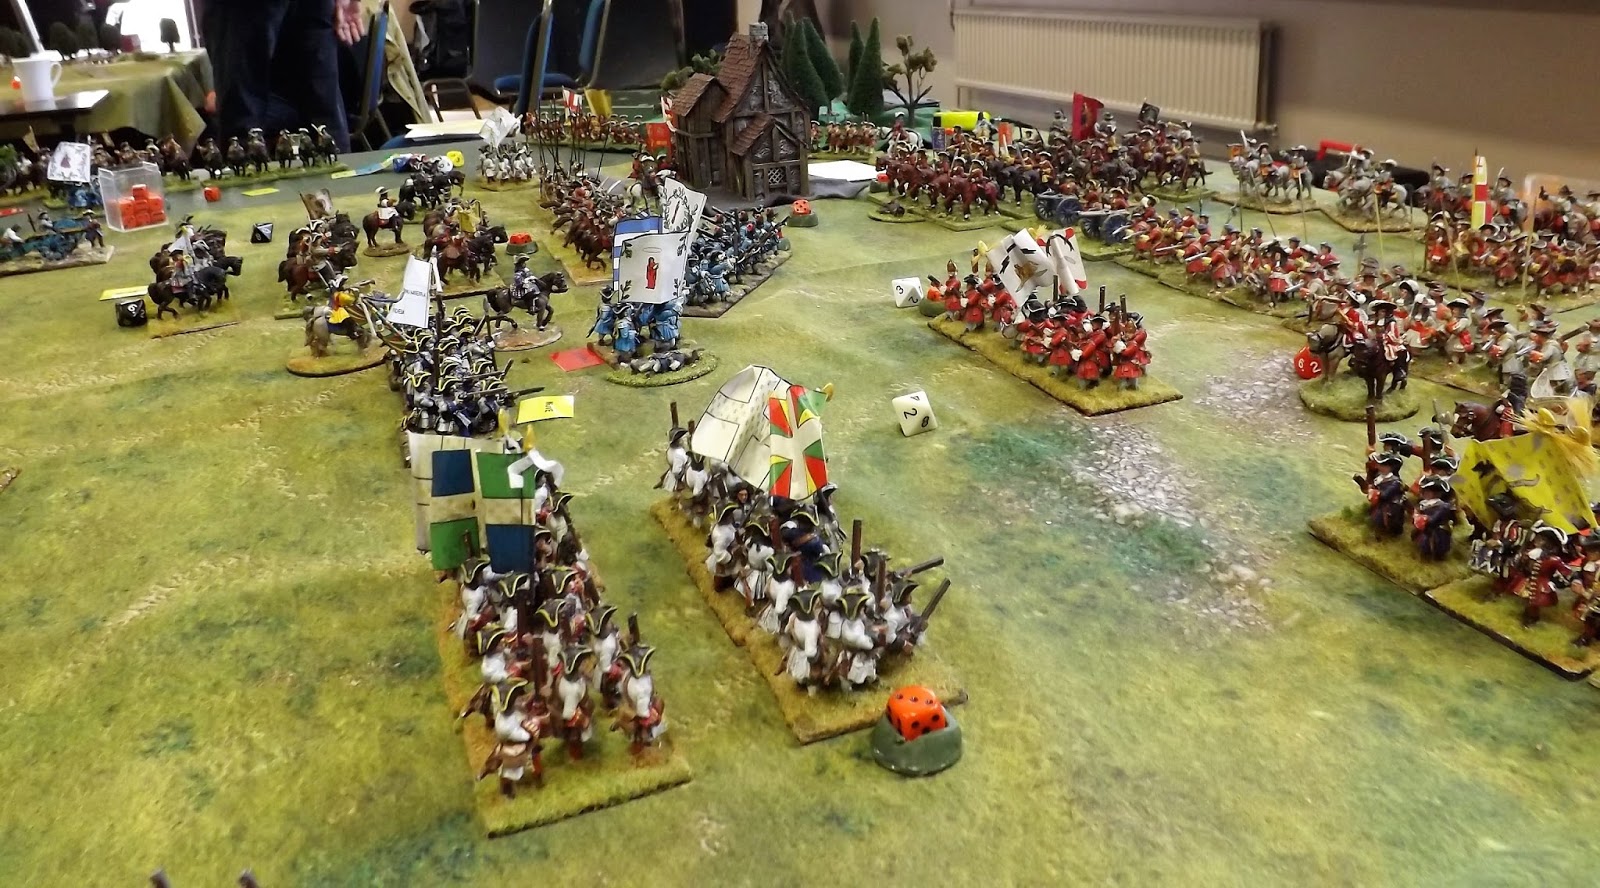
The battlefield, played on a 6x4, is pretty simple; Buttes at the Quebec end, with scrub on either
flank and Sillery wood behind the British, with a couple of roads. I did tell the players that French
reinforcement’s may turn up on the left, as you look towards the Buttes, but in the end I held them
off table.


On the day, Ian took the British and Steve L the French. Ian rolled 2 D6 to see how many British battalions would be deployed and rolled a 4. Not brilliant, but that did nicely equate to one brigade, to which Ian allocated the gun. Ian told me where he wanted to deploy them, but they wouldn’t be on the table until the French crested the Buttes. The other two British brigades would arrive in march column along the right hand road.


Steve deployed his three brigades on the table edge, but then only the centre one moved forward, but
far enough to view the deployed British. Next turn the British columns decided they didn’t feel like
getting into battle straight away, so a bit of a stalemate occurred, although they British gun did
cause a casualty on one of the French regulars.


Steve managed to get all his brigades moving and the British came up from the beaches, deploying
behind the right hand brigade, to form a line running across the battlefield.


Both forces closed to musket range on the British right, while the artillery caused the odd casualty.
The French initially got the worst of the exchange but manage to rally off hits before they became
‘shaken’.


On the British left, a Canadian militia battalion closed in on a British line btn for ‘hand to hand’,
Although the militia broke as expected, the British were also pushed back, which was the story of
Ian’s day pretty much!


Across the field now casualties started to mount, the British in particular finding they were having to
miss firing opportunities to rally off ‘shaken’ markers, by attaching brigade commanders. Of course, there is always a risk, and so it was that General Townsend on the British right flank went down, to be replaced by a lesser officer.


On the far right of the British line, the Scots light infantry charged a French marine battalion, the French lost and retreated, but the Scots, also shaken, failed their break test with a ‘3’!

In the centre, the Scots line battalion and the 60th ft also closed to contact. Again, although the French were pushed back, the British were ‘shaken’ and managed to roll 2 ‘3’s again on their break tests!

At this stage, although starting with a numerical advantage, the British were down four battalions broken to two French, and a lot of the British battalions were not in a good state! We called in a day, victory to the French and history is reversed!


Thanks to Ian & Steve L for a good game, played in a gentlemanly manner and Bob, another club
member, for allowing me to use his British Grenadiers, Light Infantry and some French. I may not
have played all the rules exactly to the letter, and probably forgot a few, but I certainly enjoyed
running it.

Terrain mat is by ‘Tiny Wargames’. My figures are a mixture of 1st Corps, Galloping Major, Warlord,
North Star and Redoubt. Not all compatible in size close-up, but work in their own units.

If, like me you thought the FIW was ‘done and dusted’ after the Plains of Abraham, then think again!
The following year the French came back to try and retake Quebec and what is known as the ‘Battle
of St Foy’, where the attacker/defender roles are reversed, took place. That’s on my list to put on as
a game, but if you want to know more, look at the Osprey ‘Combat’ series, ‘North America 1755-63,
British Redcoat verses French Fusilier’.

Steve M

Sunday 22 April 2018

Siege of Lille 4th September 1708 - Beneath the Lilly Banners v3

John Churchill, 1st Duke of Marlborough - Adriaen van der Werff
Chas took us to back to his days in Louis XIV army and the siege of Lille.


Eugene had completed lines of circumvallation round Lille and had been investing the city with a force of 53 battalions of infantry, 90 squadrons of cavalry and over 100 artillery pieces.


Marlborough meanwhile, commanded a force of 69 battalions, 140 squadrons and a few batteries of
artillery, some miles away, blocking any French relief force approaching from the south.


On the 29th of August, two French armies joined at Grammont and marched on Marlborough's
position. On the afternoon of the 4th of September this force came within sight of Marlborough's lines.


The French were not all in position, but still outnumbered the duke by more than two to one.
Both Berwick & Vandome judged it too late in the day to attack and resolved to give battle the
following day, when all their force had arrived.


That night Eugene responded to an urgent request for assistance and twenty-six battalions of infantry and seventy-two squadrons of cavalry arrived from Lille. A further seven battalions of infantry arrived from a position on the Brussels road.


Now the French 125 battalions and 243 squadrons faced 102 battalions and 232 squadrons on the
Allied side. Despite much posturing for nearly two weeks, the French decided little could be achieved
and withdrew, leaving Lille to fall.


Our "what if" battle assumed the French arrived earlier on the 4th September and attacked, with an
urgent request being sent to Eugene at first sight of the enemy.


Chas and Si played the dastardly French (I can't say Si's heart was in it) and myself and Nick took the
Allies.


Our forward line was anchored on two hamlets and a fortified village, which were garrisoned by infantry.

The main Allied body deployed from the table edge and moved to cover the gaps round the built up
areas.


Both side's artillery were soon firing and the Allied infantry in the houses were soon glad of the hard
cover. With few Allied guns available to reply, the casualty count was in favour of the French.


French infantry now joined in with musket fire and a Dutch Guard battalion was starting to suffer.
With everyone but Chas agreeing that cavalry couldn't hope to take on fresh infantry, Chas decided to
throw the manual out of the window and charge the British infantry under Nick with cavalry. Slowly
but surely a full cavalry brigade was fed into the meat grinder, blown away by squadron and
consigned to the casualty roster. It looked like everyone else was right.


Undaunted, Chas charged one of the hamlets, bounced, charged again, routed and moved up a fresh
battalion. Rinse and repeat. You get the idea.


Meanwhile, with Eugene's newly arrived battalions moving up, the Dutch Guard battalion was given a Form" order, put into column of march and looked to get the hell out of Dodge. At this point I saw Si had turned over a "Form" order for the mounted dragoons facing my Dutch Guard. I thought, "He's a bloody mind reader. He is going to form a column to avoid the rough terrain and charge me in the
rear. " Seconds later I realised I had over-thought the situation and breathed a sigh of relief as the
dragoons dismounted to fire on me.


I pulled my cavalry off table, to let Eugene's infantry through.


Now the French charged the large village in the centre, got blown away, went back to shooting and
decided this wasn't much fun either.


With Eugene's men moving into the built up areas, the French conceded and withdrew.


Looks like Vandome and Berwick knew what they were about all those years ago.

Many thanks to Si and Nick for playing in a style that befits gentlemen and to Chas for putting it all
together.

As a first try of version 3 of "Beneath the Lily Banners", things went well, but then I have always liked those rules in their previous incarnations too.

Nice to see all the toys on the table.

Vince

Sunday 15 April 2018

Battle of Lympstone Cross - 896 AD


Yesterday was an opportunity to get the Saxon/Viking collection out on the table for their first game of Dux Bellorum, a rule set I have been ken to play again since my first go with the rules back in November last year, courtesy of Nick and Steve L.

http://devonwargames.blogspot.co.uk/2017/11/dux-bellorum-arthurian-wargaming-367.html


Until you have set up your own game using rules new to you, you only have an image of the game in the minds eye to go by, so I arranged with Mr Steve to bring his collection of Scots & Irish just in case my collection was not enough to cater for our two players aside.

As it turned out the collection was plenty enough to cope and we fielded two forces, just over the standard forces recommended in the rules which gave a thoroughly entertaining game.


I threw down some terrain to recreate the terrain required for the River Battle scenario which in our case re-imagines the little known battle of Lympstone Cross here in East Devon which occurred during 896 AD and the abortive raid by a six ship Viking force that had based itself on the Isle of Wight.

The battle between King Alfred's new navy and the Viking ships in an estuary on the south coast fits very well with the theory that this occurred in the River Exe along the coast that had suffered most heavily form the recent incursions.

Some of the raiders escaped the naval battle and tried to make a break for it over land only to be met by the local Saxon Fyrd on a tributary of the Exe close to the hamlet of Lympstone.

Both sides were eager to get this clash over with (both sides were warrior rather than shield wall) as the Vikings were desperate to escape and the Saxons were eager for revenge with the sound of shields being clattered as the two sides faced off across the shallows and ford.


The Saxon aggression proved the superior of the two forces and their warriors formed up into two distinct groups rapidly pressed forward into the river.


The first warriors to close were met by a hail of arrows, javelins and sling-shot with the first casualties caused. This however had no effect on the closing lines that simply pressed together into the gaps caused by the fallen and pressed on.


As the lines of warriors drew near both sides seemed to release the leash on their men who needed no encouragement to charge in (warriors at three base widths will charge automatically unless restrained with a successful bravery test).


As the two sides ripped into each other the mayhem was only added to as both sides attempted to use their skirmishers to pepper the opposition line looking to add to the hits from the heavy infantry.


Both commands had the option to use their leadership influence to defend against casualties or add to the chances of inflicting them, with the latter option being by far the more popular.

This inevitably led to large gaps appearing on the bases as more and more warriors fell and the inevitable removal of bases.

Added to this was the disruption caused to the neat lines formed by the groups as the fighting swayed too and from over the river, breaking up any neat formations into smaller group fights between opposing troops.


The two lines of warriors happily singing axe and sword gave a really bloody and exciting struggle with the result in the balance right to the end when both sides were facing morale collapse, but with the Viking forces having formed troops closest to the ford still on the battlefield to claim a Pyrrhic victory.


The chaps seemed to really enjoy playing this rule set and with the majority of us new or relatively new to the rules it was great to see the play become more and more intuitive as the sequence and system became more familiar.

The rules are simple without being simplistic and the mechanic of reinforcing the various groups with Leadership Points to influence events in the players favour really adds a lot to those all important player decision moments.


The game plays fast and furious and would be more than capable of handling larger groups of players which is an advantage in a club that likes to bring lots of players to the same table.

We managed to finish this game and play several more rounds of a second game where Mr Steve and myself played two shield wall armies against each other which produces an entirely different game to the one reported.


I even chose the option of constructing a smaller but more combat effective force of Vikings with the maximum amount of Leadership capability to test it out against a more numerous but less effective Saxon line. It was surprising to see how effective a small group of experienced well led Vikings could hold off a larger group of enemy and the grinding battle two shield walls create.


I really like this rule set and can see myself playing them more often and now need to get a bag load of casualty figures to sprinkle around the areas of fighting to better portray the action.


I have put together some more thoughts on these rules on JJ's Wargames together with some ideas on play aids to aid setting up and overseeing the game.

https://jjwargames.blogspot.co.uk/2018/04/dux-bellorum-at-devon-wargames-group.html

Thanks to Mr Steve in helping to run this little outing and bring along his extra figures and to Jason, Nathan, Bob and Chris for providing a really entertaining game.