Sunday 29 May 2016

18thC Ottomans - 15mm Figure Comparison

L to R - Old Glory European, Old Glory Anatolian, Fire & Sword  Segban, 15mm.co Azab
Wargaming the 7YW in 15mm is something I have been doing now for a few years and have almost exclusively been using Old Glory figures to do so. My Allies v French armies, after two reinforcement upgrades, are now finished (for now) and I was looking around for something new to start up that was in the same time period.

I decided on Russians v Turks however neither Timecast nor Old Glory USA have any pictures of their 15mm 7YW era Ottomans on their website and all my internet searching for any pictures of their figures elsewhere came up blank as well.

With no other option I bought up a few bags of various key types to let me have a look at them before getting that big order placed and then I thought, why don’t I do my bit for the betterment of mankind and post up some pictures myself, using the Devon Wargames club blog.

First up then are Sekhans/Sekbans:

Old Glory Anatolian Sekhans , made up of 3 poses and command figures
Old Glory Anatolian Sekhans - Close Ups
By Fire and Sword pack of Segbans
By Fire and Sword Segbans - Close Ups
Old Glory European Sekhans, only two poses in this pack and the command
Old Glory European Sekhans - Close Ups
Along with the two versions sold by Old Glory I also bought some from the new “By Fire and Sword” range and a few suitable figures of Azabs from 15mm.co.uk (The ones from By Fire and Sword and 15mm.co.uk are from their Renaissance ranges but do just fine).

Various Azabs from 15mm.co.uk
Old Glory and By Fire and Sword mix well together, unfortunately 15mm.co.uk figures are too small.

I still have more figures to buy , Janissaries, Sipahi, Tartars etc. however I was thinking that as the weather is slowly improving I could perhaps justify having a nice day out in the Shrewsbury area, taking in a pleasant lunch somewhere on the River Severn and popping into Timecast whilst I was there. (Hmm, probably better if I go to Timecast first).

I will post up more pics later on this site as the figures become available.

This was a Mr Steve Figure Comparison Production

Saturday 28 May 2016

Washing the Spears - Final Zulu Warm-Up Game


This month, the third game run at the club was another warm-up game for our Summer Time Excursion to Chez Chas in North Devon where this year's game will be Zulu themed.

For our big games the stress is very much on playability and fun and therefore warm-up games are very important to stress test the rules and fine tune the scenario parameters so that we are all ready to go on the day.

I grabbed a selection of pictures from the game and present them as a warm up for the full thing next weekend with an AAR to follow on JJ's Wargames

Oh and it wouldn't be a Zulu game if we didn't warm up the best quotes for the day.

Zulu's in sight, the British Imperial force circles the wagons
Capt. Frederick Scheiss - "A Zulu regiment can run fifty miles and fight a battle at the end of it" - Pvt. William Jones - "Well there's daft, it is then. I don't see no sense in running to fight a battle".
Bromhead - "You mean your only plan is to stand behind a few feet of mealie bags and wait for the attack?"
Pvt. Thomas Cole - "Why is it us? Why us? - Col.Sgt. Bourne - "Because we're here lad, Nobody else. Just us"
Lt. John Chard (The Zulus are chanting before their final charge) - "Do you think the Welsh can't do better than that, Owen?" Pvt. Owen - "Well they've got a good bass section, mind, but no top tenors, that's for sure."
Col.Sgt. Bourne - "Mark your target, face your front"
Lt. Gonville Bromhead - "Sixty! We dropped at least sixty, wouldn't you say?" Adendorff - "That leaves only 3,940"
Col.Sgt. Bourne - "A prayer is as good as a bayonet on a day like this."
Lt. John Chard - "The army doesn't like more than one disaster in one day." Bromhead - "Looks bad in the newspapers and upsets civilians at their breakfast."
Col.Sgt. Bourne - "It's a miracle." Lt. John Chard - "If it's a miracle, Colour Sergeant, it's a short chamber Boxer Henry point 45 calibre miracle." Col.Sgt. Bourne - "And a bayonet, sir, with some guts behind."

And finally when it's all over and the roll call of survivors is taken.
Colour Sergeant Bourne - "Hitch.... Hitch, I saw you. You're alive."
Pvt. Fred Hitch - " I am? Oh, thanks very much."

Saturday 21 May 2016

Battle of Binh Ba, 6 June 1969, Vietnam - Chain of Command


Over the past year we have played several games in the 1958 to 1980 “Retreat from Empire” period,
however we hadn’t tried a Vietnam game yet. Since our figures were British Commonwealth types,
we opted for an ANZAC’s v Vietnamese scenario. After some research the Battle of Binh Bah, looked like an interesting scenario, especially as it included some urban warfare. We used the ”Chain of Command” rules, by Two Fat Lardies, with their “Bush Warfare” supplement and borrowed ideas from their Vietnam War rules “Charlies Don’t Surf”.

Other sources covering the Battle of Binh Ba
https://en.wikipedia.org/wiki/Battle_of_Binh_Ba
http://vietnam-war.commemoration.gov.au/combat/binh-ba.php
https://www.youtube.com/watch?v=pK8TJFMs51c
http://www.5rar.asn.au/narrative/Battle-of-Binh-Ba.pdf


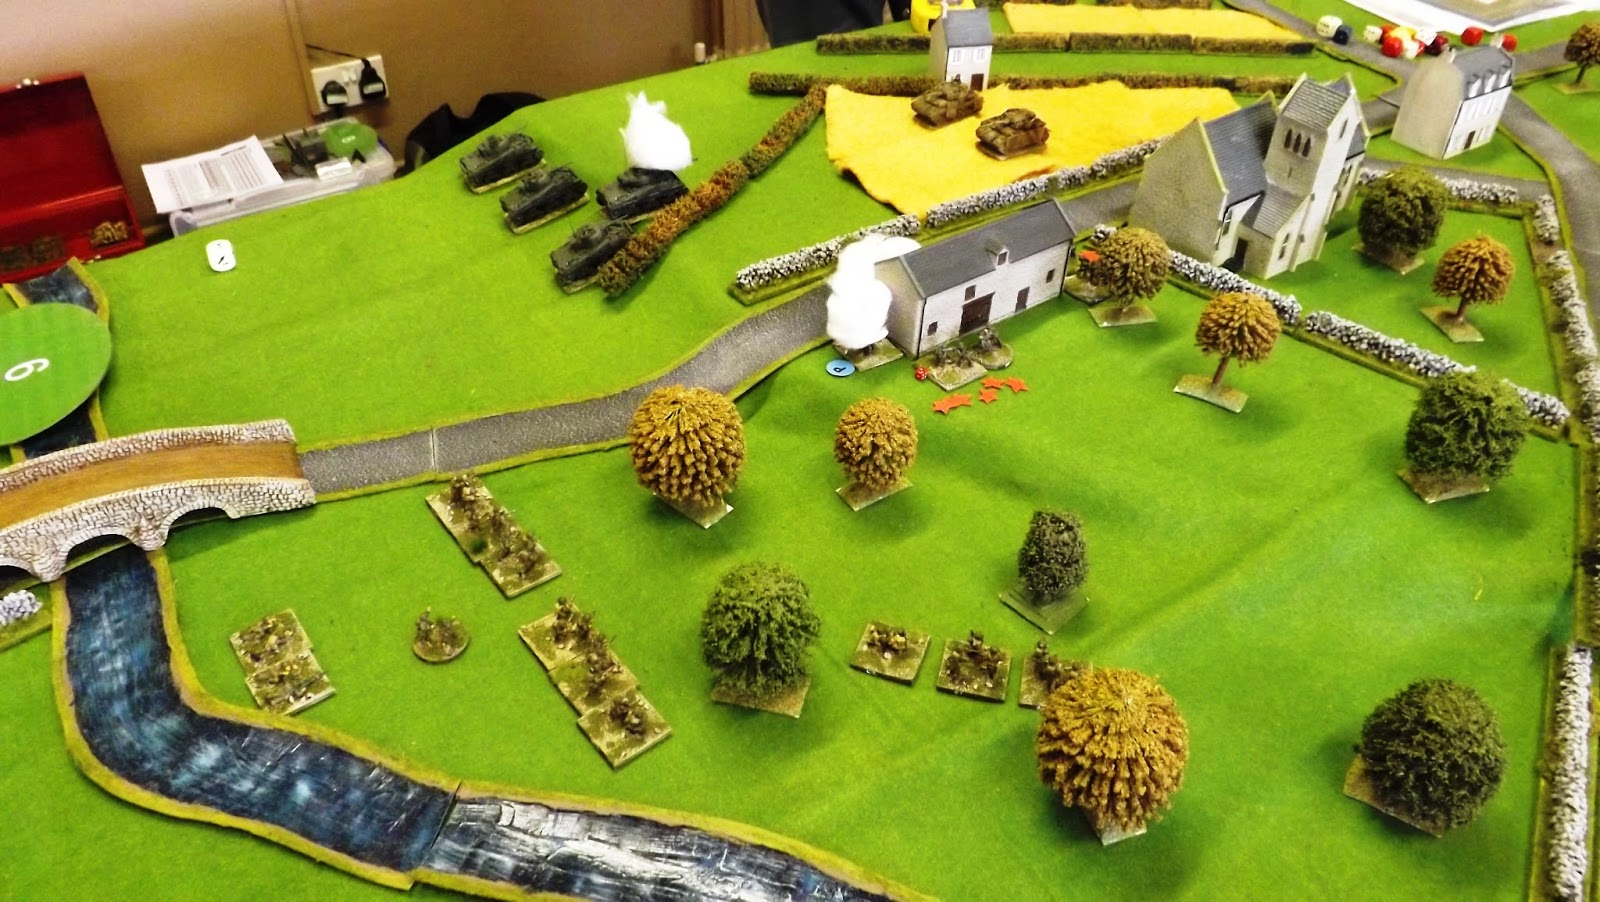
The ANZAC’s morale started at twelve, and the Vietnamese at eight. The Vietnamese had the first move and deployed local troops into the tunnel system under the village. The ANZAC’s cautiously advanced through the paddy fields, with the support of Centurions and M113’s. The first Vietnamese section took up position in a reinforced building overlooking the paddy fields and opened fire on the ANZAC infantry, but with no effect. The ANZAC’s returned fire and very soon the Vietnamese had suffered many casualties and the building was on fire too.


Gradually more Vietnamese units arrived on the table, and moved into defensive positions around the
village, often using the tunnel network for extra safety. The village commissar and political officers
stiffened resistance by improving the morale of local Vietnamese units too. The Vietnamese fired on
ANZAC infantry whenever they saw them and the ANZACs replied with the withering fire
characteristic of western forces. At close range the accuracy of the Centurion tank’s fire control
system allowed the ANZAC’s 1/3rd chance to fire HE rounds though doors and windows, with
devastating effect on those inside.


Once the ANZAC’s reached the village buildings they started to search for the tunnel entrances, with
the assistance of tracker dogs. Sometimes they were immediately successful, others times less so,
causing them to slow the advance. The ANZAC’s were reluctant to move far into the village leaving
uncollapsed tunnels behind them. One ANZAC unit set-off a booby trap hidden in a grove of banana
trees, but lucky for them, nobody was hit.


By now more heavily armed regular Vietnamese elements had started to arrive, with their RPG
teams. The grid road layout made spotting the ANZAC’s easy, even if the range was long. The first
RPG team engaged an M113 at the far end of the village, but missed. The M113 gunners returned
fire, but the RPG team was not eliminated. By now a second RPG team had arrived and both RPG
teams fired at the same M113, with the second team immobilising the vehicle and forcing the
passengers to de-bus.


For some reason both sides seemed to accumulate chain of command points quickly, these points
allowed them to carry additional actions The Vietnamese took extra opportunities to fire on the
ANZAC infantry whenever they saw them, but the ANZAC’s soon hit on a far better tactic. If a
weapon firing at a target in a building, roles three 6’s, the building is considered to be on fire and
structurally damaged. At the end of the turn the building collapses and any occupants are in danger
of being killed. The ANZAC’s soon realised that, after rolling three 6’s which happened quite frequently given their enormous fire-power, to quickly end the turn.

Many local Vietnamese forces were killed as the buildings collapsed above them and those that escaped promptly routed. This proved a very successful tactic for the ANZAC’s, soon eroding the Vietnamese morale to zero and ending the game in their favour.


Aftermath
Victory conditions were expressed as a combination of military and political objectives. ANZAC
casualties added far more victory points to the Vietnamese than vice versa. Conversely the ANZAC’s
had to return the village to the civil authorities in reasonable condition and not to flatten everything in
full view of the CNN television crew, which they were successful in doing.


At the end of the game the Vietnamese had suffered many casualties to the ANZAC’s three. However, to reflect western combat medical support the ultimate fate of the three casualties was only determined at the end of the game; one was lightly wounded, one badly wounded and one KIA, so the ANZAC casualties were surprisingly light. This giving the ANZAC’s almost double the number of victory points and a clear win.


However the Vietnamese did manage to get the village commissar and political team clean away
too. A good game with a realistic result; the western forces winning the combat, but key Vietnamese
elements getting away.


Thanks to Stephen H and Jack for this game and report

Sunday 15 May 2016

Canadian VC - IABSM

Major David Currie (left with revolver in hand) oversees the surrender of German troops in St Lambert to Canadian forces 18th August 1944
Major David Vivian Currie VC

Perhaps one of the most iconic scenes that epitomises the closing of the Falaise pocket and the closing stages of the allied campaign in Normandy is the pictures of the end of the battle to take St Lambert sur Dives which saw the awarding of the Victoria Cross to Major David Currie.

The map below illustrates the significance of the little hamlet of St Lambert and it's taking by Canadian troops as being pivotal in preventing remaining German troops from retreating back over the River Seine and the Belgian border beyond.


The club is having a bit of a resurgence in playing "I Aint Been Shot Mum" just recently following a lot of games of its stable mate "Chain of Command" and for this game Ian pulled together his collection of figures and terrain to play the scenario "Canadian VC" that models the battle to take St Lambert and is featured in the main rule book.

Too Fat Lardies - I aint been shot mum

The map of the terrain from the scenario briefing

The village of St Lambert is described as a typical Normandy village with sturdy stone built buildings surrounded by open orchards and light hedgerows atop a slight rise overlooking a stream in the valley below it.

Major David Vivian Currie VC - South Alberta Regiment

The village was held by a "hotch potch" of German troops scraped together for the sole purpose of holding the route open for as long as possible.


Conversely the Canadian force is rated as Veteran and the motivation that rating brings would see the Canadian troops able to take the fight direct to the German defenders and very quickly gain the ascendancy. 

The table top interpretation of the map, with the Canadian entry road top right
So with the table set up and the forces deployed on blinds, we were ready to start. The Canadian troops would advance onto the table on and around the road leading over the three arch bridge.

There objective was to break the German force holding the village and take the crossroads at its rear, without being a broken force at game end.

The view of the village from the Canadian edge with the stream to their front, a likely bogging obstacle to tanks not using the bridges
With the objective in mind the Canadians advanced with a troop of Shermans under Currie (Blind 5) and an infantry platoon under CSM Mitchell (Blind 4) with the armour looking to cross the bridge and gain the dead ground under the ridge, whilst 'brassing up' the forward buildings to cover the approach of their supporting infantry.

Canadian forces moving into the village outskirts on blinds
Behind the lead units, the second troop of Canadian tanks (Blind 6) would move through the orchard on the Canadian bank to cover Currie's troop, whilst the 1st infantry platoon under Lt. Gill (Blind 2) would quickly follow over the bridge and make for the centre of the village on the right of Mitchell's platoon.

First contact as a Canadian Firefly is dispatched by the Panzer IV zug
Currie's troop were the first to bump the enemy, with their rapid advance over the stream, shooting up the first building and shocking the hidden German infantry on their passing; their progress was stopped by a fierce little duel with two Panzer IV's, that saw the German tanks get the better of it.

As the armour on the left 'bumps' enemy tanks the Canadian infantry moves in against the buildings under the cover of 2" mortar smoke rounds and plenty of small arms fire (note the red shock markers)
Currie quickly brought the other three Sherman Vs in his troop up to the ridge and their combined fire took out the two Panzers.

Meanwhile Mitchell's infantry, making best use of their veteran four action capabilities, poured on mass small arms fire at the first house on the road and then placed 2" mortar smoke in preparation for their assault on the badly shocked and pinned German infantry.

With the German infantry pinned and smoked off the Canadians prepare to assault
The Canadian infantry attack was irresistible when it hit, sweeping through the first building and wiping out the defenders. CSM Mitchell then formed his platoon into a fire base to shoot up the next German zug that left the cover of the nearby buildings to line the wall of the church yard in a desperate attempt to stall the attack.

The second German zug fell the way of their comrades, coming under fire from Mitchell's platoon and Lt Gill's platoon, before Gill lead his men forward with grenades and bayonets to clear the wall.

The Canadian attack is relentless with their infantry holding the centre of the village and their armour in support
The German defences were reeling under the assault and threw in their remaining assets to stop the rot.

The Tiger/Panther zug rumbled out into the fields on the German right to take up the fight with Currie's troop, quickly disabling one of the remaining Shermans and forcing the other two to retire to hull down on the slope, taking pot shots at the big cats frontal armour.

Major Currie's troop of Sherman's having knocked out the Panzer IV zug comes under fire from the Tiger/Panther zug forcing them into hull down positions. Canadian infantry set about clearing the village.
Meantime Lt Gill's platoon came under punishing machine gun and small arms fire from the three storey house on the crossroads, causing the first Canadian infantry casualties in the fight so far.

Hunkering down on the wall to their front, Gill's men returned the fire as best they could and were amazed to see huge chunks of masonry fall from the building as the first shells from Captain Redden's tank troop smacked into it as the Sherman tanks drew up behind their infantry.

Stalemate as the German armour is pinned by Currie and unable to break off as the remaining Canadian tanks and infantry take the German infantry apart.
Our gaming day was coming to a close and the bar beckoned when we assessed the end of our game.

The German defence was clearly unhinged with three of the five zugs written off and their remaining infantry zug under withering fire from Canadian tanks and infantry and little hope of relief from their remaining tanks who were pinned holding off Currie's troop.

The German ability to manoeuvre was now compromised as the loss of 60% of their forces had reduced the number of their force cards in the deck very much in favour of the Canadians who were now more likely to get the drop on their opposite numbers and so we called it a Canadian win.

German troops surrendered in St Lambert. The German soldier extreme right, grinning, looks particularly pleased to be out of the war 
The map below illustrated the Canadian attack and three separate actions that turned the battle leaving the Germans with a battered infantry zug at blue 5 and their two tanks at blue 4.


Tiger tank knocked out in St Lambert sur Dives
This scenario is a great historical battle to re-fight with good mix of troop types on the table and with Canadian infantry carrying their 2" mortars allowing us the chance to practise the rules using them.

IABSM produced a fast moving unpredictable feast as usual and allowed us to do a bit of tag-wargaming as I was able to hand over command of the Canadians for the first part of the attack to prospective new member Simon, who joined us early in the day, whilst I went off to photograph and record events in the other games being played.

The sole remaining German infantry zug, holding out on the objective but badly battered from infantry and tank fire
Thanks to Ian for pulling the game together and for Steve and Simon in making another pleasant day of gaming at the DWG.