Saturday 19 November 2011

Sidi Rezegh - Witches Cauldron

Steve and I played the "Witches Cauldron" mission on Thursday night with the game based on a 7th Armoured Division Jock Column commanded by Brigadier Jock Campbell VC, occupying ground on the Sidi Rezegh airfield and bracing itself for the inevitable counter attack by the Panzers of 21st Panzer Division.
The Sidi Rezegh Battlefield
The Witches Cauldron has the defenders placed in the centre of their half of the table with two objective markers placed by the attackers. Once the defender has deployed the attacker dices to randomly deploy his initial forces to come on the table from the opposite edge or from either flank, with a 5 or 6 allowing a choice. The attacker can deploy up to half their forces with the rest coming on as reserves from turn 1. The defenders reserves cannot start testing before turn 3 and will arrive from the opposite table edge.

The Panzers are on the flank
The German placement die rolls produced fives and sixes allowing for the whole German force to arrive on the British left flank, the nearest to the two objectives and completely unhinging the defence set up. The two objectives were the building and sandbag emplacement either side of the soft sand area in the picture below.

The British set up with 25lbrs behind the infantry

The British position from the German perspective


Turn one saw the British ambush force (a troop of three A13s) immediately revealed (they have to be declared in turn one) and after a brief exchange of fire with the Panzers just as immediately dispatched.
The A13s in ambush are eliminated by the German tanks

The Panzers move in on the British Gun Line
The destruction of the British cruiser tanks left the 25lbr gun line as the main anti-tank defence to the infantry dug in on the airfield. These were supported by the infantry Boyes AT rifles. However the combined assault by the Panzers and Panzergrenadiers supported by the Stukas took its inevitable toll. Two of the guns were quickly neutralised for the loss of a Panzer II.
The Luftwaffe add to the destruction
As the battle waged furiously around the first objective, with the Panzergrenadiers seeking to drive off the British infantry and secure the ground, the British reinforcements appeared on turn 5. However the whole of the German force was on table at that stage and the German battery of four 105mm howitzers placed a smoke screen down to seal off the objective area from the onrushing Honeys.
The British reserves get smoked
With the objective taken in turn 6 and the Panzer IIIs in support of the two Panzergrenadier platoons, we called it a night.

The Panzers and Panzergrenadiers consolidate on the objective (the small round sandbag emplacement centre left)
Thanks to Steve for a fun game and "bearing up" whilst the God of Dice kept serving up the Afrika Korps fives and sixes. It just happens like that sometimes.
Jon

Sunday 13 November 2011

Fire and Fury in the American Civil War

Hi all,

In addition to our Malayan Emergency Game this month, Jack laid on a 28mm Fire and Fury ACW game in preparation for the "Big One" in December as our annual Xmas game where all club members can come together on one table.

This year Nathan is organising an ACW big game using Fire and Fury rules so to get things warmed up for December, I grabbed a few photo's of Jack's game.


Malayan Emergency

This months game was put on by Chas and featured a sharp little skirmish somewhere in Malaya during the Emergency 1948-1960 and gave us a chance to try out the "Force on Force" skirmish rules prior to our large Summer game where we plan to play a "Black Hawk Down" scenario.

The village, with the Mosque in the centre and the Police Station on the right
The scenario had a village police station threatened by a large gang of Chinese guerrillas who had infiltrated into neighbouring buildings and brought the police force under fire. This was all a ruse to cause the local military force consisting of Royal Marines and Gurkhas to come to the rescue and walk into ambushes planned on likely access routes.
  
The Police Station with the District Commissioner's Land rover outside
 The Police station was well guarded and their fire power had to be respected. In fact the initial exchanges of gunfire definitely went in favour of the Police. 

The centre of town saw heavy fighting
The neighbouring jungle provided plenty of cover for the guerrillas to move their forces and the first success for them came when one of the Marine patrols were surprised by a large force of the enemy. After initially debussing from their transport they quickly remounted but the fire from the Guerrillas on the exposed crew caused the vehicle to quickly reverse back up the road.

The Royal Marines were tasked with coming to the rescue
However the other patrol proved more robust and quickly debussed avoiding several booby traps along their route, including mines. They cleared the first main building and went on to clear the mosque.

The battle started to move towards the cross roads where the guerrillas mounted one last attempt at causing casualties to the police and managed to kill a couple of officers and shoot up a Gurkha patrol coming in over the river.

The British firepower soon got control of the situation and the guerrillas were forced to break off

Caution was the watch word with ambushes a constant threat
Chinese guerrillas in ambush
The learning from the game shows that irregular insurgent teams need to tackle regular troops in the open with as much firepower as they can bring to bear. The best guerrilla option were their snipers whose firepower was on a par with the regular troops.

The rules proved quick to master and should work well for our game next summer. Thank you to Chas for a fun game.

Jon


Sunday 9 October 2011

Battle of Camden 16th August 1780

Battle of Camden 1780
Following our two games of the Battle of Harlem Heights, we concluded the afternoon with the Battle of Camden scenario.
The map from British Battles.com clearly shows the historical outcome with the collapse of the American militia in the face of Tarleton's regulars leading to the rout of the American main force under Gates.

Map of the battle - British Battles.com
The forces set up as per Hold the Line with the only notable terrain being the swampy ground on each flank.
Hold the Line Scenario Map
The table set up based on the map above.
The British advance on the militia
This scenario is a straight forward clash of force with both sides looking to destroy enemy units and achieve 6 victory points for the win.

General de Kalb and the first Continental line
I think it is very satisfying when a game gives a very similar result to the historical events. As per the actual battle, the British forces took the initiative, and pressed the American militia on the American left flank. General "Granny" Gates struggled to control more than three of his units each move, reflecting his poor command attributes and found his militia soon in a state of collapse.
General Cornwallis with the British left flank
The American left flank collapse surrendered the 6VP required for a British victory and the game was concluded with a move to spare.

Tarleton commands the British right
This is a very difficult scenario for the American player, when following the historical set up, but then so it should be!

Jon

Battle of Harlem Heights, 16th September 1776

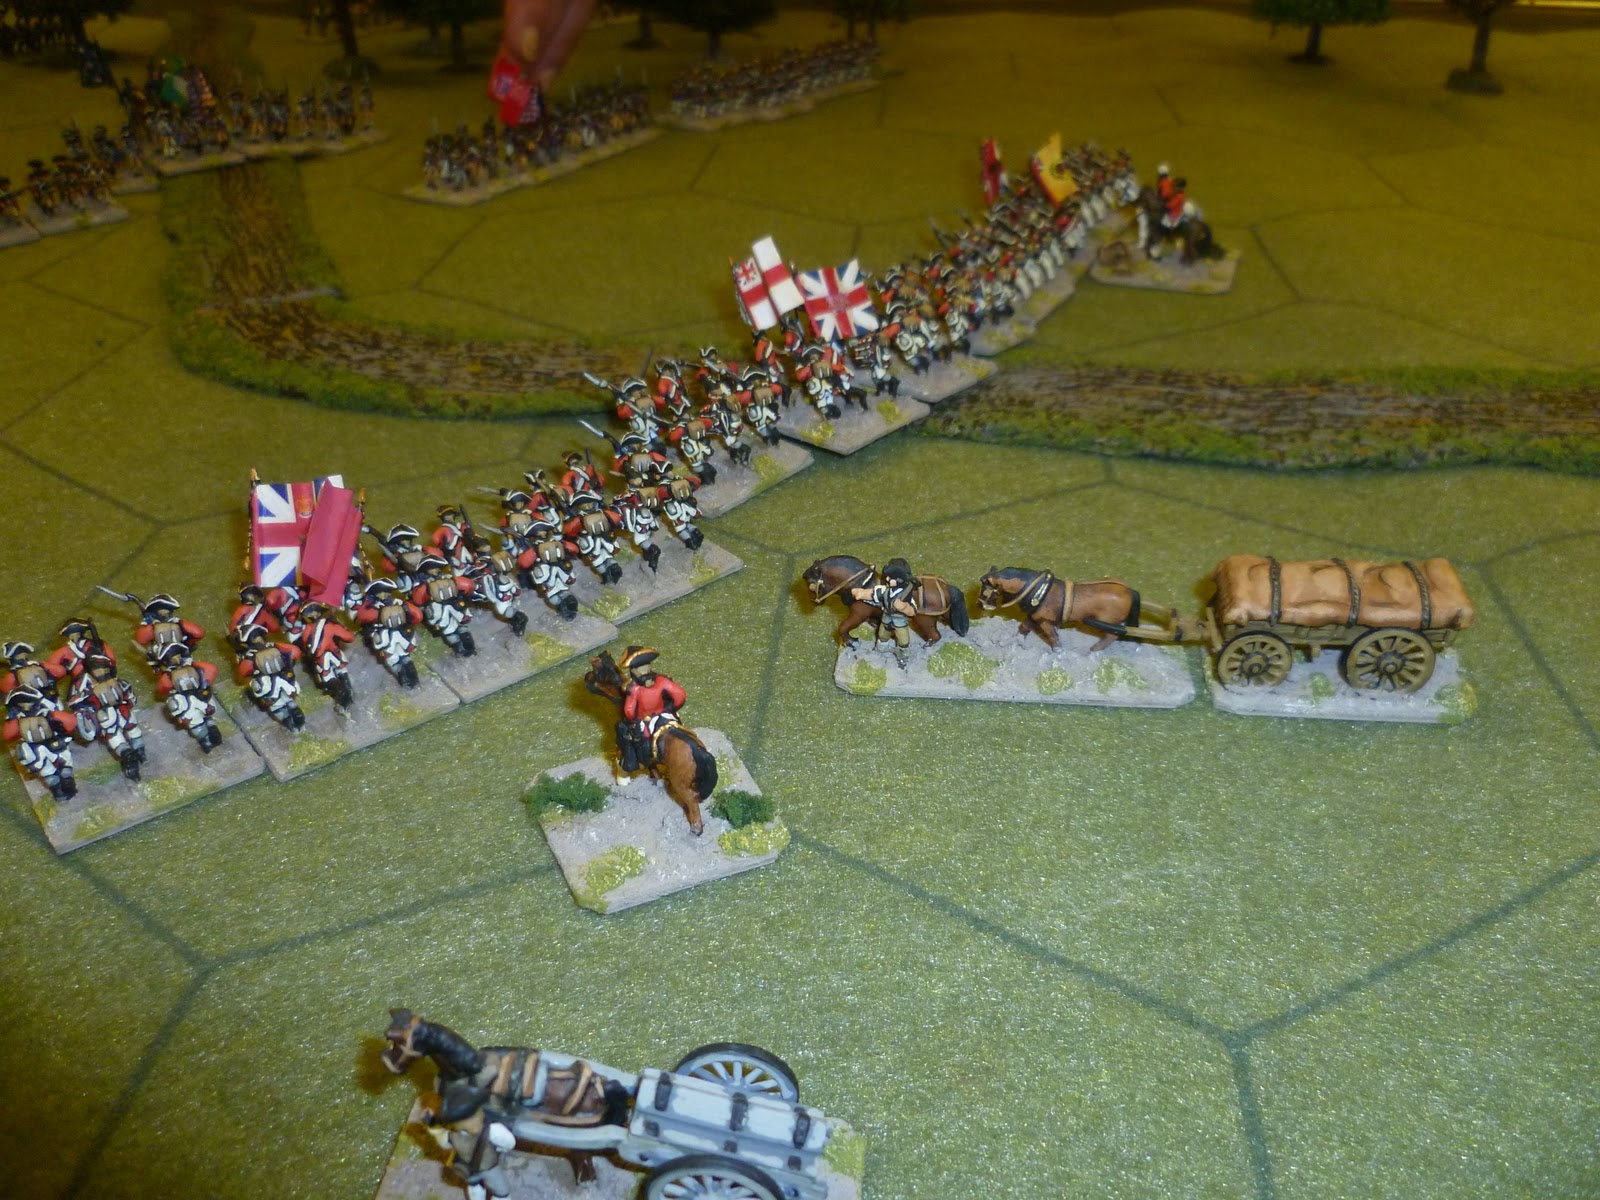
Continental Infantry at Harlem Heights
 This months club games featured an AWI clash using the "Hold the Line" rules from Worthington Games. The board game has a number of scenarios and with the availability of the new Holtz Mats Command Mat which follows the hex map in the game, the rules give a fast playable 15mm figure game.

Contemporary Map of the Battle
 The scenario we chose this month was a follow up to game we played in January, the Battle of Long Island. The Battle of Harlem Heights has the British advance guard under General Leslie ambushed by General Washington's main force. The Americans have the opportunity to seriously damage this force before General Howe can come to their support with the British main force. The map below shows the initial positions of the two sides. The three objective hexes behind the British advance guard give victory points to the Americans only and are shown on the game table as wagons and limbers of the baggage train. These together with destroyed units give the victory points for the scenario and both sides were looking to achieve 6 victory points in 20 moves.

We have adopted a few house rules to the basic game.
  • To make the end of the game slightly variable, we multiply the number of turns by three to give a score that is reduced each turn by the roll of a d6. On average the game will last 20 moves but this may vary slightly either way.
  • Casualties in the game would usually result in a base being removed (the number of bases in a unit indicate its morale). In our game the first casualty is indicated with a body marker and subsequent casualties by the little red dice next to the unit.
  • The road in the game is purely for aesthetics and has no function in the game.
The figures are 15mm Poly Oliver, and baggage vehicles by Hallmark.
Hold the Line Scenario Map showing set-up
 The forces are moved and fought using action points a base number for the scenario plus a d3. The Americans start with a base of 3 whilst the British only have 2. This reflected General Howe's rather "laid back" performance in the battle and made things difficult when attempting to bring forward the British main force.
The Americans realised that time was of the essence and that they had to press their advantage early. We played the scenario twice and with different results. The second game was probably more of an illustrative game as both sides took stock of the situation In our second game the British Light infantry counterattacked the Continental line as it emerged from the woods and forced them back causing and taking heavy casualties.


The Americans ambush is sprung
The British advance guard under General Leslie
However General Washington in the center pressed General Leslie's flank, destroying the Guards battalion and forcing the British back onto their main force. In the first game Washington was killed in this attack on the Guards.

The British are forced back
General Howe and the British main force
The American's advance in line
 As the opposing lines faced off in the open fields, the firefight started to decide the eventual outcome. In the first game the Americans managed to just miss out on a clear win ending up with 5VP vs 1VP (General Washington killed).

 The second game was a more close run affair with the Americans coming out on top 3VP vs 2VP
Generals Howe and Leslie form the line to protect the baggage
General Howe attempts to bring forward the reserve
General Howe in the thick of the action
The final positions
Hold the Line is a great game with an excellent set of rules that always give an enjoyable wargame.

Thanks to Nathan, Ian and Steve H for a fun game

Jon

Saturday 17 September 2011

Hellfire and Back, "Dust Up" in North Africa

Last weekend Steve got his desert forces out to try out one of the new missions in FOW's "Hellfire and Back" early war in the Desert book.

The forces pitched British and German forces in a tank on tank shoot out.The force list as below with Steve taking the Panzers and me the Brits.


The map shows the terrain, set up of forces, the reinforcement deployment areas and the objective positions. The objectives are "hot" from turn one so are open to a rapid dash, provided they can be held uncontested. At least half the platoons are held as reinforcements entering the table after turn 3.


I Chose to lead with my artillery, 2lbr portees, Honey Company HQ and a troop of Honeys. Steve led off with his artillery, Panzer Kompanie HQ, Panzer II platoon and his PaK platoon. However I soon realised the error in my deployment choice when the Germans got their first reinforcements and the British drew a blank. Steve immediately placed his infantry platoon on my flank threatening my gun line as my Honey troop "swanned off " into the desert seeking death or glory, see below.


I had however taken the precaution of dismounting my AT guns and digging them in around my artillery position, so this provided them a modicum of cover from the German small arms fire that came their way. My company HQ with their two tanks also enabled some return fire with their machine guns.

In the centre a temporary standoff occurred as Panzer IIs and Honeys eyed each other looking for an opening with the Brits all to aware of the PaK front formed up behind the German armour. I took the unhistorical option of choosing discretion and not wading in. Perhaps Battlefront should have early/mid war British armour having to take a control test when in close proximity to the enemy, to see if they fail to resist charging in, rather akin to British cavalry in the Napoleonic period.


However on turn 5 events took another twist with the reinforcing British armour turning up on the German flank. Now it was Steve's turn to have his gun line threatened. So putting the pedal to the metal, my Honey platoon charged in on the 105's knocking out a gun and forcing another to leave the table in retreat. In addition I was in behind the PaKs and Panzers causing a temporary halt to their advance on the objectives.


The appearance of the British armour led to a classic tank on tank pell-mell battle with flaming wrecks appearing on both sides. I chose to reinforce this fight with the third Honey troop, ignoring the German armour that was building on my own flank, consisting of the Panzer IIIs and IVs who were jousting with my Company HQ and 2lbr/25lbr gun line.


With the game moving into turn seven, events took another twist. The Brits had a remarkable stroke of luck with the 2lbr AT guns knocking out two Panzer IIIs causing the platoon to fail its morale check. This changed the balance in the middle of the table as the other German armour was primarily engaged in dealing with the two Honey troops in their lines. I made a dash in the centre to grab the middle objective with the remaining Honey troop, looking to smoke them off with my artillery to enable them to stay on uncontested.

However it was not to be, the fickle dice gods enabled me to fail to call the guns in on three rolls and with my AT guns failing a morale check and bugging out in turn eight we called it a day.


In FOW the mission uses the Fair Fight rule comparing lost platoon counts on the losers column of the Victory Points table, which gave Steve a 2:1 win. The VP points system in FOW is very simple and probably fails to give a good indication of how clear a win was, so I have included an alternative approach which I saw on another blog and have adopted (apologies, I cannot recall where). This looks at the value of units damaged and destroyed to calculate an advantage, which called the game a draw. Either way both Steve and I agreed that this was a very enjoyable mission, and gave us plenty to talk about re set ups and initial troop placement.


Thanks to Steve for a great game.

Monday 25 July 2011

Direct from Detroit, 11th July 1944

Hi all,
Steve and I fought the third game in this six game linked campaign, adapted from the Skirmish Campaign book, "Heroes of Omaha and Panzer Lehr". The first three games are fought over the same table simulating the fighting that went up and down the road from Les Hauts Vents (see the google map, bottom right, on the campaign summary sheet)on 10th & 11th of July.
This third game simulates the counter attack by US 3rd Armoured Division to take Hill 91 and Les Hauts Vents and roll back the advance of Panzer Lehr's right thrust. The map below shows the US and German front lines prior to this action, with the hill top shown on the southern edge.

The picture of the table shows the set up after the troops were deployed, the variable set up being that because Steve's Panzers won the last encounter, his defences could include the house in the centre of his front line. As can be seen the Panzergrenadiers occupied the front line backed up by the Panzer platoon and Company HQ with the HMG section.
The terrain in this action was not conducive to armoured attacks, with plenty of bocage, limited roads and rain sodden fields which would cause wheeled vehicles to check for bogging. This together with occasional minefields left blocking gateways from the previous two battles severely limited my US troop deployment. Thus the tanks went into the fields, with the armoured infantry moving on my right where unimpeded gateways allowed access to the half tracks, with some tanks, the HMGs and recon advancing down the road.
I was also hoping the US artillery would lend a hand so had my Sherman OP and Company commander on the hill to my rear able to spot for my guns. The only hazard with this plan was that historically the artillery was inaccurate on the day, and to reflect this problem Steve got to place two alternate positions for the strike, which would fall on my positions should I roll a 1 or 2 on a d6!!!!


The US force looked well balanced with all arms capability and plenty of recon.

The German force although small in comparison to the Americans was formidable with Veteran morale, dug in, plenty of Panzerschecks and Panzer IVs sitting still on the defence able to blaze away at my advancing armour. Also they could rely on a PaK40 taking pot shots at any US vehicle in fields on the US left flank with an open edge. This simulated 352nd Infantry Division on Panzer Lehr's right flank.

The picture below shows the slow advance in the hedgerows as my road column advanced on the German position with my flank support

The recon boys did an excellent job revealing two Panzergrenadier sections and allowing me to quickly bring HE and HMG fire to bear, causing a few casualties and pinning their positions.


This initial combat was successful beyond the American expectations as the mission checks this caused the Lehr grenadier platoon to take saw Steve throw two ones and a two on a d10 in the first couple of moves (low being not good). The grenadiers panicked and left the position. The road looked open for the taking. That's when the wheels started to come off the US attack!
The picture below helps illustrate the point. My Shermans looking to take advantage of the Lehr collapse advance on the hedgerows. At this stage in the campaign US Sherman's didn't have Cullin forks and therefore they have to crash over the boccage, forcing them to bog check.

Steve's response to was to rely on the Panzer IVs overlooking the valley to start to thin the US armour.

The result was that across my front the Shermans started to burn.

Not only that but my armoured infantry started to take hits as they tried to stalk the panzers with bazookas.

Eventually the US artillery started to get involved, not without bombarding my own positions twice, but it was not enough to stop the Panzer attack which caused my armoured infantry to flee and a Sherman platoon to quit with them.

However at turn seven the game was still in the balance and with a roll of a 6 on a d6 the game continued for another two turns, with US shells falling on the German ridge. With both sides teetering on Company morale checks, the shelling managed to kill the German company commander and his 2IC failed to take over when he fled the field.

It was too little too late for the Americans and the panzers managed to hold firm to the game end, with the remaining US armour not daring to engage in any further long range tank duels.

The result was one Sherman and one M8 armoured car totally destroyed and four foot groups killed or wounded giving the Germans 6VP for casualties inflicted (The damaged Shermans and routed groups do not give casualty VPs). In addition the US failure to take the hill gave them a further 5VP plus 4 attachment credits to be used in future games (gulp). The US gained 3VP for the German casualties (two foot groups and the company CO).

The position at the halfway stage has Panzer Lehr sitting on a commanding lead of 10 victory points with all to play for for the US forces against the second Lehr attack which was aimed at Le Dezert (see map). The next three games are scenarios looking at the battles along this route.
Thanks to Steve for a very fun game that had lots of swings of fortune throughout the day.
Jon