Saturday 29 January 2022

Lion Rampant in the foothills of the Pyrenees


On 16 July 1212, an army led by the allied Christian kings of Spain defeated the forces of the Almohad Caliphate of al-Nasīr, signalling the ultimate decline of Islamic power in Iberia. A number of crusading knights from beyond the Pyrenees had joined the Spanish campaign, although many of them departed before the decisive battle. This skirmish represents a detachment of French troops making their way back to France who are caught by an advance party of Moors in the foothills of the Pyrenees. The Moors, led by the Valencian warlord al-Mutahawir, hope to gain some booty while deterring future interventions from Christian powers beyond the peninsula, while the French, under Count Raymond-Roger of Foix, hope to avoid the fate of Roland and Oliver in the mountain passes…


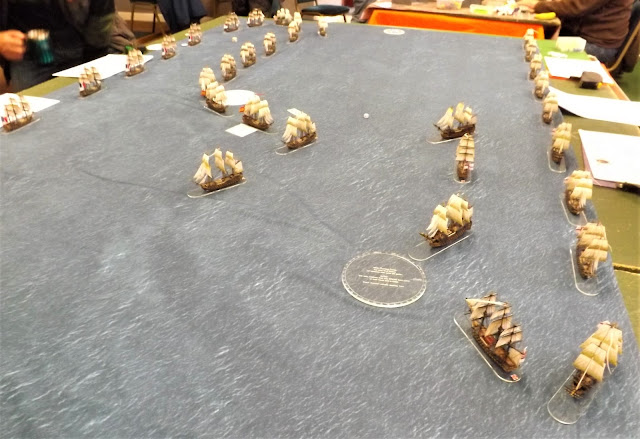
The rules used for this game were Lion Rampant, with a scenario loosely based on ‘A Gentle Stroll’. The forces were supposed to be around 50 points per side, though dodgy maths on my part meant the French had an extra two units of mounted sergeants—as you’ll see, this didn’t affect the outcome unduly. The Moorish objective was to prevent as many French units from escaping off the far short table edge, while the French needed to get more models off that edge than were killed or routed by the enemy.


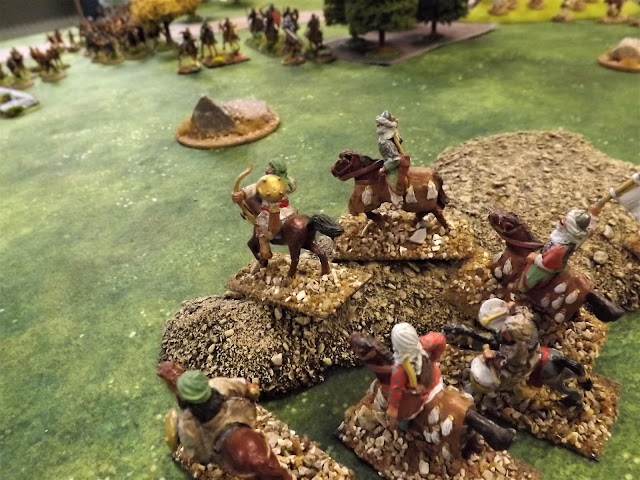
The Moors were hidden at the start of the game, though it was clear to the French edging down the road that there were several key locations from which an ambush might be sprung. Indeed, the prospect of the narrow pass flanked by high ground on either side looked so daunting that the army hesitated before even approaching further. Meanwhile, the Moors kept themselves behind the rocks and trees, giving the whole field an atmosphere of eerie quiet. But as the first French mounted crossbowmen established a screen behind which the rest of the army might advance, groups of lightly armoured Arab warriors appeared on either side of the pass, supported by medium cavalry to the north. All of the Moors were clearly armed with bows along with their swords and spears, which made the prospect of proceeding straight up the road thoroughly unattractive to the crusaders.


As the French foot sergeants took up defensive positions along the road, the mounted crossbowmen swung around the wood east of the pass to see if any Moors might be hiding among the rocky outcrops north of the road. Immediately, Arab light cavalry burst into view, spraying the crossbowmen with arrows and bringing down half of them within a few minutes. The rest of the crossbowmen dismounted and began returning bolts of their own.


South of the road, two squadrons of French mounted sergeants drove toward another suspicious outcropping, flushing out more lightly armoured infantry and cavalry bearing bows. Nevertheless, the 
sergeants struck one group of horsemen who sickened of the close combat and fled. Close behind them, a group of heavily armoured knights smashed into the infantry, but had to retire as the Almohad warriors held their ground. Inspired, the mounted Moors turned to face the enemy, while those foot loosed a well-placed volley of arrows that killed half of the knights.


Meanwhile, to the north of the road, mounted sergeants charged the light Arab cavalry, who peppered them with arrows as they wheeled and rode back toward the hills. A group of crossbowmen on foot, sent forward against their will by the encouragement and threats of Raymond-Roger, rushed up alongside the remaining dismounted crossbowmen, and together they poured more shafts into the mounted Moors, who stayed just within range on the northernmost hill. As the sergeants pursued the evading Moors, they cleared the edge of the woods and came within sight of al-Mutahawir’s personal guard. The impetuous captain waved his sword and charged the sergeants, who wheeled to meet him. Men and horses on both sides went down in the crush, before both parties pulled away to gather their strength.


Back to the south, the knights and sergeants drove forward once more into the Arab infantry, this time scattering the timid and forcing the braver ones to seek shelter a safe distance away. But a shower of arrows from the cavalry behind sent one of the squadrons of sergeants riding pell-mell for cover. Two more knights fell, stuck like pincushions, while the brave Hugh de Lacy held his ground, preparing to spur his steed for a lone, (vain)glorious charge against the retiring infantry. Alas, the chance never came, for the Moors gathered their courage just in time to send him to join his brothers under another hail of arrows.


The crossbowmen to the north of the road continued to pump quarrels into the Arab cavalry on the hill, while the mounted sergeants turned their backs on al-Mutahawir and closed with those just east of the rise. The Moors did not react in time, and the heavy impact of the sergeants drove them from the field. Those on the hills withered under the attention from the crossbows, which picked off man and mount while staying out of range of their composite bows, before being finished off by the sergeants as they fled. 

But as the Moorish cavalry to the north melted away, so did the French sergeants to the south, who were all too close to the Almohad bowshots. The French infantry, until this point huddling on the road out of range, suddenly surged forward to engage the Moors to the south. As had happened several times over the course of the afternoon, the Moors did not immediately react. 


Despite the recklessness of their commander, the Muslim warriors seemed much less eager to take action, allowing the initiative once again to pass to the French while al-Mutahawir stood in his stirrups, gnashing his teeth in frustration.


French infantry was also fanning out to the north of the road, moving into the thick woods that screened them from the Moorish light troops on the cliff above the crucial pass. As the Moors still dithered, the foot sergeants picked their way through the undergrowth and those crossbowmen with horses mounted up to swing round the trees, the hill to the north now being clear of the enemy. The situation on this side of the road was now becoming perilous for the Moors, as only the light troops and al-Mutahawir remained to face the crusaders who had cleared the north-eastern hill. 


However, it was now Raymond-Roger’s turn to stand paralysed. As his crossbowmen moved forward to draw a bead on the Moors above the pass, and the foot sergeants reached the edge of the wood, the victorious sergeants remained celebrating on the hill, deaf to his distant imprecations. As for his own troop of knights, they were too busy cheering a success which they had done nothing to achieve to respond to his repeated insistence—strewn with pleaded cajoling and blasphemous threats—that they must seize the opportunity presented to them.


Initiative had swung back to the Almohads, who swung west of the pass to cover the road and prevent a breakthrough in the north, leaving the blooded French to hunker down defensively to the south. However, another group of crossbowmen had now come up to the front and began picking off the light infantry on the southern side of the pass. A methodical shooting war began, as crossbowmen engaged the Moors above the pass at long range, whittling down their numbers and driving them off ridges around the pass. Paralysed once more, the Moors looked on as another group of foot sergeants rushed up the road and prepared to charge over the southern hill while the remaining sergeants south of the pass ventured forward again.


A group of heavy Moorish infantry which had been sheltering behind the hill now sprang into action and rushed to block the pass. This momentum brought the fleeing light infantry to their senses, and from the western base of the hill, they loosed arrows into the advancing mounted sergeants. This was too much for their battered nerves, and their initial retreat became a rout.

The only remaining mounted French troops were now north of the road, where the mounted crossbowmen, sergeants, and Raymond-Roger now began to close the distance. The Moors had now lost half their force, and while morale held among the cavalry, much of the infantry now wavered or quit the field. The mounted crossbowmen rushed to the top of the abandoned northern ridge above the pass, only to be immediately felled by bowshots from Moors on the other side of the road. The mounted sergeants, confident in their own invincibility, charged the light cavalry, only to be shot down and driven back under arrows from the evading horsemen; like their comrades to the south, the survivors fled for their lives.


As Raymond-Roger closed on a squadron of light cavalry, he was spotted by al-Mutahawir. ‘Come on, you sons of dogs’, the Moorish commander yelled to his two remaining ġuzāt, ‘let us go and win martyrdom for ourselves against these heathen Franks!’ 

‘My lord and most devout servant of God’, replied one, as the other shifted uncomfortably in his saddle, ‘why do you not challenge him to fight you alone, so as to determine God’s truth between you and him?’ ‘What a glorious suggestion, best of companions!’, replied al-Mutahawir, much to the relief of his men.


Spurring his horse forward, he shouted defiance at Raymond-Roger, who understood the tenor, if not the meaning, of the Moor’s words and peeled off from his squadron to engage him in single combat. Their swords clashed, shields splintered, and helmets rang as they traded blows before pulling back, exhausted and a little shamefaced, to their own troops. The French knights, rejoined by their commander rushed at the the light cavalry, which once more wheeled away, peppering the knights with a deadly volley of arrows that reduced their numbers by half and sent them running.


The French had now also lost half of their army, and while much of the infantry were unbloodied, the mounted men were all but gone. One group of foot sergeants slipped away, while Raymond-Roger’s men began to panic, sweeping their commander away with them. The panic spread, and another group of sergeants fled. In the road, an attack against the Arab heavy infantry by the foot sergeants had been repulsed, but pressure from the crossbowmen continued to push the Moors back, opening the pass.

As more French infantry rushed up the road, al- Mutahawir cried out, ʾ‘Allāhu ʾakbar!’ for the last time and rushed headlong into the advancing sergeants. His and his reluctant fellows’ horses were bloodily transfixed on the spears of the fresh warriors, and his own head caved in by a sergeant with an iron-tipped club. The loss of their leader convinced the remaining Moors, save one squadron of light cavalry, to seek easier prey elsewhere; the stalwarts soon regretted their stubbornness, as crossbow bolts brought them finally to the ground.


A dismal quiet settled over the battlefield, the ground to the east of the pass and along the road soaked with blood and gore. The Moors had been driven off with substantial loss, but the French had nothing to celebrate. All of the expensive horses that had been brought on campaign had been lost. None of the the knights, with their bright shields, shining helms, and fluttering banners, would ever see France again. The surviving groups of sergeants and crossbowmen wearily shouldered their weapons and trudged northwest, lordless and leaderless, hoping to hold together through the mountains and on till home.


A massive thanks to Vince, Chas, and Ken for playing this, my first game of Lion Rampant, with me. It was a great game, in which the crossbowmen showed themselves as star players for their ability to inflict damage at long range, and the ability of bow-armed light cavalry to run circles around heavier mounted units, particularly as the game wears on, was capably demonstrated once more. 

Everyone did really well; the Pyhrric nature of the result on both sides shows how well-fought it was on both sides (despite my inadvertent padding of the French side!). Most importantly, it played in the perfect spirit of friendly competition and good humour. 

Special thanks to Vince, who topped up my French forces with some of his (admittedly anachronistic) Normans and provided most of the terrain, and to Chas, who brought the Moors

Sunday 23 January 2022

Redcoats & Rebels - AWI Clash using Muskets & Tomahawks Ver II.


This weekend I got to play Muskets & Tomahawks (M&T) version two which was launched about June 2020 during the height of the pandemic which seemed to leave a lot of players with a new set of rules but unable to play them with anyone!

That said I like many were familiar with M&T Original which like all rules contained some interesting quirks, but gave a fun game with a strong French Indian War theme and have been played here a few times at the club so was not surprised to see the interest in the new incarnation.

I myself am in the process of building an AWI Mohawk collection of figures as illustrated on my own blog  JJ's Wargames and with the collection growing to completion have been thinking very much about an appropriate set of rules to model them around, with the three top offerings being Sharp Practice II, Rebels & Patriots and now M&T 2 in consideration, which having not played using the new version, left me really eager to take up Mike C's offer to run an AWI game using them.


The new version of M&T is themed around scenario books
which tailor the forces to a particular era, and we were using the
North American Wars book which covers the FIW, AWI and War of 1812 lists.

Mike had prepared a table with the Rebel Americans holding a rather formidable looking entrenched line of gun redoubts and log protected emplacements behind a stream facing broken wooded terrain through which the King's redcoats, loyalists and Indians would make their assault.


Si and myself would be leading the Crown forces whilst John and Mike R took the Rebels and we all started by getting a summary of the similarities and changes between the new look and old look M&T which primarily focussed on the card play which now sees the respective players holding three, occasionally four cards in their hand rather than the previous method of simply drawing a card from a common deck.

This means that opposing sides can be holding cards that would enable the opposition to activate on, giving them control over when those cards will be played, as each side takes turns to lay a card on the table to activate the given troop type, regulars, irregulars, artillery, Indians etc.

If forced to play an opposition card, which allows them to activate their troops, the playing side gets a command point to be added to a total than cannot exceed four points, which can be spent in later turns to replace laying a card and be used for additional activations and other useful command activities that enhance the combat potential of your own troops.

This makes for a very interesting game with lots of decision points for the players about when to lay a card and how to spend command points and the best time to do either.


The other big change is the use of d10 instead of d6 for combat and morale check resolution with '0' representing zero not ten and the guidance that 0 is usually a fail and a straight nine a success with, for example, the range and tactical factors in a shooting calculation adding up to an 'impossible shot' being resolved by rolling a nine to hit and nine to convert to a kill, almost impossible, but we did get such a shot from a group of Rebel riflemen in our game.

The Crown light troops and Indians deploy into the woods and advance on the Rebel left as our game of M&T II gets started.

Other than those very important differences M&T seemed to me to be very familiar as I started our game by deploying my Indians, Light Infantry and Queens Rangers off of the Deployment markers to make the trek through the trees towards the enemy lines.


The Crown plan being to avoid the centre ground which was easily covered by interlocking fire from the Rebels two light guns, whilst pinning the Rebel left with fire from the light troops and the potential threat from the bayonet armed British light infantry which might help to draw in Continental troops in support.

As this threat was developed, Si would lead the Crown strike force against the other flank composed of British regulars, elite Grenadiers and Provincial Loyalists in support.


John and Mike had arranged their Rebel troops in a broadly symmetrical arrangement with an equal mix of regulars, militia, light troops and riflemen supporting the guns in their respective half of the line, prepared to thin the ranks of Crown troops as they struggled forward to engage their line.


The first few moves were very revealing about the new card play set up as we started to identify the nuances of when to play opposition cards and command points, discovering how useful it was to spend our four points to retrieve the 'forward boys' activation card from the used cards deck before the final clock card ended the turn and caused the used cards to be reshuffled back into the draw deck.


In addition the need to pay a healthy respect for the cannon able to fire along lines of sight that if not carefully anticipated would allow a bouncing roundshot to not only hit men targeted in the front, but likely take out those in direct line to the rear. This lesson cost me an Indian and two unfortunate Queens Rangers before my troops dispersed into nearby trees for better concealment and a harder target.


After the revelations about artillery lines of fire, the sighting table took precedence as we got familiar with the best ways of staying unobserved whilst being able to see the enemy and then finding out how effective or not small arm fire was at various ranges, which saw the odd figure dropped as the two sides closed the ranges.


It was interesting to observe how the card play could impact on the advance or not of the various troop types with certain units like the Loyalist infantry seemingly static for large parts of the game as other priority units mopped up available command points to gain additional movement and activations to cards already played.


The card play and activation sequencing seemed to impact on the unfolding of the Crown plan as contact with the enemy inevitably forced changes and success demanded reinforcement with further activations before the enemy could react to try and shore up a threatened part of their line.

The Light Bobs and Queens Rangers brave the enemy fire as they get across the stream 

Thus my part of the Crown plan changed as my light troops got across the stream to threaten the Rebel left and turn their line with the Rebel riflemen, militia and gunners not seemingly relishing the thought of tangling close up with these bayonet armed aggressive troops, closely supported by Simcoe's Queens Rangers, as Indians provided sniping cover to their advance.

The Provincial Loyalist company struggled to get activation opportunities as other more urgent requirements took precedence.

The demand on activation priority was soon illustrated as Mike's Rebel riflemen missed their opportunity to severely shoot up the British Light Bobs as they crossed the stream leaving them needing two activations to simply reload their very accurate but cumbersome bayonet-less rifles.

The race was then on for my Light Bobs and Queens Rangers to cover the ground and close with the enemy gunners and riflemen before they were at risk of further missile fire.

The British attack on the Rebel right develops as Si moves the regulars up through the trees to threaten the opposite flank.

As Mike's troops demanded activations to prepare to meet the advancing British, I eagerly looked for cards and points of my own to beat him to the punch, whilst John and Si had demands on their own respective fronts to consider as both teams of players decided on priorities.

This situation revealed to me the best of the new version of M&T with the demand placed on activations and players not being able to do everything they would choose, mixed with the uncertainty of success even if they did.


In the end it was Queens Rangers that took advantage of the situation with an audacious assault into the Rebel gun redoubt, braving the fire of a Continental company further along the line that tried to intercede as they clambered over the log emplacement and disposed of the enemy gunners.


Looking to support the Rangers, the Light Bobs were in a race to deal with the riflemen to their front concealed in a fence lined paddock and receiving sporadic covering fire from a unit of militia as they desperately reloaded their rifles.

The Light Infantry subaltern, realising his men would not be able to reach the riflemen in the small enclosure, now having dropped back from the fence to reload ordered his men up to the fence and opened fire with a telling fusillade of musketry that felled four of the six enemy troops whilst the remainders failed a follow up morale test having recoiled from the fire and dispersed.


The attack of the Crown light troops proved to be the high water mark of the assault on the Rebel line as the British regulars on the other flank were decimated by fire from Continental and light troops facing them, and unable to get across the stream under such fire were forced back into the tree line as the 50% casualty threshold for the Crown force was passed, causing a general withdrawal.

British regulars face a storm of musketry from well covered rebel troops and are forced back into the treeline as the assault is called off with heavy casualties.


I have to say that I really enjoyed this game of the new M&T and much fun and laughs was had by all involved.

The rules have left a very favourable impression and I have a feeling no two games would ever be alike due to the variability produced by the card play and command points, so I am very pleased to have picked up a copy of the new version just after Xmas and would happily recommend to anyone that hasn't played them yet to have a go if you're interested, with the supplements now extended to cover Napoleonics and a future Colonial book planned.

Thank you to Mike C. for hosting a very fun game and to Mike R, John, and Si for the tabletop action that produced lots of thrills and spills on the American frontier. 

Tuesday 11 January 2022

An Opportunity Mist! (Battle of Cape Ferrol or 'Calder's Action' - 22nd July 1805) - Kiss Me Hardy

Finisterre - Carlos Parrilla Penagos
https://www.carlosparrillapenagos.es/pintura-naval/
The 80-gun Argonauta, flying the pennant of Admiral Gravina at her mizzen, and leading the van of the Combined Fleet, exchanges broadsides with HMS Hero in the van of Vice Admiral Sir Robert Calder's squadron during the Battle of Cape Finisterre 22nd July 1805

This first meeting of the Devon Wargames Group for 2022 saw me hosting a Kiss Me Hardy (KMH) set-to recreating the 'infamous' Battle of Cape Finisterre or more commonly known as 'Calder's Action' fought during the dramatic days of 1805 with Britain, in the grip of invasion anxiety with the new Emperor of the French Napoleon Bonaparte sat across the English Channel with his Grande Armee; eagerly anticipating his plans to bring a French style Armada into the narrow straits that would allow him the time to bring his army on to the English south coast and knock 'Perfidious Albion', that damnable nation of shopkeepers, out of the war once and for all.

Sir Robert Calder seen here as a Rear-Admiral in 1797 - Lemuel Francis Abbott (National Maritime Museum). Calder's Action has become a forgotten part of the Trafalgar Campaign lost in the shadow of the titanic outcome of Trafalgar and the creation of the legend of Nelson in his hour of triumph.

To say the result of this battle left their Lordships of the Admiralty and the British public somewhat underwhelmed would be an understatement, but perhaps the anxiety in Britain at the time of becoming a French satellite state ruled from Paris, had Napoleon succeeded in evading the Royal Navy helps explain that despite Vice Admiral Sir Robert Calder's victory with the Combined Fleet losing two Spanish ships of the line, San Raphael 80-guns and Firme 74-guns, together with 149 officers and men killed and 341 wounded and some 1,200 Spanish sailors held prisoner, for the loss to the British of 39 killed and 159 wounded and the 98-gun HMS Windsor having lost the best part of her foremast, he could not avoid being recalled to London on the eve of the later Battle of Trafalgar to face a court martial for his efforts on that day and more particularly in the two days that followed the battle.

The set up illustration in the 2006 Summer Special
shows a broad appreciation of the historical position of the
two fleets versus the wind at around 17.30.

Our scenario was adapted by me from Nick Skinner's original set up published in the Too Fat Lardies 2006 Summer Special which starts the battle at the end of the pre-battle manoeuvring in the fog following the two fleets sighting each other sporadically at around 12.00 to the first exchanges of gunfire between the opposing vans at 17.30 so gloriously captured by Carlos Parrilla Penegos in his picture that heads this post.

If you would like to know more about the historical events that led up to and shaped this battle, together with what happened afterwards, I have put together a post to accompany this one on JJ's Wargames covering those aspects of this interesting battle and its place within the wider Trafalgar campaign of 1805.

JJ's Wargames - Battle of Cape Finisterre, Ferrol or Calder's Action

The changes and tweaks I made covered the spotting rules, detailed later in the post, death of an admiral taken from the Trafalgar Scenario (there are six admirals and a commodore in this battle), Battle Fleet Preservation Point Values and simplified signalling.

Mark Adkins map from his Trafalgar Campaign helps give a better idea of the two opposing lines of battle and was one of the maps that helped me set up the table that you will see in our game.

In his scenario preamble Nick Skinner sets out the two factors that make this an interesting battle to recreate on the table and the peculiarities that will impact on the respective players together with a summary of the respective forces involved;

' . . . from a wargaming perspective the game offers some interesting possibilities. Firstly, it enables us to toy with the concept of fog and gives us the chance to recreate an action where visibility played a decisive part in the outcome of the battle. Secondly it provides a great opportunity to answer the question that is most commonly associated with this action – could Calder have done any better?'

The first move in and already the British Van squadron under Commodore George Martin have got the jump on the Spanish Van squadron led by Admiral Gravina as the Hero 74-guns, (centre of picture) crosses the bow of the Argonauta 80-guns delivering a particularly effective bow rake as she passed, narrowly failing to cause the Spanish flagship to strike, whilst blowing away the Spaniard's bowsprit.

'Calder’s command comprised fifteen ships of the line (Prince of Wales, Glory, Barfleur, Windsor Castle, Malta, Thunderer, Hero, Repulse, Defiance, Ajax, Warrior, Dragon, Triumph, Agamemnon, and Raisonnable), two frigates (Egyptienne and Sirius), and two smaller vessels.

Villeneuve had twenty ships of the line (six Spanish: Argonauta, Terrible, America, Espana, San Rafaël, Firme under Gravina and fourteen French: Pluton, Mont Blanc, Atlas, Berwick, Neptune, Bucentaure, Formidable, Intrépide, Scipion, Swiftsure, Indomptable, Aigle, Achille, and Algésiras) with seven frigates, and two brigs.

As in our refight of Trafalgar I have chosen to ignore the frigates in this larger scale game. By all means add them in to your refight if you wish.'

Likewise for expediency and because I was using the game to try out several ideas and concepts for future large games, I decided to leave out the frigates and smaller vessels, although I did use a simplified signalling procedure as the players struggled to come up with a better plan than either Calder or Villeneuve were able to devise.

The impressive start made by the British Van only continued as Hero was followed by Triumph 74-guns which delivered a second bow rake that finished the job by taking down the Argonauta mainmast, killing the helmsmen and destroying the wheel and seeing the distressed Argonauta drifting helplessly into the British line as she hauled down her colours

My other adaptations to the original scenario was to include the Point Preservation Value system of fleet and squadron morale to determine when respective commands had suffered more than enough damage to cause them to break off the action, that was tried out with success in my previous KMH game, The Leeward Line, played at Clotted Lard last September.

This key adaption would make its impact felt towards the end of our game setting up the historical outcome seen in the actual battle.

Finally I changed the ideas around Nick's proposal to use 'blinds' to recreate the foggy conditions encountered on the day, choosing rather to assume that the respective sides were aware of the proximity and rough position of the enemy fleet but that the smoke of battle mixed with the fog would require vessels hoping to fire on an enemy within gunnery range to test for visibility prior to firing, with target ships at or over 15cm needing a successful sighting die roll beforehand.

The spotting table used for our game with 'Fog' applying to all range-sighting tests 

I don't particularly like blind markers on the table and this modification seemed to work well with the firing much more sporadic, as in the actual reports of the battle, due to failed sighting attempts. In addition because of the chit driven activation mechanism, if a side had its 'Fire Chit' already drawn and failed to sight any enemy at the time, its being held, allowed the respective force to open fire later in the turn, as enemy units hove into view as a result of their own activation.

The helpless Argonaute drifts into a collision with the Triumph to be boarded and taken under tow by the British third rate.

One of the other key features about this battle is that the Combined Fleet enjoyed the weather gauge when contact was established and maintained that advantage through to this stage when the lines started to engage which explains the unusual hair-pinned shaped lines as the two fleets wore and tacked to work their way across the intervening foggy sea.

The second Spanish ship in the van, Terrible 74-guns attempts to come up in support of the flagship , just as she hauls down her colours.

Given the visibility conditions and the likely need by both commanders to retain control of their fleets, ships were required to maintain their headings and sailing orders unless signalled to change, made just as difficult by the visibility.

However with gun-flashes breaking through the murk ahead both commanders were keen to influence the action as best they could with Calder ordering Sir Charles Stirling to take his Rear squadron towards the Allied centre and van supports coming up in line astern whilst he looked to support Martin's van with the Centre squadron.

The view down the line of the Spanish Van with Firme 74-guns nearest to camera and the 80-gun San Raphael ahead of her. Note French Admiral Magon in the Rear squadron has received the signal for his ships to turn to starboard together and they can be seen attempting to come to the aid of the Spanish, right background.

Likewise Villeneuve ordered Rear Admiral Magon aboard Algiciras 74-guns to turn his Rear squadron by ship to starboard and support Gravina's van, but with his centre squadrons making better speed with a quartering wind had to content himself  with coming up behind the Spanish in line ahead now having Rear-Admiral Stirling's ships turning towards his approaching line.

Sir Charles Stirling's Rear Squadron now led by HMS Warrior 74-guns, as Stirling's own flagship HMS Glory 98-guns failed to spot Calder's signal in the fog and sailed on, starts to turn in succession to close on the Allied line. Ahead Calder''s own centre is attempting to head off any attempts to interfere with Commodore Martin's attack on the Spanish van.

The battle between Martin's and Gravina's respective van squadrons started immediately with Hero 74-guns crossing the Argonaute's bows and delivering a short range initial broadside that blew away the enemy's bowsprit, dismounted nearly half her guns and destroyed the helm, narrowly failing to cause her to strike.

The first exchange of gunfire was soon followed by a second as Triumph 74-guns crossed Argonaute's bows and delivered a similarly devastating bow rake bringing down Argonaute's mainmast and causing enough additional damage to force a strike that left the enemy flagship heavily damaged and unmanageable as she drifted into the oncoming British line eventually colliding with and fouling the Triumph who sent over a boarding part and took the ship under tow. 

The view from the opposite side as seen above with the British Van and Centre coming across the Allied line with the Spanish flagship being towed by Triumph in the centre whilst engaging the next upcoming Spanish 74, Terrible and the fast approaching French 80-gun Indomptable, part of Magon's Rear Squadron. Note Sir Charles Stirling's Glory 98 out of position and wearing back towards the rear having missed Calder's signal in the foggy conditions.

With the various squadrons turning to engage more closely, and various ships missing or responding to signals, the battle soon developed into a bit of a mess with both commanders struggling with the conditions to control and fight their battle and leaving the various squadron commanders to fight their own battles when able to see the enemy.

The heart of the battle with Commodore George Martin's 98-gun Barfleur seen far left looking to close on the Spanish Van as Rear Admiral Magon's squadron close in from the opposite side (centre background). Barfleur would join with Hero and Agamemnon to surround and board the stranded Indomptable when the Allied fleet turned away to break contact.

British superiority in gunnery was the key factor as Martin's van continued to swap broadsides with the oncoming Spaniards and the Terrible 74-guns was next to receive the treatment with another short range bow rake, this time from Martin's own flagship the 98-gun Barfleur that destroyed her bowsprit and inflicted high casualties among the officers causing the second Spanish ship to haul down her colours, to also find herself taken under command by a British boarding party as the British van closed in around its prizes as HMS Hero swapped broadsides with the 80-gun Indomptable.

In the latter exchange the British ship came off the worse as the Frenchman took advantage of an unusual spotting success at long-range as the fog parted and allowed the 80 gunner to pour on a well directed broadside against the enemy rigging bringing down the bowsprit and adding to damage recieved at short range from the Hero's battle with the Spanish van that left the British 74 unbowed but heavily damaged with all her guns dismantled.


It was at this stage of the battle that the Fleet Preservation Rule kicked in with the Combined fleet now having lost a flagship (Argonaute) and another third rate, struck and captured by the enemy forcing a morale check first on Gravina's Spanish Van Squadron, needing a 5 or 6 on D6 to stay in the fight, which they promptly rolled.

However the two lost Spanish ships also breached the Combined Fleet's test threshold requiring to see if Villeneuve would hold his nerve or signal a disengagement, which was failed and the battle now changed to a rear-guard action as the Allies sought to get their squadrons clear without losing another ship and seeing the British trying to organise a 'General Chase' by units able to close in whilst trying to tack ever closer, revealing the benefit of having the wind to control events when either attacking or defending.

Villeneuve and Dumonoir maintain line ahead as the French commander signals a disengage command

In the closing last moves of the game the Allies managed to break contact, with Villeneuve and Dumanoir able to bring their line across to cover the withdrawal of the Spanish and most of Magon's squadron, however unable to prevent the British van securing a third prize, the Indomptable, which was caught in the manoeuvre to break off and boarded by three British ships, including the 98-gun Barfleur, Commodore Martin's flagship, that closed with her and with this third prize secured a better result than the historical outcome.

'British take between 3 and 6 ships of the line:
Well done, you have bettered the historical outcome and probably saved yourself from the court martial that Calder had to face.'

Thank you to Gregory, Jack and Lawrence who took the roles of Calder, Martin and Stirling respectively and to David, John and Steve M who took the roles of Villeneuve/Dumanoir, Gravina and Magon respectively.

Both sides fought their battles more aggressively than their respective historical predecessors which is no surprise to most wargamers and it was pleasing to see Kiss Me Hardy working well for large games like this, with half the number of ships involved as at Trafalgar and producing a result playing from about 11am to 5pm with the chit driven activation standing up well to recreating the peculiar aspects of this difficult battle, made all the more fun in the spirit it was played.

I always think it shows how well a set of rules work when you can refight an historic battle and recreate so closely the events on the day, even with the commanders adapting the plan as best they can to those of their predecessors, and still deliver a final result that closely matched what happened.

I aim to put on more games with the collection this year to include some of the smaller actions so we can get more familiar with the nuances of this fun set of rules.

The collection uses the excellent 1:700th models from the Warlord Black Seas range of kits, the 10 by 5 foot sea cloth is from the also superb selection of cloths from Tiny Wargames, see the link top right, and all the model ships are based on acrylic pill bases supplied by Fluid 3D.