
 |
| Finisterre - Carlos Parrilla Penagos https://www.carlosparrillapenagos.es/pintura-naval/ The 80-gun Argonauta, flying the pennant of Admiral Gravina at her mizzen, and leading the van of the Combined Fleet, exchanges broadsides with HMS Hero in the van of Vice Admiral Sir Robert Calder's squadron during the Battle of Cape Finisterre 22nd July 1805 |
This first meeting of the Devon Wargames Group for 2022 saw me hosting a Kiss Me Hardy (KMH) set-to recreating the 'infamous' Battle of Cape Finisterre or more commonly known as 'Calder's Action' fought during the dramatic days of 1805 with Britain, in the grip of invasion anxiety with the new Emperor of the French Napoleon Bonaparte sat across the English Channel with his Grande Armee; eagerly anticipating his plans to bring a French style Armada into the narrow straits that would allow him the time to bring his army on to the English south coast and knock 'Perfidious Albion', that damnable nation of shopkeepers, out of the war once and for all.
 |
| Sir Robert Calder seen here as a Rear-Admiral in 1797 - Lemuel Francis Abbott (National Maritime Museum). Calder's Action has become a forgotten part of the Trafalgar Campaign lost in the shadow of the titanic outcome of Trafalgar and the creation of the legend of Nelson in his hour of triumph. |
To say the result of this battle left their Lordships of the Admiralty and the British public somewhat underwhelmed would be an understatement, but perhaps the anxiety in Britain at the time of becoming a French satellite state ruled from Paris, had Napoleon succeeded in evading the Royal Navy helps explain that despite Vice Admiral Sir Robert Calder's victory with the Combined Fleet losing two Spanish ships of the line, San Raphael 80-guns and Firme 74-guns, together with 149 officers and men killed and 341 wounded and some 1,200 Spanish sailors held prisoner, for the loss to the British of 39 killed and 159 wounded and the 98-gun HMS Windsor having lost the best part of her foremast, he could not avoid being recalled to London on the eve of the later Battle of Trafalgar to face a court martial for his efforts on that day and more particularly in the two days that followed the battle.
 |
| The set up illustration in the 2006 Summer Special shows a broad appreciation of the historical position of the two fleets versus the wind at around 17.30. |
Our scenario was adapted by me from Nick Skinner's original set up published in the Too Fat Lardies 2006 Summer Special which starts the battle at the end of the pre-battle manoeuvring in the fog following the two fleets sighting each other sporadically at around 12.00 to the first exchanges of gunfire between the opposing vans at 17.30 so gloriously captured by Carlos Parrilla Penegos in his picture that heads this post.
If you would like to know more about the historical events that led up to and shaped this battle, together with what happened afterwards, I have put together a post to accompany this one on JJ's Wargames covering those aspects of this interesting battle and its place within the wider Trafalgar campaign of 1805.
 |
| JJ's Wargames - Battle of Cape Finisterre, Ferrol or Calder's Action |
The changes and tweaks I made covered the spotting rules, detailed later in the post, death of an admiral taken from the Trafalgar Scenario (there are six admirals and a commodore in this battle), Battle Fleet Preservation Point Values and simplified signalling.
 |
| Mark Adkins map from his Trafalgar Campaign helps give a better idea of the two opposing lines of battle and was one of the maps that helped me set up the table that you will see in our game. |
In his scenario preamble Nick Skinner sets out the two factors that make this an interesting battle to recreate on the table and the peculiarities that will impact on the respective players together with a summary of the respective forces involved;
' . . . from a wargaming perspective the game offers some interesting possibilities. Firstly, it enables us to toy with the concept of fog and gives us the chance to recreate an action where visibility played a decisive part in the outcome of the battle. Secondly it provides a great opportunity to answer the question that is most commonly associated with this action – could Calder have done any better?'
 |
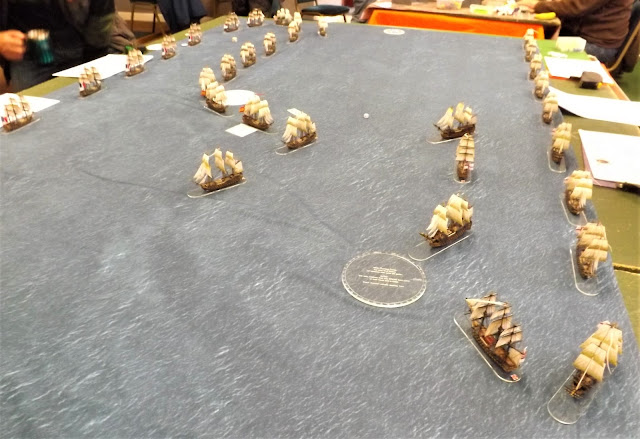
| The first move in and already the British Van squadron under Commodore George Martin have got the jump on the Spanish Van squadron led by Admiral Gravina as the Hero 74-guns, (centre of picture) crosses the bow of the Argonauta 80-guns delivering a particularly effective bow rake as she passed, narrowly failing to cause the Spanish flagship to strike, whilst blowing away the Spaniard's bowsprit. |
'Calder’s command comprised fifteen ships of the line (Prince of Wales, Glory, Barfleur, Windsor Castle, Malta, Thunderer, Hero, Repulse, Defiance, Ajax, Warrior, Dragon, Triumph, Agamemnon, and Raisonnable), two frigates (Egyptienne and Sirius), and two smaller vessels.
Villeneuve had twenty ships of the line (six Spanish: Argonauta, Terrible, America, Espana, San Rafaël, Firme under Gravina and fourteen French: Pluton, Mont Blanc, Atlas, Berwick, Neptune, Bucentaure, Formidable, Intrépide, Scipion, Swiftsure, Indomptable, Aigle, Achille, and Algésiras) with seven frigates, and two brigs.
As in our refight of Trafalgar I have chosen to ignore the frigates in this larger scale game. By all means add them in to your refight if you wish.'
Likewise for expediency and because I was using the game to try out several ideas and concepts for future large games, I decided to leave out the frigates and smaller vessels, although I did use a simplified signalling procedure as the players struggled to come up with a better plan than either Calder or Villeneuve were able to devise.
 |
| The impressive start made by the British Van only continued as Hero was followed by Triumph 74-guns which delivered a second bow rake that finished the job by taking down the Argonauta mainmast, killing the helmsmen and destroying the wheel and seeing the distressed Argonauta drifting helplessly into the British line as she hauled down her colours |
My other adaptations to the original scenario was to include the Point Preservation Value system of fleet and squadron morale to determine when respective commands had suffered more than enough damage to cause them to break off the action, that was tried out with success in my previous KMH game, The Leeward Line, played at Clotted Lard last September.
This key adaption would make its impact felt towards the end of our game setting up the historical outcome seen in the actual battle.
Finally I changed the ideas around Nick's proposal to use 'blinds' to recreate the foggy conditions encountered on the day, choosing rather to assume that the respective sides were aware of the proximity and rough position of the enemy fleet but that the smoke of battle mixed with the fog would require vessels hoping to fire on an enemy within gunnery range to test for visibility prior to firing, with target ships at or over 15cm needing a successful sighting die roll beforehand.
 |
| The spotting table used for our game with 'Fog' applying to all range-sighting tests |
I don't particularly like blind markers on the table and this modification seemed to work well with the firing much more sporadic, as in the actual reports of the battle, due to failed sighting attempts. In addition because of the chit driven activation mechanism, if a side had its 'Fire Chit' already drawn and failed to sight any enemy at the time, its being held, allowed the respective force to open fire later in the turn, as enemy units hove into view as a result of their own activation.
 |
| The helpless Argonaute drifts into a collision with the Triumph to be boarded and taken under tow by the British third rate. |
One of the other key features about this battle is that the Combined Fleet enjoyed the weather gauge when contact was established and maintained that advantage through to this stage when the lines started to engage which explains the unusual hair-pinned shaped lines as the two fleets wore and tacked to work their way across the intervening foggy sea.
 |
| The second Spanish ship in the van, Terrible 74-guns attempts to come up in support of the flagship , just as she hauls down her colours. |
Given the visibility conditions and the likely need by both commanders to retain control of their fleets, ships were required to maintain their headings and sailing orders unless signalled to change, made just as difficult by the visibility.
However with gun-flashes breaking through the murk ahead both commanders were keen to influence the action as best they could with Calder ordering Sir Charles Stirling to take his Rear squadron towards the Allied centre and van supports coming up in line astern whilst he looked to support Martin's van with the Centre squadron.
 |
| The view down the line of the Spanish Van with Firme 74-guns nearest to camera and the 80-gun San Raphael ahead of her. Note French Admiral Magon in the Rear squadron has received the signal for his ships to turn to starboard together and they can be seen attempting to come to the aid of the Spanish, right background. |
Likewise Villeneuve ordered Rear Admiral Magon aboard Algiciras 74-guns to turn his Rear squadron by ship to starboard and support Gravina's van, but with his centre squadrons making better speed with a quartering wind had to content himself with coming up behind the Spanish in line ahead now having Rear-Admiral Stirling's ships turning towards his approaching line.
 |
| Sir Charles Stirling's Rear Squadron now led by HMS Warrior 74-guns, as Stirling's own flagship HMS Glory 98-guns failed to spot Calder's signal in the fog and sailed on, starts to turn in succession to close on the Allied line. Ahead Calder''s own centre is attempting to head off any attempts to interfere with Commodore Martin's attack on the Spanish van. |
The battle between Martin's and Gravina's respective van squadrons started immediately with Hero 74-guns crossing the Argonaute's bows and delivering a short range initial broadside that blew away the enemy's bowsprit, dismounted nearly half her guns and destroyed the helm, narrowly failing to cause her to strike.
The first exchange of gunfire was soon followed by a second as Triumph 74-guns crossed Argonaute's bows and delivered a similarly devastating bow rake bringing down Argonaute's mainmast and causing enough additional damage to force a strike that left the enemy flagship heavily damaged and unmanageable as she drifted into the oncoming British line eventually colliding with and fouling the Triumph who sent over a boarding part and took the ship under tow.
 |
| The view from the opposite side as seen above with the British Van and Centre coming across the Allied line with the Spanish flagship being towed by Triumph in the centre whilst engaging the next upcoming Spanish 74, Terrible and the fast approaching French 80-gun Indomptable, part of Magon's Rear Squadron. Note Sir Charles Stirling's Glory 98 out of position and wearing back towards the rear having missed Calder's signal in the foggy conditions. |
With the various squadrons turning to engage more closely, and various ships missing or responding to signals, the battle soon developed into a bit of a mess with both commanders struggling with the conditions to control and fight their battle and leaving the various squadron commanders to fight their own battles when able to see the enemy.
 |
| The heart of the battle with Commodore George Martin's 98-gun Barfleur seen far left looking to close on the Spanish Van as Rear Admiral Magon's squadron close in from the opposite side (centre background). Barfleur would join with Hero and Agamemnon to surround and board the stranded Indomptable when the Allied fleet turned away to break contact. |
British superiority in gunnery was the key factor as Martin's van continued to swap broadsides with the oncoming Spaniards and the Terrible 74-guns was next to receive the treatment with another short range bow rake, this time from Martin's own flagship the 98-gun Barfleur that destroyed her bowsprit and inflicted high casualties among the officers causing the second Spanish ship to haul down her colours, to also find herself taken under command by a British boarding party as the British van closed in around its prizes as HMS Hero swapped broadsides with the 80-gun Indomptable.
In the latter exchange the British ship came off the worse as the Frenchman took advantage of an unusual spotting success at long-range as the fog parted and allowed the 80 gunner to pour on a well directed broadside against the enemy rigging bringing down the bowsprit and adding to damage recieved at short range from the Hero's battle with the Spanish van that left the British 74 unbowed but heavily damaged with all her guns dismantled.

It was at this stage of the battle that the Fleet Preservation Rule kicked in with the Combined fleet now having lost a flagship (Argonaute) and another third rate, struck and captured by the enemy forcing a morale check first on Gravina's Spanish Van Squadron, needing a 5 or 6 on D6 to stay in the fight, which they promptly rolled.
However the two lost Spanish ships also breached the Combined Fleet's test threshold requiring to see if Villeneuve would hold his nerve or signal a disengagement, which was failed and the battle now changed to a rear-guard action as the Allies sought to get their squadrons clear without losing another ship and seeing the British trying to organise a 'General Chase' by units able to close in whilst trying to tack ever closer, revealing the benefit of having the wind to control events when either attacking or defending.
 |
| Villeneuve and Dumonoir maintain line ahead as the French commander signals a disengage command |
In the closing last moves of the game the Allies managed to break contact, with Villeneuve and Dumanoir able to bring their line across to cover the withdrawal of the Spanish and most of Magon's squadron, however unable to prevent the British van securing a third prize, the Indomptable, which was caught in the manoeuvre to break off and boarded by three British ships, including the 98-gun Barfleur, Commodore Martin's flagship, that closed with her and with this third prize secured a better result than the historical outcome.
'British take between 3 and 6 ships of the line:
Well done, you have bettered the historical outcome and probably saved yourself from the court martial that Calder had to face.'
Thank you to Gregory, Jack and Lawrence who took the roles of Calder, Martin and Stirling respectively and to David, John and Steve M who took the roles of Villeneuve/Dumanoir, Gravina and Magon respectively.
Both sides fought their battles more aggressively than their respective historical predecessors which is no surprise to most wargamers and it was pleasing to see Kiss Me Hardy working well for large games like this, with half the number of ships involved as at Trafalgar and producing a result playing from about 11am to 5pm with the chit driven activation standing up well to recreating the peculiar aspects of this difficult battle, made all the more fun in the spirit it was played.
I always think it shows how well a set of rules work when you can refight an historic battle and recreate so closely the events on the day, even with the commanders adapting the plan as best they can to those of their predecessors, and still deliver a final result that closely matched what happened.
I aim to put on more games with the collection this year to include some of the smaller actions so we can get more familiar with the nuances of this fun set of rules.
The collection uses the excellent 1:700th models from the Warlord Black Seas range of kits, the 10 by 5 foot sea cloth is from the also superb selection of cloths from Tiny Wargames, see the link top right, and all the model ships are based on acrylic pill bases supplied by Fluid 3D.
well written report and an enjoyable read. Nice ships too. I'm off to read up on the KMH ruleset...
ReplyDeleteHi Stuart,
DeleteThank you for your kind comments and I think KMH are a rather unique and very entertaining way to play Age of Sail games, so I hope you have fun with them.
Cheers
JJ
Great game report.
ReplyDeleteHi AJ,
DeleteThanks for your comment, very much appreciated.
JJ
Good looking game as ever.
ReplyDeleteBest wishes for 2022,
Jeremy
Hi Jeremy,
DeleteThanks mate and a great 2022 to you to.
Cheers
JJ