Saturday 25 November 2023

Gunfight at the OK Corral & The Earp Vendetta Ride 1881/82 - What a Cowboy


The November meeting saw the first club outing for "What a Cowboy" rules from "Too Fat Lardies". I had played the rules twice before, but this was my first outing as umpire. 

The rules are designed for up to ten figures a side, but previous experience suggests six characters aside is more reasonable. Characters are divided into "Legends", "Gunfighters", "Shootists" and "Greenhorns". 

https://toofatlardies.co.uk/product/what-a-cowboy-complete-bundle/

Naturally, "Legends" and "Gunfighters" get to do things ordinary men cannot and "Greenhorns" things you wouldn't want to. There is also the option of groups of "Henchmen", but we didn't use this, as the play was character based.

Play is card driven, with each character having his own card and activates when it is drawn from a deck. In addition there are "Bonanza" tokens, which are one off interruptions of a phasing player's actions, by a non phasing player. Add to this special traits and one off Desperado cards (one off special actions) and you have a fully rounded character.

On a character's card being drawn, the player gets to roll a set of six "Action Dice", with the scores determining which particular actions may be taken (move, aim, shoot, any action etc). Successful attacks allow a "Dodge" roll, with either a dodge to cover or the possibility of accruing "Shock" or wounds.

Shock leads to action dice being removed to a temporary shock pool. Wounds can give "Shock" and effects, as well as the permanent loss of "Action" dice.


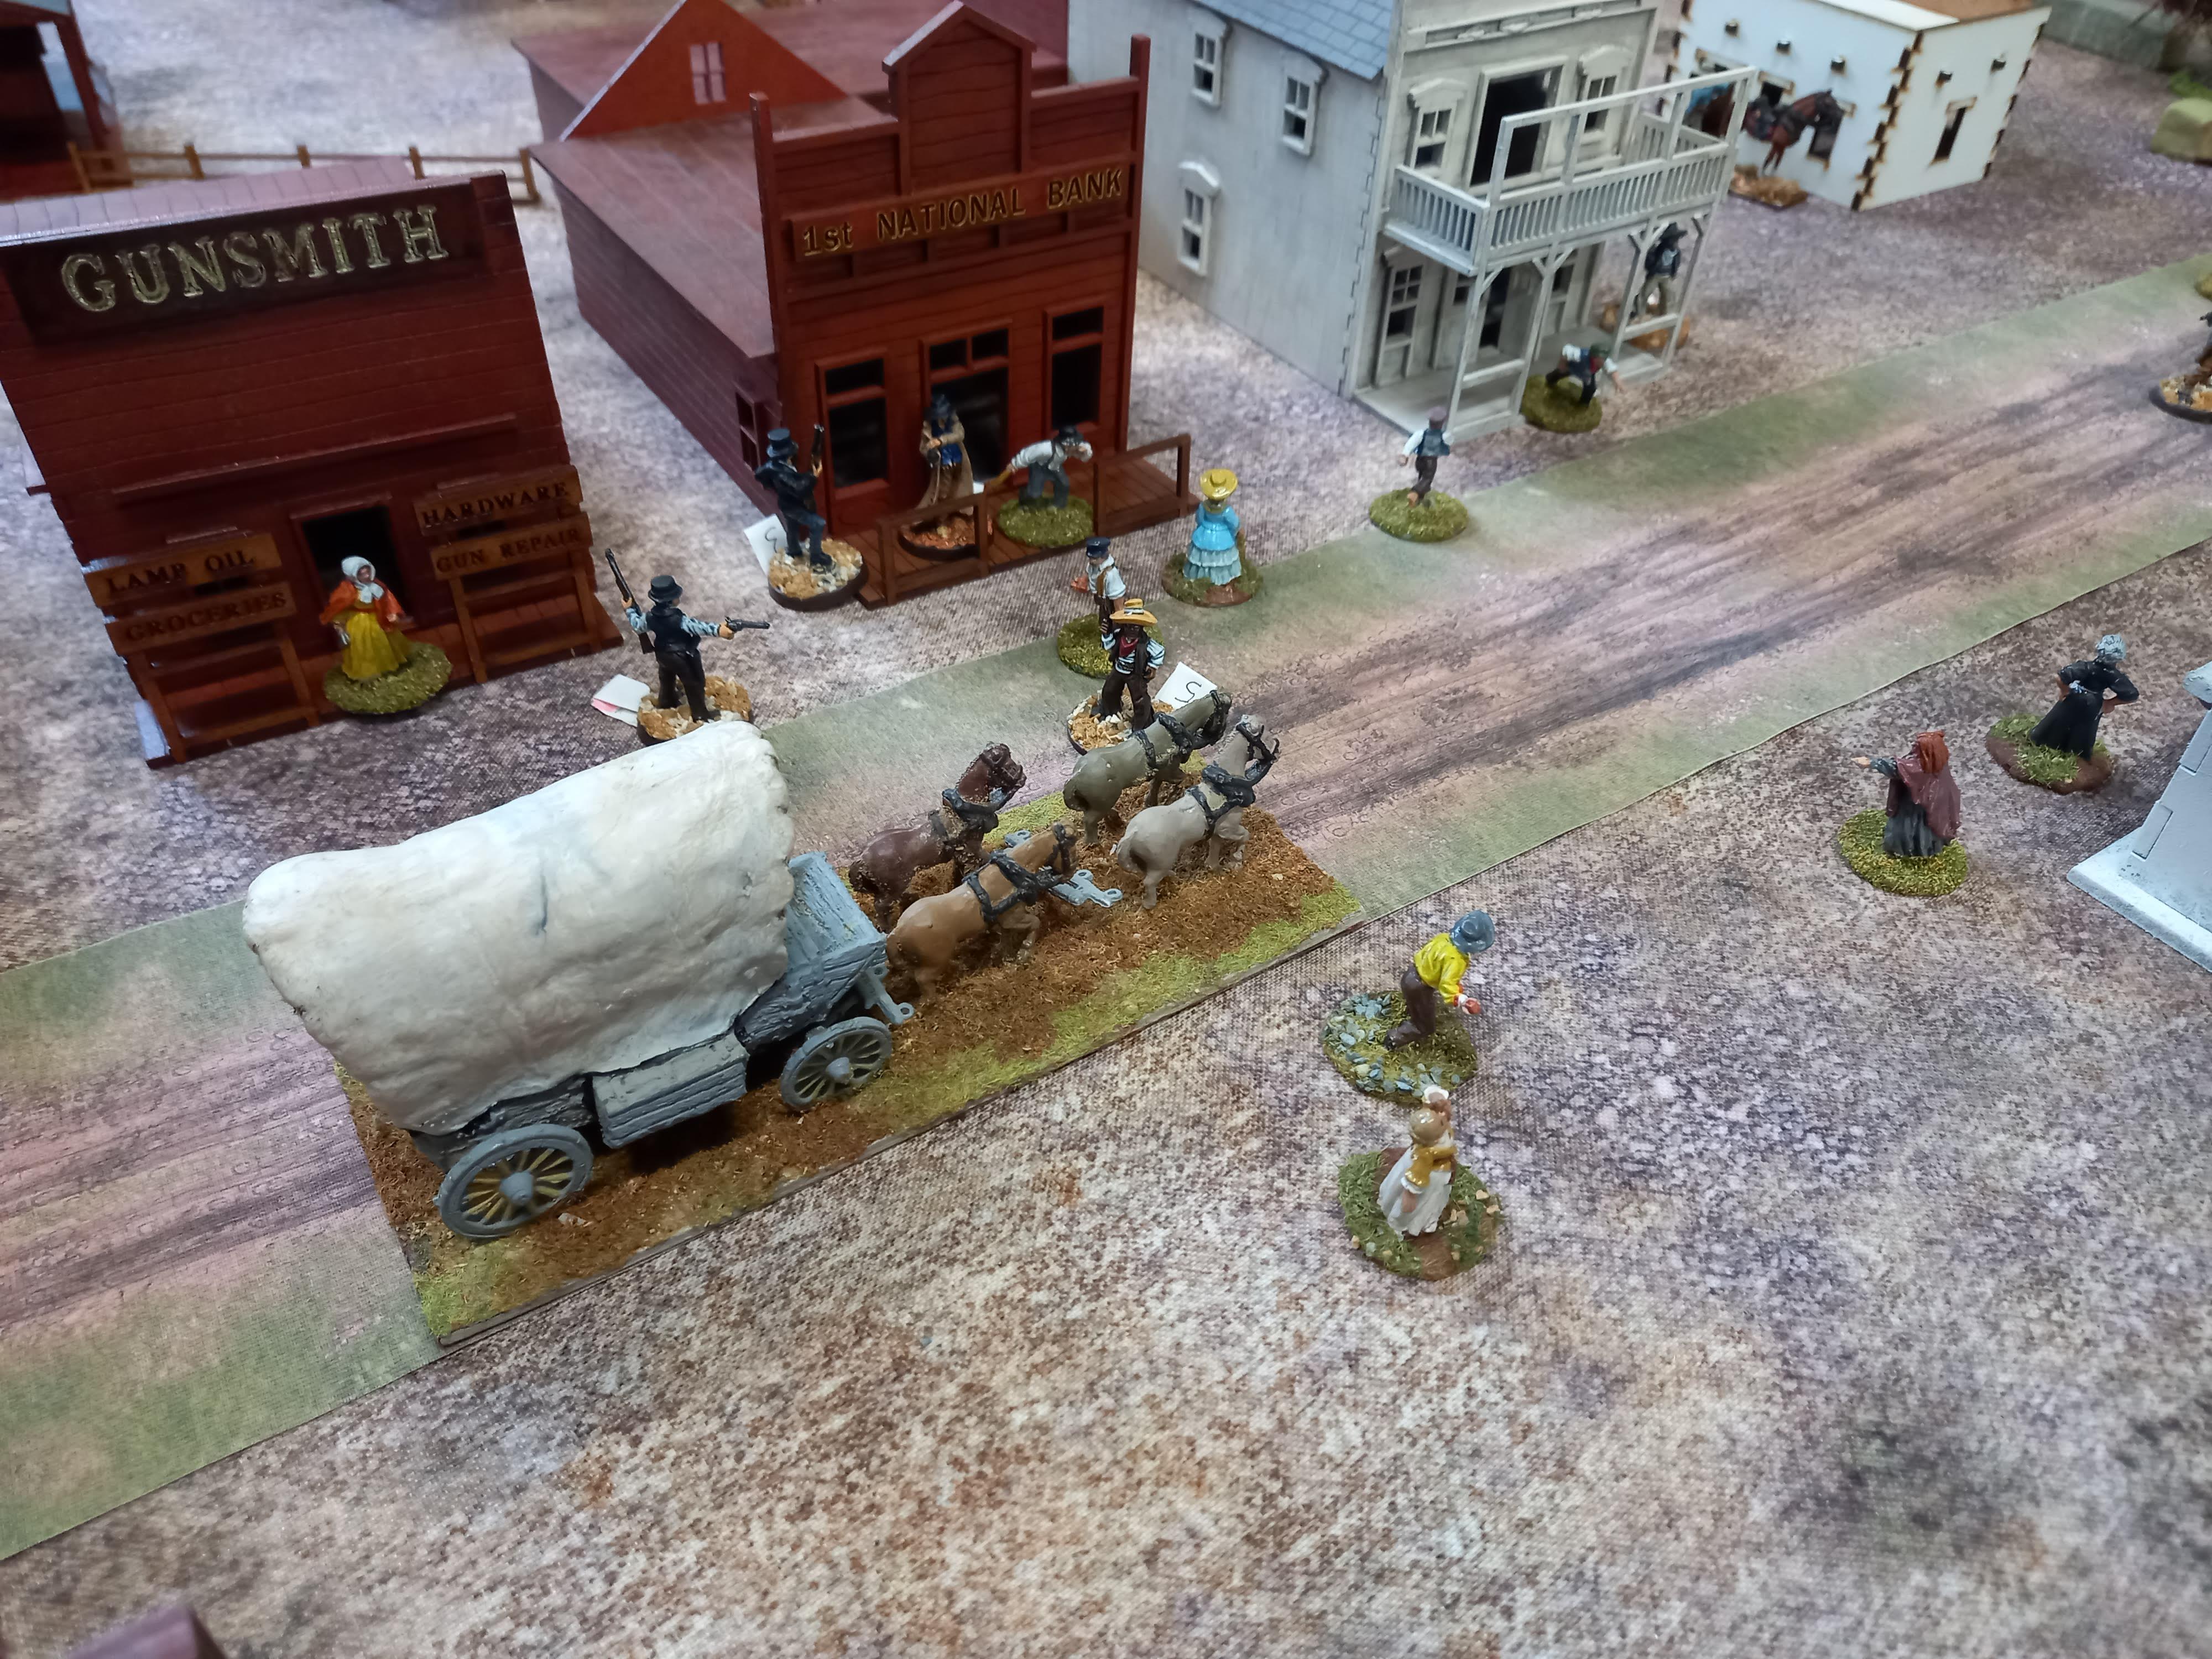
The players were Chas, who had play tested the rules with me before, Gregory, Mark E and father and son Mark & Matthew, who were playing as one player. The split was Gregory & Mark/Matthew as the "Cowboys"; Chas and Mark E as the Earp posse.

Earps Vendetta Ride - Bud Bradshaw
https://www.legendsofamerica.com/we-earpvendetta/

I had decided a full day club meeting should allow me to run the "Gunfight at the OK Corral" and "The Battle of Iron Springs" (part of the Earps Vendetta Ride), but I would have to make sure the pace of play didn't slacken.


The background to the scenarios was the growing hostility between the Earps and the "Cowboys" (a loose grouping of horse thieves, cattle rustlers, stagecoach robbers etc) in Tombstone, Arizona Territory. Virgil Earp being a US Marshal is treading a delicate path in this prospective State, not least as many inhabitants like the free and easy life in a Territory, rather than a regimented State. Add to this the sympathies held by the town Sheriff Johnny Behan for the "Cowboys" and a conflict was likely.


With the passing of a local Ordinance banning the carrying of firearms or Bowie knives in Tombstone, Virgil was determined to see the law was enforced. Having deputised his brothers and Doc Holliday, Virgil came across an armed Ike Clanton and proceeded to pistol whip him and drag him up before the local Judge. After the hearing, Wyatt ran into an armed Tom McLaury, who he proceeded to pistol whip and tell to check his gun at the nearest saloon. That night Ike was drinking heavily and loudly boasting of how he would kill the Earps. Word of this reached Wyatt the next morning.

The game opened with the Earp posse (Wyatt, Virgil, Morgan & Doc Holliday) walking down Fremont
Street, looking for the "Cowboys".

Unseen, in a vacant lot next to "Fly's Boarding House", the "Cowboys" were standing around, whilst Ike cleared his head by dunking it in a horse trough.


At this point Sheriff Behan ran up to the Earps and said "There is no need for you to go down there. I have been down to disarm them."

Wyatt told Behan to "move out of the way, as I mean to check" and brushed him aside.

With the Earp's walking down the middle of the street, quite a few "innocent bystanders" came out to take a look. This came to the notice of Billy Clanton, who stood nearest to Fremont street, in the alley by "Fry's Boarding House". Moving out onto the main street, Billy shielded his eyes to see who the men walking towards him were. A good hand of spot rolls later, he could see they were the Earps and Holliday and was not slow to let the other cowboys know too.


Holliday dodged into Fry's Boarding House and made for the stairs, bringing his shotgun out from under his duster coat as he went. Ike made his special "Panic" roll, passed, and headed into Fry's Photographic. Both men ignored the protestations of the owners of these establishments.

Holliday had stolen a march on the Earps, who were still half way down the street. The Earps being well aware they could not start any trouble, as they were the law. Holliday was another matter and he arrived on the balcony at the boarding house and drew a bead on the cowboys exiting the alley. Tom McLaury saw him just in time and dodged behind cover, as pellets kicked up the dirt where he had been.

Meanwhile several bystanders froze with fear or ran about like headless chickens, adding to the confusion.


Billy Clanton made it onto the boardwalk and faced a hail of fire from the Earps. Bullets struck all round him, but he made it into the boarding house and was up the stairs after Holliday, scattering civilians as he went.

The Earps took cover in various shops, as Billy Clanton walked up behind Holliday on the balcony. He couldn't miss. Well, he did and Doc cut him down with a shotgun blast.

Ike Clanton had made his way down a side alley and got the drop on Morgan, shooting him through a window. Wyatt fired three shots at Ike, but none found their mark.


Frank McLaury wounded Virgil and then decided to leave the scene, with Tom McLaury.

Meanwhile Ike and Wyatt were shooting at each other through a window. Wyatt hit Ike and he fell. As Wyatt engaged Frank McLaury, Billy Claiborne arrived in the side alley. Ignoring Ike's wounds he picked up his gun. Finally he was armed. At this point Wyatt popped up and gunned him down.

With Wes Fuller shouting "I ain't got no gun", a volley of bullets cut him down. The remaining cowboys beat a hasty retreat and the action was over.


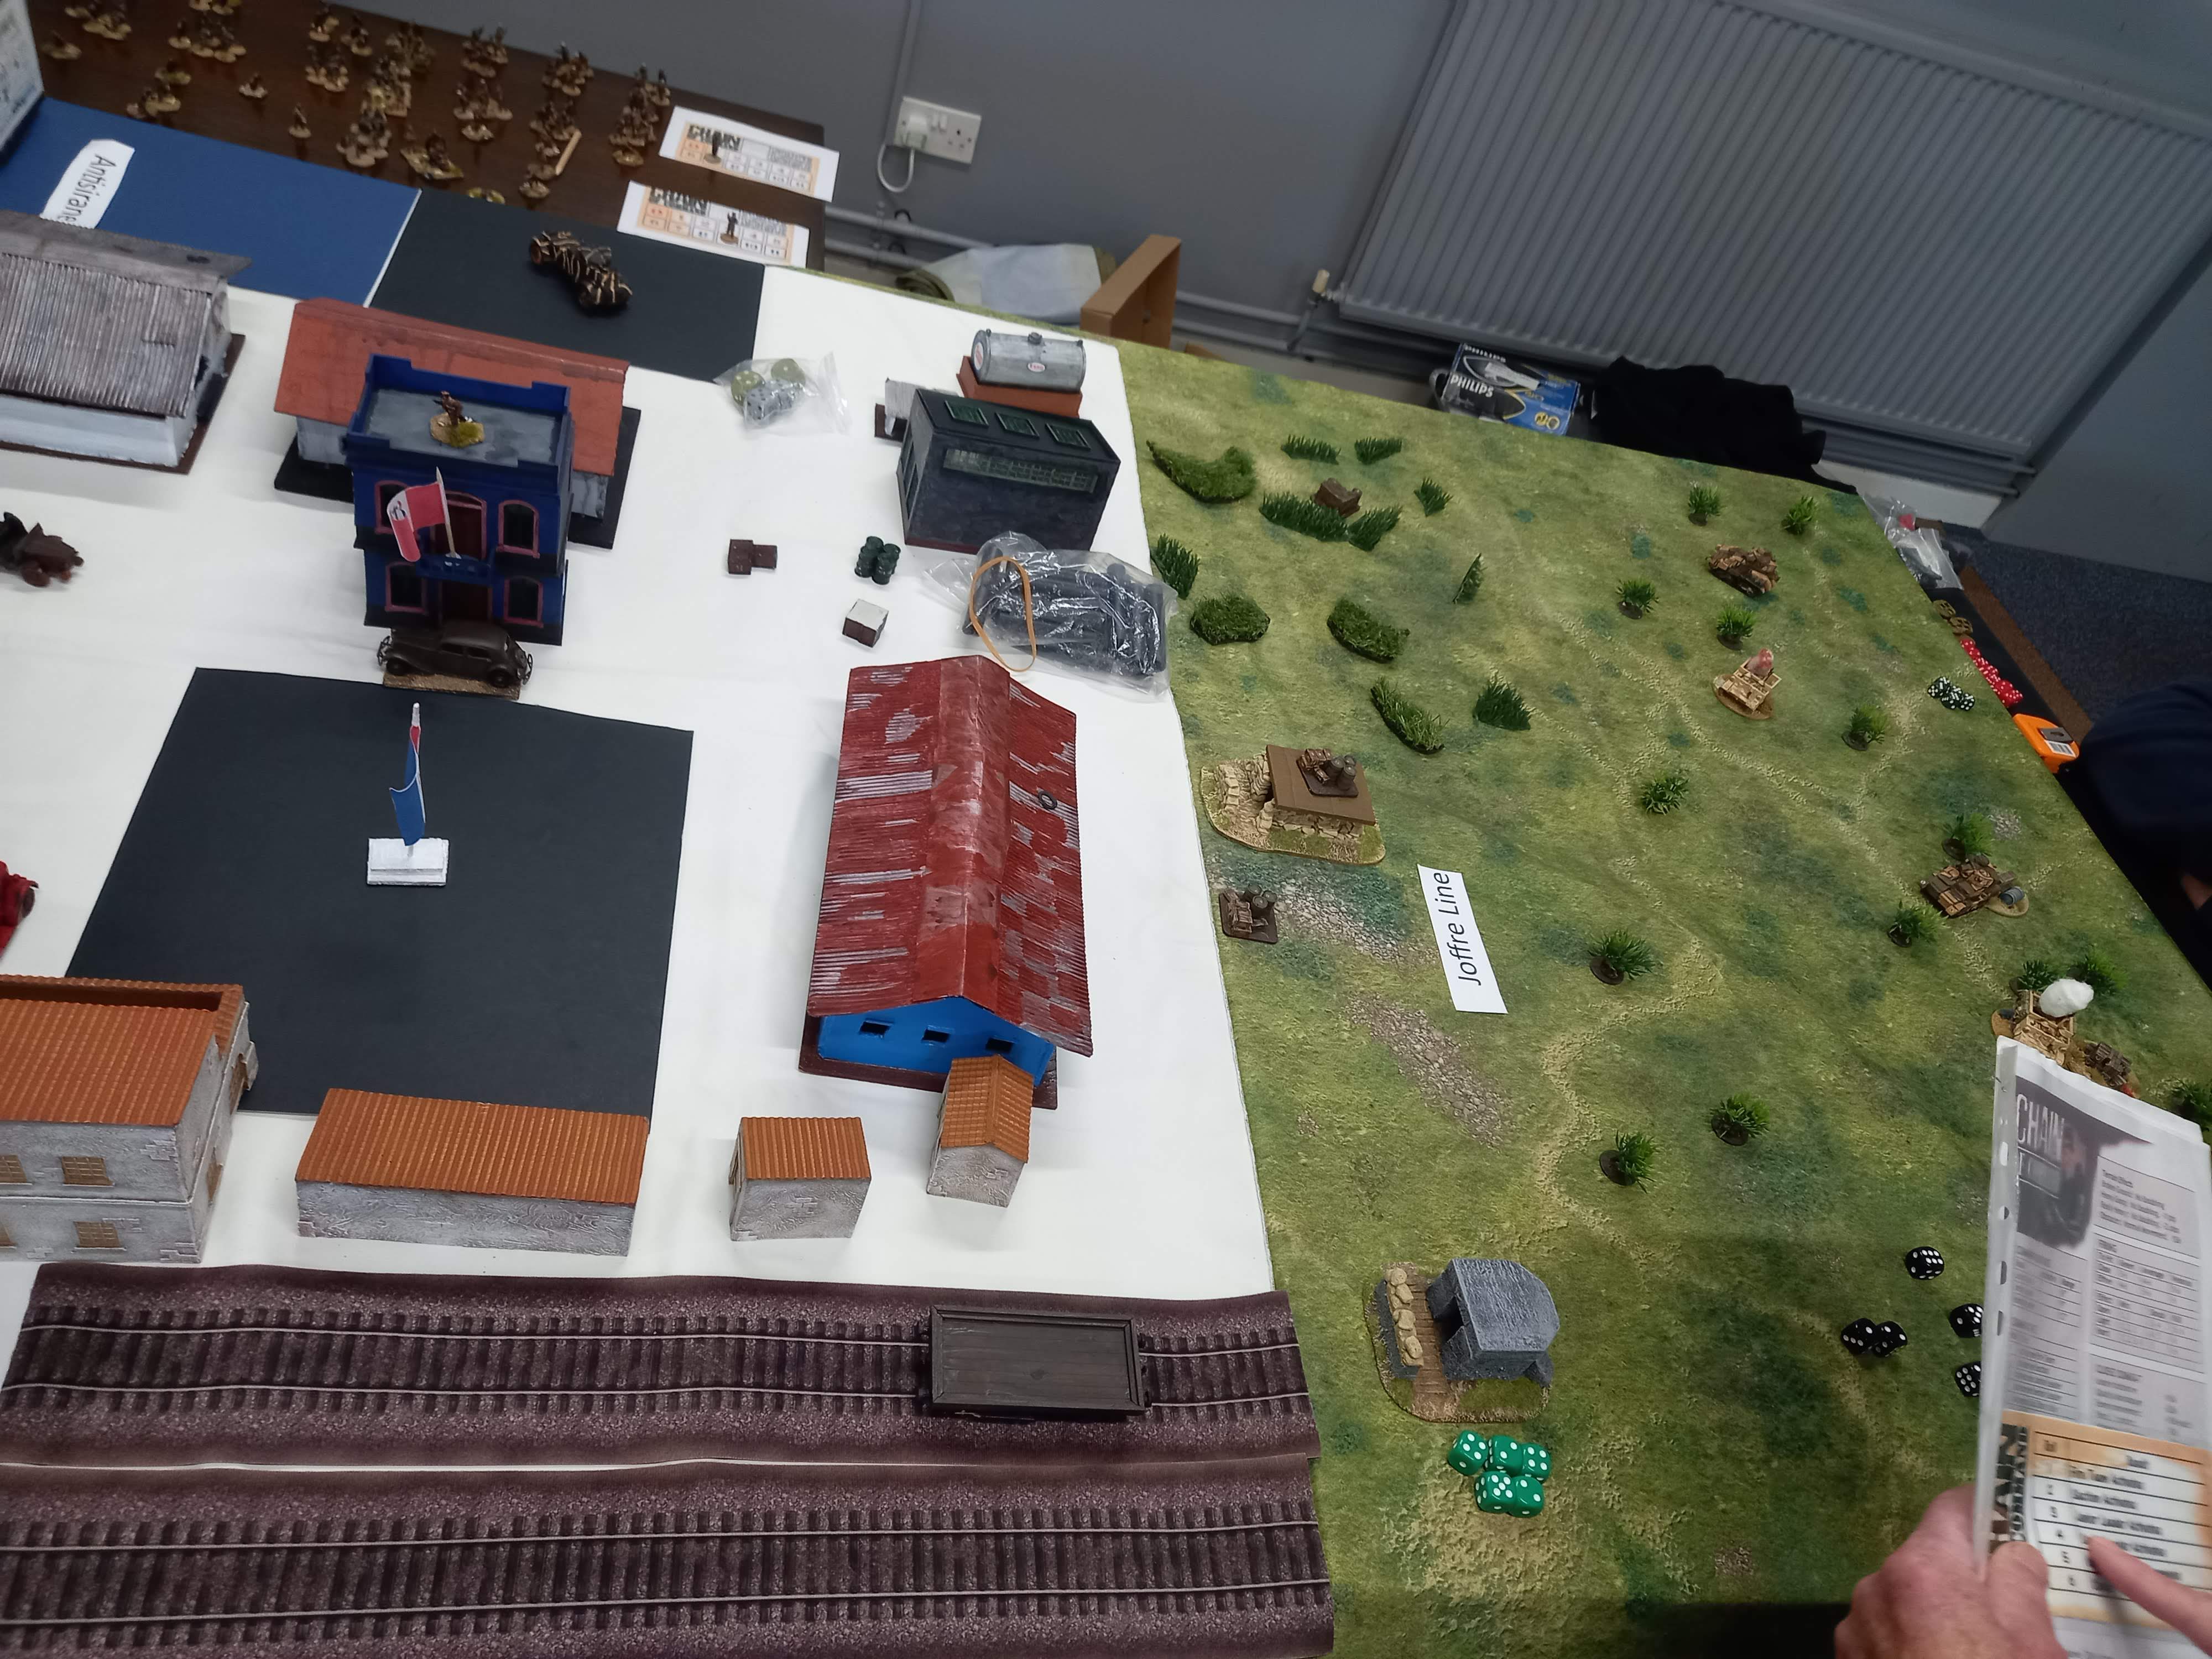
The second scenario was the part of the Earp Vendetta ride. Following the action in Tombstone, the cowboys bushwhacked Morgan and Virgil on separate nights. They killed Morgan and wounded Virgil. The remaining Earps and their friends meant to have their revenge and set off to hunt down the cowboys.

Riding to meet one of their number who was bringing them $1000, the Earp posse crested a low hill near Iron Springs, only to see a few cowboys breakfasting by the stream. Some good spotting enabled them to pick out Johnny Ringo and Curly Bill Brocius, both of whom were on their blacklist.

William 'Curly Bill' Brocius

The Earps had the advantage, having long arms to hand and dismounted. They fired on the four in the camp, picking on the two of the four men they recognised. At this point Wyatt threw caution to the wind, drew his six-gun and rushed towards the cowboys.

The fight continued, with Curly Bill being wounded. Seeing this, Johnny Ringo made a break for the horses hidden behind a stand of trees, telling the others he meant to get his Winchester.


Whilst this was going on, the other five cowboys were rushing towards the scene, having been off collecting wood.

Now the Earps were caught in the crossfire. Doc decided to finish off those in the camp and advanced, firing as he went. He wounded one cowboy with his shotgun, but was himself cut down by close range fire.

Johnny Ringo

Meanwhile Wyatt was into the woods in pursuit of Johnny Ringo. Just as Johnny reached the horses, Wyatt's gun spoke and felled him.

With another member of the Earp's posse being shot by the returning cowboys, both sides broke off and head for the hills.

https://wallpapers.com/picture/cowboys-1920-x-1280-picture-3san5oxn4neyginy.html

Many thanks to Chas, Gregory, Mark E, Mark & Matthew, for playing in the spirit of the game. I would
also like to thank Gregory, who acted as my American cultural advisor, making sure the freedoms of the Constitution were exercised at all times!

Vince

Saturday 18 November 2023

OPERATION IRONCLAD The British Invasion of Madagascar 1942- Chain of Command

British troops wading ashore during Operation Ironclad

Introduction
The Vichy Government oversaw France’s overseas empire, including Madagascar. The island’s proximity to vital sea routes is shown on the map. Vichy had allowed the Japanese into Indo-China, helping their invasion of Malaya and Singapore; what if this happened in Madagascar? London got to work on Operation Ironclad, the biggest landing since Gallipoli. And The Devon Wargames Group gets to visit another obscure theatre of The Second World War.


Operation Ironclad
In early 1942 a troop convoy was being assembled for transit to India. The plan was to reinforce the
convoy with more troops, commandos, capital ships and aircraft carriers and invade Madagascar.
Included were the first infantry and vehicle landing ships, that would become so familiar later in the war.

A Valentine tank being uploaded from LTS Bachaquero during a pre-invasion exercise.

Diplomatic and economic pressure was applied to persuade Madagascar to switch to De Gaulle but the anglophile governor, who had not declared for either Vichy or for De Gaul, was replaced and any Gaullists were jailed.

British naval forces assembled for Operation Ironclad off the Madagascan coast

The objective of Operation Ironside was the harbour of Diego Suarez, the size of Scapa Flow with the
adjacent naval base of Antsirane, France’s equivalent of Singapore, both on the northern peninsula of the island. 

The eastern entry to Diego Suarez harbour was heavily defended by shore batteries and the French had not neglected landward defences too - The Joffre Line. The French were confident that the western side of the peninsula could not be attacked from seaward, due to the many reefs and island; here their defences were less. 

Vice-Admiral Sir Edward Neville Syfret, pictured in his Office at the Admiralty in January 1944

An exemplary demonstration of seamanship allowed the British fleet, under the command of Rear-Admiral Syfret, to navigate and land troops on the western side of the peninsula. On 5th May 1942 commandos under the cover of darkness, seized the western shore batteries; the garrison was asleep and not a shot was fired. The main invasion landed further south without incident. To confuse the defenders further, the navy spent the night firing pyrotechnics at the entrance of the harbour and dummy paratroopers were dropped by the Fleet Air Arm.

British fleet operations during Operation Ironclad with a Fleet Air Arm Martlet preparing to land 

The lessons of the Gallipoli landings were well learned, “a gallon of sweet being better than pint of blood”; and the troops pushed on quickly from the landing areas to seize inland objectives. By the end of the first day British tanks were half way to Antsirane and the commandos well on the way to Diego Suarez town. 

A French officer, captured by the tank force, was released with a letter calling for surrender to avoid casualties, ill will etc. This inadvertently disclosed the main axis of the British attack to the French commander. The search for paratroopers was abandoned and all the small boats in Diego Suarez were withdrawn, so the commandos could not cross the harbour. The French now concentrated on defending the Joffre Line.

https://www.combinedops.com/MADAGASCAR.htm

The following day British tanks, unsupported by infantry, attacked the Joffre Line only to find it stoutly defended, incurring considerable casualties. Infantry that attempted to outflank the line though a swamp, were unsuccessful too. As further British troops reached the Joffre Line piecemeal, their uncoordinated attacks were all beaten off. The British realised that only an all-out assault would carry the Joffre Line and more troops and artillery were disembarked.

Rear Admiral Syfret then proposed an operation of Nelsonian daring-do. A destroyer, HMS Antony, was loaded with fifty Royal Marines and rounded the north of the island, sailing directly into the harbour under the cover of darkness. Undetected, HMS Antony landed the marines and attacked Antsirane from seaward. With the main assault on the Joffre Line underway and the marines landed, the French entered negotiations and surrendered on 7th May.

Report of Rear Admiral Syfret, source: HMS Ramillies Association

The game today is based on this final assault, with the table divided between the Jofre Line and Antsirane.

How the game played.
We used the Chain of Command rules by the Too Fat Lardies, with both sides deploying two platoons each; the British also had a force of Marines, making this a Big Chain of Command game. 

All the British and most French forces were regular but some of the French forces were green, conscripted Malagasy troops. The first turn of the game is played at night, so spotting and firing distances are limited to ten (10) inches.


British Forces: two regular platoons of infantry. British support options were:

Pre-game bombardment, an infantry assault tank, Adjutant and HMS Antony. Antony arrives from the second turn onward carrying two sections of marines (rifles only), an additional senior leader and two heavy guns (classed as 75mm for game purposes). The marines count as elite for purposes of employment (since it is a surprise) but in other respects are treated as regulars.


French Forces: two infantry platoons, one regular and one green. French support options were:

4 trench/gun emplacements, 2 x 75mm M1897 guns (one deployed on the Joffre Line and one in
Antsirane), 1 tripod mounted medium machine gun, 1 sniper team, an additional senior leader and 1 team of motor cyclists. The French may pre-deploy two units before the game starts, in secret, if
they wish.

French morale (bad things happen) declines normally for losses incurred on the Joffre Line, but twice
as fast for loses in the port.


At the beginning of the game the French don’t know about HMS Antony. Antony arrives any time after the second turn, at the British player’s discretion. The British don’t know that French morale is double penalised in the port area or of any pre-deployed French units in the Joffre Line.

The pregame scouting phase was confined to the Joffre Line end of the table to start with. Only when HMS Antony or British units cross into the port area, will a second scouting phase take place. With the Joffre Line littered with abandoned vehicles, there were plenty of places for the British to deploy their jump-off points (JOP). The French deployed a 75mm field gun and the medium machine gun in the Joffre Line bunkers and placed their JOP’s behind the defensive line plus one in the flanking swamp.


The British proceeded to advance cautiously with just one of their two platoons, taking advantage of the darkness to keep out of sight of the defenders. Despite the pregame bombardment, that was designed to slow the French deployment, some good dice rolling by one of the French players got the Joffre Line well manned faster than expected. It was soon apparent that the French were manning the line with their better troops, as only one section of green Malagasy troops was deployed to hold the flanking swamp. 

By now the French had managed to accumulate a chain of command dice, allowing them further options. Knowing that the British were out there somewhere close to their line, they opted to end the turn, their reasoning being that they would end the night-time range restriction.

With the new turn the French now had the full layout of advancing British forces close before them; both defenders and attackers leapt into action. 

The British tank pressed forward spraying the French line but only to be hit by a 75mm shell that destroyed the tank’s machine gun. The Malagasy troops in the swamp were particularly unlucky suffering many casualties from accurate British rifle fire; the French platoon officer had to come forward to steady their nerves. 

While the Joffre Line was ablaze with gunfire, HMS Antony had successfully started to land her Marines. With the arrival of the marines a second patrol phase was carried out on the port part of the table, with the French placing three JOP’s, but the British were confined to just one at the dockside. Both sides were allocated another officer, one being Captain Price of the Royal Marines and the other representing the French higher command within the port area.


The action was thick and fast now. The French deployed the remaining of their Malagasy troops in the port, supported by one section of the French regulars, a 75mm gun and the motor bike team. With French troops now spread across the Joffre Line and the port the French players had to decide how to best use their command dice. 

The British used smoke to blind the Joffre Line as they continued to advance, but not without casualties especially as their tank was now servery impeded without the machine gun. In the port the French 75 started to fire at the marines causing some casualties but Captain Price had disembarked and started to direct all possible naval gunfire fire towards the French 75mm gun. A combination of rifle fire and ships guns took two phases to silence the 75mm. 

With their officer caught between his troops in the swamp and those in the port, the sight of the lost 75mm was enough for the green Malagasy troops, and their morale broke. With the Joffre Line now well covered with British smoke the French defenders couldn’t fire at their adversaries, so the remaining French player decided to end the turn for a second time using another Chain of Command dice – this had the effect of removing all the carefully laid British smoke screen.


As the third turn began, the British advance on the line was cruelly exposed by the dissipating smoke
and heavy French fire that caused British casualties to pile up quickly. The second British platoon was
deployed by now to bolster the attack on the line too and began to infiltrate though the swamp where the Malagasy troops had been. 

However ferocious the French defence of the Joffre Line, the real action was taking place in the port itself. A brave and determined French counter attack, which resulted in hand to hand combat, was repulsed and HMS Antony continued to fire on the port. Even the motor cyclist tried to get at the marines, but Antony’s fire proved to heavy for them and with the loss of the last effective French unit in the port, it was time to negotiate terms.


All in all the game played well to historical events, a British victory but coming with more casualties than should have been.


Post Script

London thought that the capture Antsirane would end the campaign, but the French continued to resist until November 1942. Madagascar was then returned to France, under Gaullist administration. While the Japanese never planned to occupy Madagascar, the Indian Ocean was still a scene of conflict.

Shortly after the surrender of Antsirane, a Japanese midget submarines entered Diego Suarez harbour and badly damaged HMS Ramillies and sank an oil tanker.

Japan needed German technology and Germany needed access to Japanese controlled war materials. German, Italian, and Japanese submarines all plied the long and dangerous passage between Europe and Asia. If Madagascar had become an axis submarine base it would have further complicated the war at sea. 

If you wish to know more about U Boat operations in the Indian Ocean, I recommend this podcast:


Three months after Operation Ironclad the disastrous landings a Dieppe took place; there was still much to learn.


Thanks to Dave and Paul for playing the French and Nathan for commanding all the British forces singlehandedly! Figures on both sides are mostly Perry Miniatures.