Labels

Showing posts with label Pikeman's Lament. Show all posts

Saturday, 3 May 2025

The Battle of the Spurs - The Pikemans Lament (modified)


It has been over a month since our last Renaissance game at the club. As many of us are busy rounding out our collections in preparation for Pavia this December, it’s been far too long without returning to the battlefields of early 16th-century Europe.

The Italian Wars (1494-1559) are a period of shifting alliances, feuds, and rivalries. The constant clashes of egos and political manoeuvring make it hard to keep track of the various players involved. Though most of the major battles occurred in northern Italy, the conflict spread across Europe. One of the most notable episodes was the War of the League of Cambrai (1508–1516), which saw nearly every major Western European kingdom involved, including England.

Why England Was Involved
In the second phase of the war, King Henry VIII of England entered the fray. His involvement, particularly in a war focused on the balance of power in northern Italy, might seem strange at first glance. However, the context of his involvement is rooted in Italy's fragile political state. Following the French capture of Milan in 1504, Italy reached a rough equilibrium: France and Venice dominated the north, Aragon held the south, and the Papal States separated the two.

Portrait of King Henry VIII after Hans Holbein the Younger

Pope Julius II, upon taking power in 1503, quickly moved to confiscate lands from the Borgia family. This led to a series of conflicts, including the rise of Venetian power along the Adriatic coast. Tensions escalated further when Louis XII of France was angered by the lack of consultation over peace talks, eventually leading to the formation of the League of Cambrai (1508). This alliance, composed of the Pope, the Holy Roman Emperor Maximilian I, was designed to curb Venetian power in Italy. However, in the second phase saw the formation of the Holy league pitting Julius against Louis.

England Joins the Fray
Henry VIII’s involvement stemmed from both political and dynastic motivations. His marriage to Catherine of Aragon, daughter of Ferdinand, provided a convenient basis for him to claim France's territories. With French forces stretched thin across Piedmont and Gascony, Henry seized the opportunity in 1513 to press his claim to the French throne.

Henry mustered a force of 30,000 to 40,000 men, landing at Calais and advancing south. After a difficult siege at the town of Thérouanne, the French cavalry, under Jacques de La Palice, launched a feint attack, trying to relieve the besieged town and supply its garrison.


The Battle of the Spurs
The battle of the Spurs (1513) is often overshadowed by larger engagements in the Italian Wars and by England’s victory at Flodden that same year. Yet it remains a fascinating example of the period’s siege tactics and heavy cavalry manoeuvres. I thought this would be an exciting scenario to wargame. Rather than using massed rank-and-file systems, I opted for a skirmish-based system to better reflect the nature of the battle.


While I initially considered using Lion Rampant, I ultimately decided on The Pikeman's Lament, despite the battle being a century earlier than the game’s typical setting, the unit selection provides the right feel for the period and the way terrain interacts leads to some interesting tactical decisions. The rules already accounted for most of the units used during the Italian Wars, but I made a few minor adjustments to unit profiles, including tweaks for longbowmen and stradiots.


The Game and Battle Report
The scenario involved four forces, each comprised of a 24 point Pikemans Lament company:
  • English under Henry VIII - A mixture of cavalry types with some longbow, billmen and one of Henry’s prized organ guns
  • Burgundians under Maximilian I - A typical landsknecht force of pike, skirmishers, forlorn hope and Gendarmes
  • French relief under Jacques de La Palice - A force comprised of mostly heavy cavalry with one unit of stradiots.
  •  French garrison under Antoine de Créquy - A mixture of pike, skirmishers and a small cannon


The game started slowly with the Anglo-Imperials holding their siege lines. The Zweihand wielding forlorn hope did move towards the French relief to occupy a farmstead. The French garrison formed a solid pike block screened by skirmishers and advanced towards the siege lines while being peppered by arrows from the longbowmen.


Maximilian viewed the garrisons advance as the biggest threat and the Burgundian Gendarmes charged towards the town as the landsknecht missile troops also headed from beyond the siege lines to engage and slow the sallying garrison. The French heavy cavalry suddenly stirred into action making a beeline towards the centre of the Anglo-Imperial forces while the stradiots tried to sneak around the farmstead. Seeing this ruse Henry’s Yeoman of the guard moved to intercept them and the stradiots pulled back behind the French gentlemen to avoid taking casualties from the longbow fire.


Maximilian charged into the approaching garrison taking casualties from the incoming crossbow and arquebus fire however driving off some of the skirmishing troops. The French cannon fire wiped out a unit of landsknecht arquebusiers and the longbowmen succeed in driving back some of the wily adventurers. Maximilian ended up charged by the French pike, and only just survived the encounter, being forced into retreat. At this point it looked like the French pike would be over running the siege lines within a turn or two.


The zealous French relief force charged towards the yeoman who failed to evade. However, despite taking heavy casualties fell back in good order from the engagement. Henry’s gentlemen pensioners met the advancing gendarmerie head on, however they were soon overwhelmed, with Henry himself ending up alone. For a moment it looked like England would likely be without a king, however costly counter charges from the billmen and landsknechts blunted most of the knights elan and Jacque de la Palice fell to the zweihanders. 


The stradiots searched for the path of least resistance to be met by the English border horse, who they quickly wiped out with their combined javelin and sabre attack. The ordinance archers barrelled into the siege lines following the death of knightly superiors and succeeded in driving back the billmen and defeating the English King. The English army was severely battered however the English longbow turned around to remind the French heavy cavalry what the word archer means leaving the stradiots as the last unit of the relief force.


The French pike continued bearing down on the siege lines routing their landsknecht adversaries. The cavalry’s distraction of the longbowmen allowed the pikemen to charge, however the dug in longbowmen turned the pikes away. That said, the longbowmen where ultimately driven off their defensive line by the surviving adventurers. 


After struggling to fire for most of the game the English organ gun opened fire on the pike squares causing one to waver, however they soon rallied and where once again bearing down on the thread bare siege lines. In spite of this, following their dispatching the French grand master, the Zweihanders had returned to the siege lines and drove the remaining French pike back, routing their commander in the process. 


The stradiots, being the only unbloodied unit left on the table suddenly gained a deal of confidence and moved to occupy the bridge, throwing their javelins with abandon hoping to disorder or rout the surviving Anglo-Imperials. Some of the surviving landsknechts charged the bridge but were driven off by a hail of javelins. At this moment the longbowmen recovered from their retreat and were soon drawn up within range of it. Soon the stradiots where being peppered with bodkin points until they routed off the table.


In the end, the Anglo-Imperial forces emerged victorious, though at significant cost. King Henry had fallen, and Maximilian barely survived. Despite this, the victory has allowed the capture of Thérouanne.

Aftermath
The victory at Guinegate in 1513 set the stage for the fall of Thérouanne and further English victories in the region. This combined with the fall of Navarre, Milan and Dijon meant France had all but lost the war. However, the alliance soon began to dissolve. Ferdinand of Aragon lost interest having captured Navarre, Maximilian squabbled with Venice over territory and Pope Julius had died of fever. Ultimately, bankrupt and with dwindling support of his allies Henry returned his army to England.

Henry and Louis XII of France signed a peace treaty in 1514, solidified by a marriage between Henry’s sister and the French king. Unfortunately, the aged Louis found the marriage to the young Mary over exerting and died on the 1st January 1515. His successor, Francis I, would go on to win the war at Marignano later that year, finally bringing peace to Italy after eight years of war, well for the next five years at least.

Conclusion
This was a fantastic game and played like a rollercoaster, every turn having a new game changing dice roll and no clear winner until the very end. The modified rules for The Pikeman’s Lament worked well with just a few tweaks. Thanks to all the players—Ian as Henry, John as Jacques de La Palice, Matthew as Maximilian, and Stephen as Antoine de Créquy—for making it a memorable event! 

Saturday, 10 September 2022

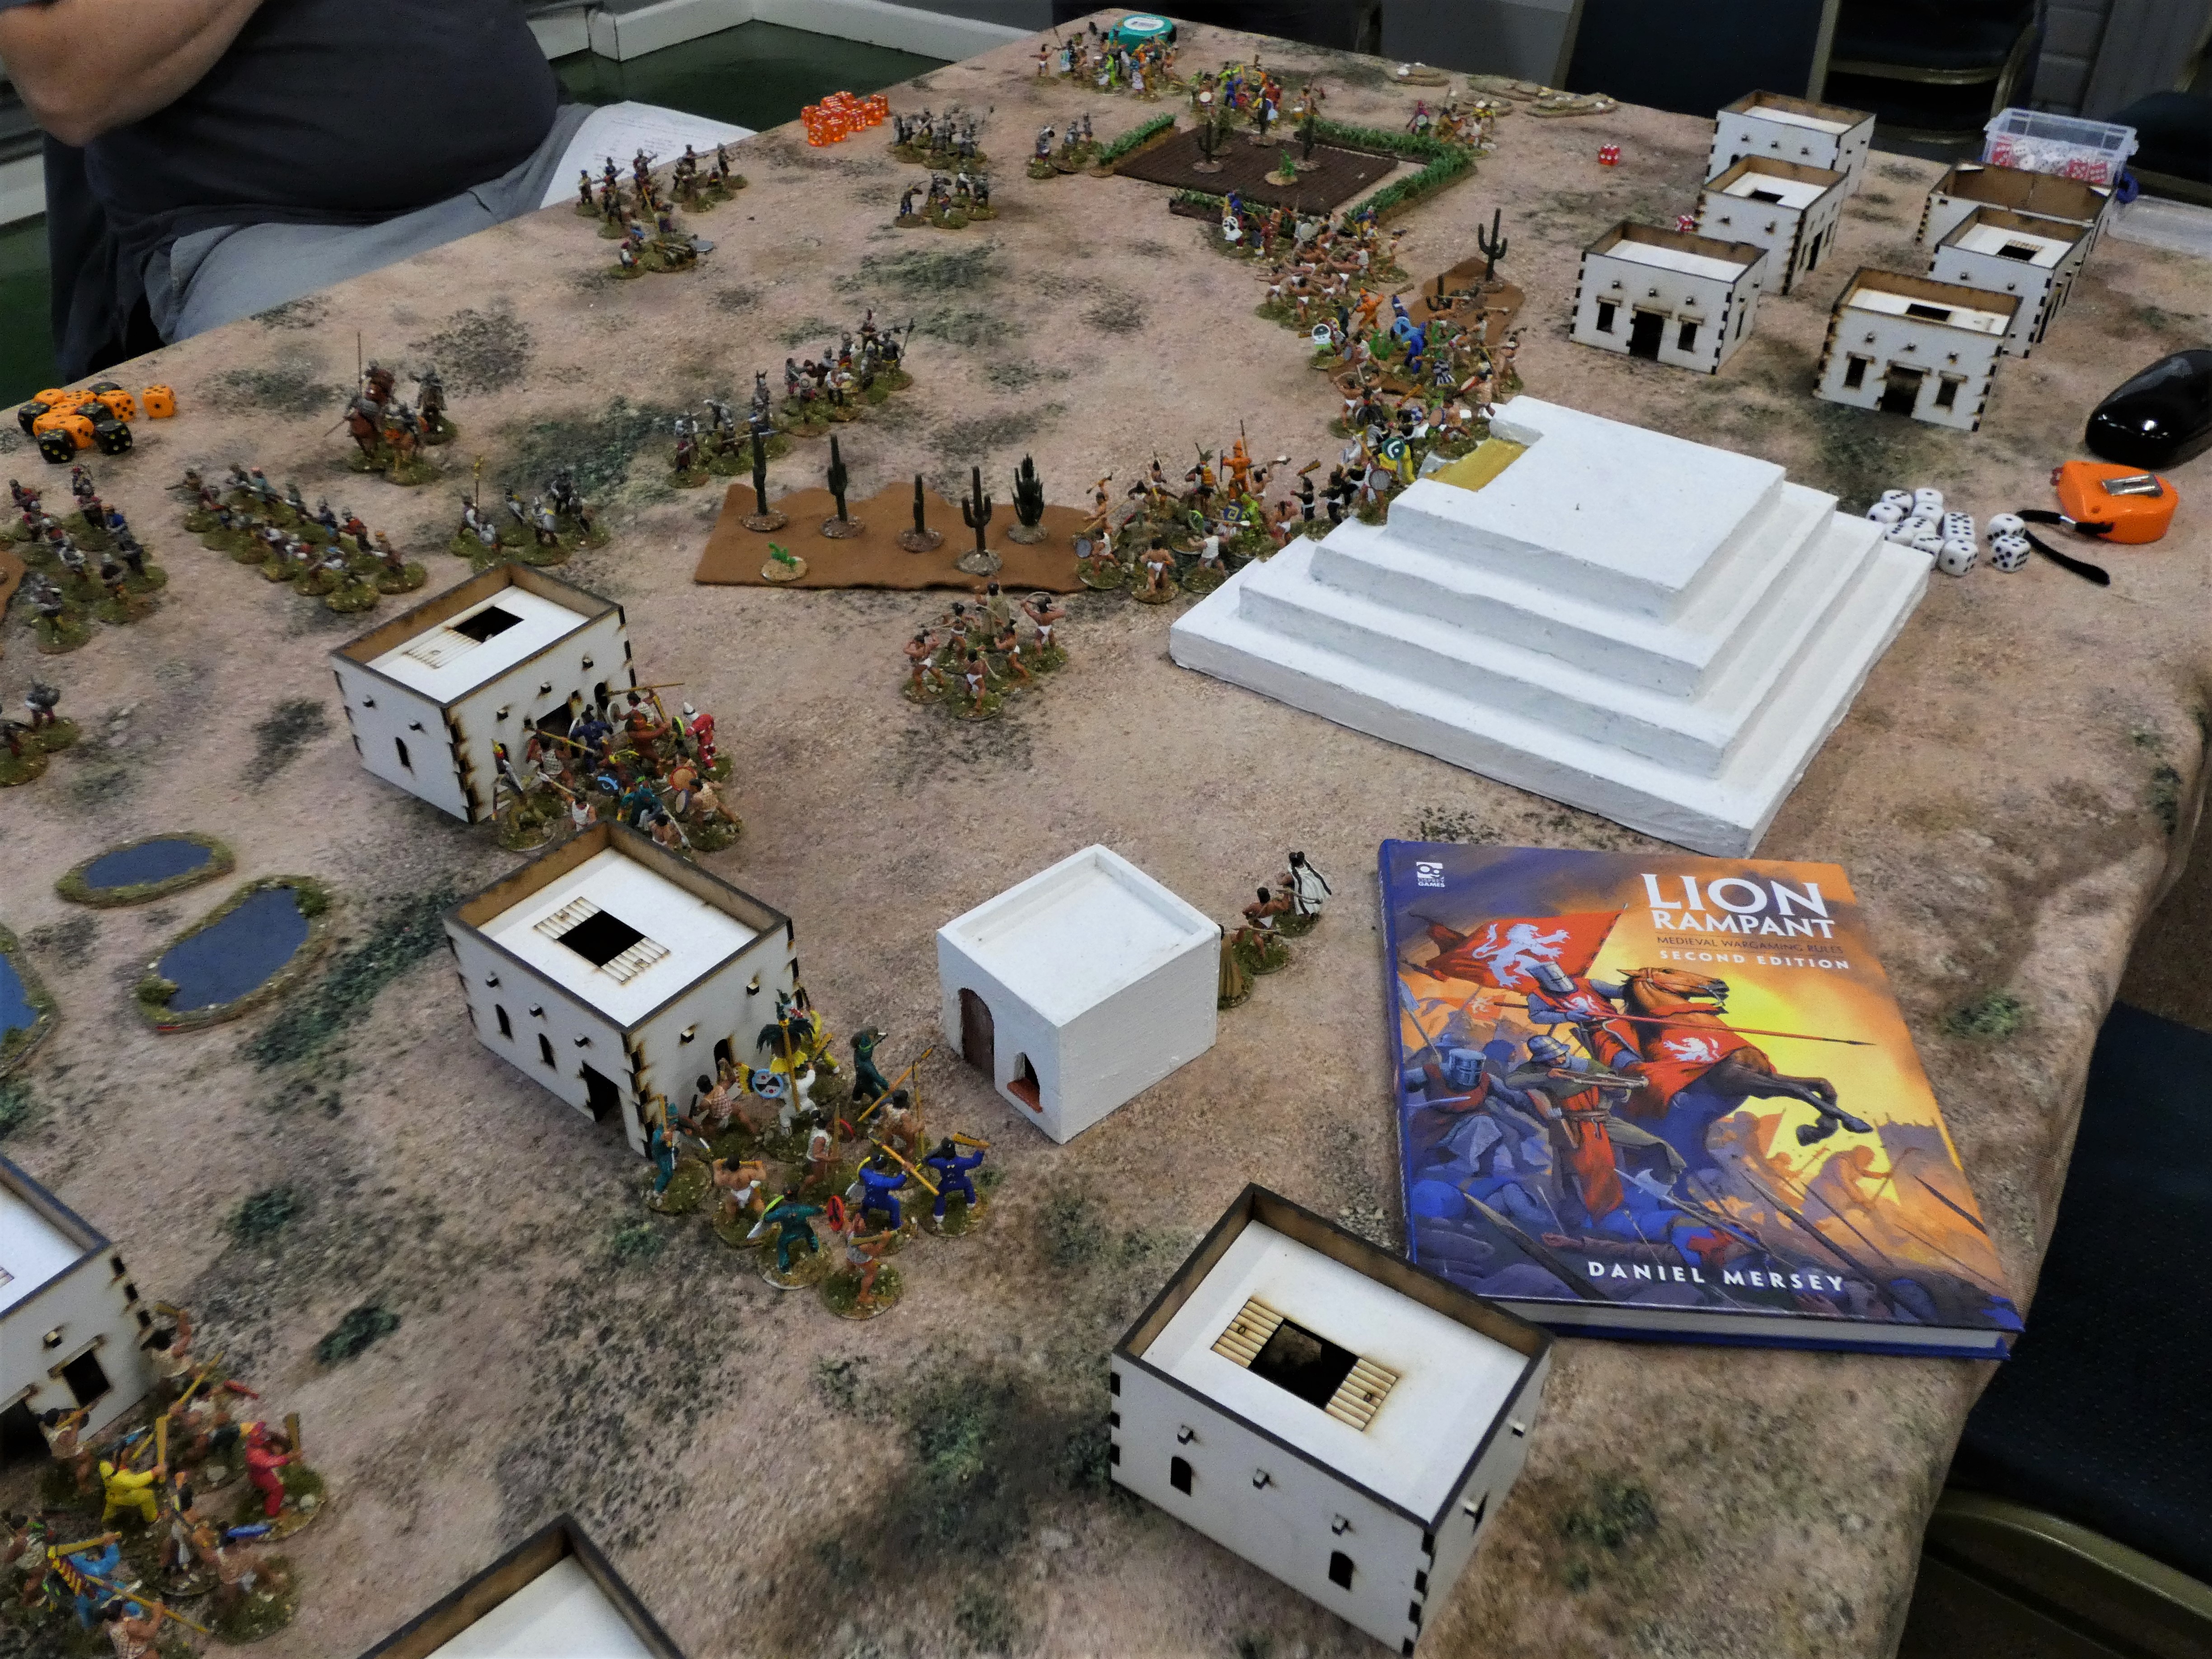
TENOCHTITLAN (A Large Lion Rampant Skirmish)


A detachment of Conquistadors have been sent off by Cortes to take the treasure that has been amassed at an Aztec Temple. After camping outside the town they woke to find that all their allies had deserted them. What was worse they were surrounded on three sides.


Needless to say the Conquistadors where not phased by this and advanced towards the temple. Out in front was the Conquistador cavalry with a leader attached. This unit attracted missile fire from the Aztec skirmishers.


This horrified the Conquistadors who lost two figures. Their response was to advance the missile troops with melee infantry in support. The then leader spent the rest of the game behind the infantry giving moral support.


Fired up by the early success the Aztecs flanking troops rushed forwards. Inspired by promises of support by the central commander based on the temple.


This did not go well. On the Conquistadors right flank the Arquebusier and a crossbow unit did great damage. Then two units were wiped out by elite units when they failed to counter charge. 

The Aztec command for this force pulled back into the town. 


On the left flank things went better for the Aztecs, as they only had to put up with one crossbow unit. However the outcome ended up the same when the Aztec leader on this flank was wiped out.


Where was the Aztec central force? Well in typical Lion Rampant tradition they kept failing command tests. This is partly due to the umpire not allowing the leader's unit to leave the temple, so missing out on the re-roll.


Now the battle moved into its final phase. What was left of the flanking forces together with the centre surged forwards. Directing the main thrust on Conquistadors left flank. The effect was to drive the Conquistadors back and killing a Conquistador leader (more treasure for the other leader). But at a heavy cost to the Aztecs as they were now a spent force.


The remaining Conquistadors had re-aligned and were ready to attack. The Aztec Leaders thought perhaps it was time to let them have the temple!


After the game we discussed how well it played. We all agreed the new edition of the rules worked well. In addition we all commented that next time we would use different tactics.

Should the Conquistadors be worried?

Lastly thanks to Vince, John, Mike B and Mike C for playing a fun game.

Technical Stuff
The forces used were 180 Aztecs, using plastic Wargames Atlantic figures and 80 Conquistadors from various manufactures but mostly Assault Group.

The rules were Lion Rampant 2nd edition (which arrived a week before the game). In addition some ideas from Pikeman's Lament, arquebusier and gun. The ideas for how to represent the Aztecs were influenced by the following;

by David Sullivan.

The WAB Forum and extensive reading on their tactics (lots of missile fire and ferocious charge).

The Roster used for the game

Aztec
Commanders:- All commanders re-roll first activation test if within 12”. In addition classed as Patient, one unit within 12” may ignore Wild Charge activation.

Special Rules:-
Flexible - Use normal attack/defence in rough terrain.
Wild Charge - If within attack distance must test to activate as attack.
Counter Charge Infantry - If enemy successfully charge will counter charge on 7+.
Fast - Movement not halved in Rough Terrain
Captured Enemy - If opponent in melee retire throw d6 if number equal or less than casualties inflected. An enemy casualty has been taken as captive. This will give +1 to unit courage and is cumulative.

Special Rules:-
Skirmish - Activated on 7+, may make ½ move, shoot before or after move, hit on 6.
Evade - When enemy successfully charge may react on 7+ can Skirmish.
Fast - Speed not halved in rough terrain.
Hard to Hit - Count as armour 2 against shooting.

Conquistadors
Commanders:- All commanders re-roll first activation test if within 12”. Both leaders are courageous, so can re-roll Courage test.

Special Rules:- 
Counter Charge - If enemy successfully charge, throw 7+ can counter charge, will meet half way.
Fearsome - If inflected casualty from attack, target applies extra -1 to courage test.
Bloodthirsty - Any Attack dice of 6 counts as two hits (not not defence or shooting).

Special Rules:- 
Flexible - This unit uses normal Attack/Defence profile when fighting in terrain.
Bloodthirsty - Any Attack dice of 6 counts as two hits (not not defence or shooting).

Special Rules:-
Bloodthirsty - Any Attack dice of 6 counts as two hits (not not defence or shooting).

Special Rules:- 
First Salvo - First time in game get +1 to dice for for, defence or shoot.
Damp Powder - Throw double 1 to activate to shoot. All shooting afterwards need 6 to hit.
Fearsome - If inflected casualty from shooting, target applies extra -1 to courage test.

Special Rules:- 
None

Special Rules:- 
Fearsome - If inflected casualty from shooting, target applies extra -1 to courage test.
Damp Powder - Throw double 1 to activate to shoot. All shooting afterwards need 6 to hit.
Slow Loading - After shoot must use up Shoot order to re-load.
First Salvo - First time in game get +1 to dice for for, defence or shoot.

Saturday, 15 February 2020

PIKEMAN'S LAMENT - Dutch revolt


This was our first attempt at using Pikeman's Lament and as we had had great games with it's stable mates we thought it was about time we gave it a go. We played a scenario from the rulebook (Storm the Redoubt) and used about 54 points of troops on each side split between the four players.

The Spanish side started with three units of Veteran pike, three units of Veteran shot, one unit of  Swordsmen, two units of mounted shot and two units of Lancers.


The Dutch had four units of pike, four units of shot, one Veteran unit of shot, one unit of halberdiers and four units Reiters. The Spanish were holding the Sconce near their edge of the board and the Dutch were attempting to wrestle it from them.


The Spanish started with a unit of shot and the Swordsmen in the Sconce and quickly moved a second unit of shot in order to bolster their defences. The Dutch split there forces into a one that contained all the Horse supported by two units of shot on the right flank and all the pike and the remaining shot coming through through the village on the left.


The Spanish moved most of their pike to their left to deal with the German mercenary horse and left the last pike unit and a unit of shot on the right flank. They spit their Horse evenly between the two flanks.


Most of the action early in the game happened on the Dutch right flank (the Spanish right took a long time to do anything as their commander repeatedly failed his activation rolls and they glumly stayed stock still). The Reiters came on gave one of the pike units a quick bloody nose and almost immediately their commander decided they were needed elsewhere and they left the field (a double 1 on the activation roll meant that a special event was rolled and they were taken off the board).


The Germans, however were taking a pounding from the shot in the sconce and were keen to close with the Spanish Horse in order to avoid more of the same. On the other side of the field the Spanish and Dutch foot were tentatively moving toward each other with the Spanish Lancers eyeing up a unit of shot that was straying from the protection of the pike.


First into action was a the Spanish mounted shot, however, who were first to feel the hot lead that the Dutch men had saved up for them.

Meanwhile in the Sconce, double 6's on activations meant that some Heroes of the Spanish Empire had heard of the importance of the battle and come to join the fight, bolstering the countrymens courage.


The fire from the Sconce and the charges of the Spanish Lancers had broken the resolve of the German Mercenaries and the last of them was chased from the field, at the same time the exhausted Spanish horse left leaving the flank in the hands of a beleaguered unit of shot and some mounted arquebusiers.


Within a round the Spaniards outside the Sconce collapsed, the remaining horse fled and single unit of pike remained on the right flank. Caught flat-footed, the Dutch tried to regroup, only minutes ago it appeared as if they were surely to be beaten but now there was a chance to gain some victorious pride for their homeland.

The veteran shot and the remains of the shot units from the right flank scrambled towards the sconce.
The pike and Halberdiers form the left fought their way up the slopes of the redoubt in the face of determined opposition!


Back and forth the battle raged with the Dutch first gaining and foothold only to be sent tumbling down again. The Spanish pike seemed shocked at what had happened to their mighty force and stood immobile with indecision. All the while the Spanish in the Sconce were being whittled away by the attacks from the Dutch, one unit of shot panicked and fled, leaving only two hard pressed groups battling for the sconce!


With one of the Spanish units gone, the Dutch shot, who had suffered so badly from the Spaniards fusilards, gained the walls of the earthwork and were able to bring their full force to bare on the desperate Spaniards. Beset on all sides, first one, then both remaining Spanish units in the Sconce failed to hold onto their morale and swiftly taken prisoner by the jubilant Dutch, surrendered to the inevitable.


Pikeman's Lament gave a great game and we managed to fight to a conclusion within two and a half hours.


We did get some of the morale rules wrong at the start of the game but it didn't make too much difference to the outcome. We all had a great time, thanks to the boys for playing in a very gentlemanly manner, right to the end!