Saturday 30 November 2019

Battle of Vorskla River 1399 -Swordpoint


With the overthrow of the "Golden Horde's" Khan, Tokhtamysh, by local rivals supported by Timur, there was an opportunity for the Grand Duchy of Lithuania to gain territory in Tatar territory. Tokhtamysh was more than happy to sign a treaty transferring Ruthenian lands to Lithuania, in exchange for military support to regain his serenity over the Horde.


Grand Duke Vytautas of Lithuania signed treaties with the Teutonic Order, Poles, Moldavians and others, which were sufficiently lucrative to attract those nations to join his expedition.

Following two successful campaigns reaching the Crimea, Vytautus obtained approval from the Pope for a "Crusade Against the Tatars". In 1399 the crusade encountered the Golden Horde's army near Poltava in present day Ukraine.


The stage was set for the Battle of Poltava. A truce was agreed with Khan Temur Qutlugh, to allow both sides to prepare for battle. The Horde were secretly waiting for reinforcements and Vytautas wanted to prepare a wagon fort to break up charging horsemen and drive them onto his guns. Consequently neither side sought to break the truce.


Not liking what he saw, Temur feigned a retreat by his army. Seeing this Vytautas ordered most of his troops out of the fort in pursuit. When the Lithuanians were sufficiently far from the fort, Temur's army turned to face them and a flanking force appeared behind them. Caught in the open, allied casualties were heavy and Vytautas only just escaped with his life.

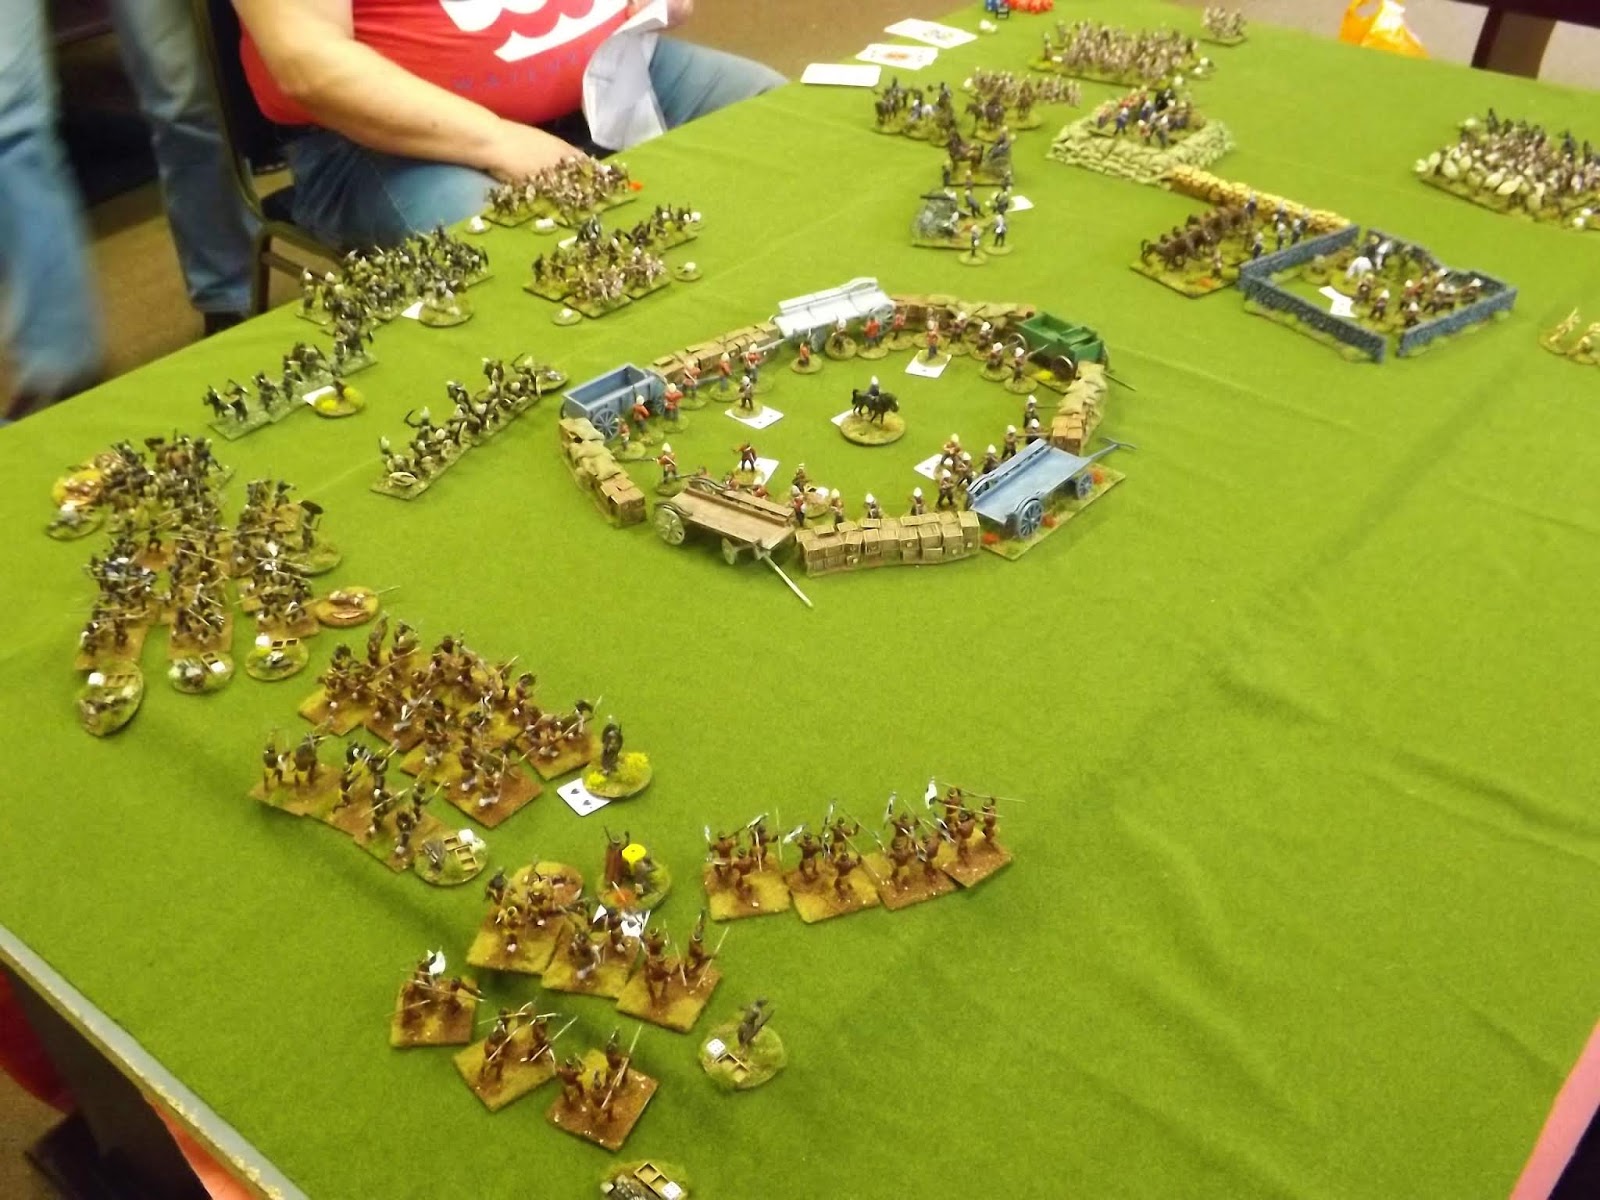
We started our game at the point where the Horde had turned to face the Allied army. The game was played in 28mm to Swordpoint rules. Myself and Andy C took the Allied army, whilst Chas, John & Steve M played the Golden Horde.


The Horde army consisted of a large number of steppe horse archers, supported by three units of noble cavalry. Deployed as both light and skirmish cavalry, the horse archers benefited from many units with Superior Shots, Parthian Shots and Nomad Horse special rules. The Nobles were heavily armoured veterans, who were also Superior Shots.


The Allied army employed Teutonic and Polish knights, as well as Lithuanian Boyars, supported by turcopoles, mounted and dismounted crossbows and spear armed foot, and a light bombard. Needless to say the knights were a force to be reckoned with.

Before the game start, the Horde used their special ability to advance their skirmish horse on our flank and in front of our main line.


Thanks to Andy's die rolling we won the initiative and sought to prevent our flank being turned, by deploying our own Tatars and Lithuanian horse to the flank.


Firing broke out along both lines and soon saddles on both sides were being emptied. On our right we had the better of the contest, with Andy consistently winning the initiative and driving the Tatars back. On my flank things did not look so rosy, as Steve advanced and I was soon waving goodbye to some of my mounted crossbows.


Seeking to bring the enemy to battle we advanced across our line, rotating out any units discouraged by enemy shooting and trying to stop the horse archers concentrating fire on isolated units, by forming line of battle.

In the centre, our knights kept charging and forcing the horde to evade, relying on their armour to save them from the worst of Parthian shots coming their way.


Eventually our centre drew the Horde's noble horse to battle and the true struggle started. Getting the better of the situation, we forced them back, but my flank was suffering from skirmish fire and I had to bring up my crossbow armed infantry to take the strain.


With knights rampaging forward in our centre and Andy sweeping up his flank, the pressure was off my flank and the Horde headed for the hills.


A good game, played in good spirit by both sides. The excellent Swordpoint rules handled things smoothly, once our aged brains had come to terms with their intricacies again.

The Horde suffered, but would have done better had Andy not won every single initiative roll. I can see why he was put in charge.

Vince

Saturday 23 November 2019

American Civil War - Regimental Fire & Fury


The Scenario


The Confederate army is in full retreat southwards. They have identified a position where they would prefer to meet the Union forces in battle.


To enable that to happen they must hold an area which includes a village on a crossroads and a dominating hill, for as long as possible. To this end there were two short divisions sent as a delaying force and they deployed their lead regiments in the village and on the hill.


The area was lightly wooded and the ground broken. Visibility was restricted by these woods, and because it was early morning, there was also still mist about.


The hill counted as favourable ground for the defenders and the climb as rough ground. Units in the village area counted as defending favourable ground for firing and charging.


The Union advance guard, with some of their best units were advancing to take the strategically important cross roads and dominating hill. They must achieve this as quickly as possible so as not to delay the advance of the main force only a few hours behind.


This was a twelve move game or 30% loss on either side. The Unions had 112 stands against the Rebels 90. The Union had eight guns against six.

The Game

Due to a lack of visibility, 8” for the first two moves then 12”, cards were laid face down for each of the units. These cards showed the unit and in what formation it was moving. Fire and Fury (F&F) do not have a mechanism for this but it all seemed to work.


Union troops advanced through the woods towards the hill and up the road towards the village. Meanwhile the rebels were trying to get their reinforcements into position.


First fire was to the Rebels as a Union gun deployed a little too close to the village and the Rebel infantry gave them a blast. The laser range finder was obviously not calibrated correctly. The mist now lifted and the mayhem started.


On the Union Right the troops assembled themselves into attack columns and eyed the Rebels in the village. On the left they shook themselves into line and faced off against the Rebels on the hill.


The Rebel right flank on the hill opened fire as the Union troops advanced and there was a more or less equal exchange of casualties. Meanwhile in the village the Rebels waited for the Union columns.


Three columns pushed forward towards the village then from close range the rebels opened fire. The centre column was checked but the two flank columns hit and after some good dice throwing managed to push the Rebels from the first part of the village.

The Rebels then managed to put a couple of regiments on the flank and gave them a blast. Casualties ramped up on both sides. The rebel right turned into an attritional exchange of fire as the Union troops advanced their way up the hill.


In the village the Union troops were reinforced and proceeded to move through. There was hellish fighting with each side losing stands at a prodigious rate. Both sides were moving very close to the 30% casualty rate. On the hill the Union troops pushed forward. The exchange of stands continued each move.

Eventually the Rebels were pushed out of the village.

Unfortunately for the Rebels it was all a bit too much and they reached the 30% mark slightly ahead of the Union and so were forced from the field.

The game was designed as a Union victory but I tried to make it as even as possible. The Union had more and better troops but the Confederates and the advantage of ground. As it worked out I didn’t do too badly. Although the Confederates lost, the Unions were only six stands away from loss themselves.


Thanks to Ken and Steve, our bearded Confederates and Simon and David our clean shaven Unions.

Figures by AB and Blue Moon. My thanks to Nick and Mr Steve for their efforts in painting them for me.

Battle Mat by Tiny Wargames. Buildings by Empires at war. The trees are a mix of Ebay buys and from Buffers Model Railways. The hill was formed by my coat, I had left the real ones at home. Roads and rivers from Fat Frank.

Saturday 16 November 2019

Battle of Britain - Bag the Hun

Decisive Blow - Anthony Saunders

Following a reintroduction to Bag the Hun at last months Clotted Lard  I decided to put on a game after some interest was voiced by a couple of folks. So I dug out my collection of planes, printed off some aircraft sheets and set up a game for up to seven players. It was just as well that I did as the spaces were quickly filled by willing volunteers.


The scenario had a group of Ju88 bombers being escorted by two staffels of Me109s and one of Me110s, twelve escorts altogether. Against these were ranged some of the RAFs finest(or not as it turned out) in four sections each with three Spitfires.


Schwarm 1 turned out to be the cream of the Luftwaffe with a top ace and a junior ace, balanced out with two sprogs as wingmen in Me109s. Schwarms 2 and 3 had a mix of pilots, each had two veterans, one regular and a sprog.

The RAF had a lot less quality, one top ace (Lee "Wooden Trellis" Wilkins) was blue leader, the other pilots consisted of nine regulars and two sprogs.


The game began with the Me110s acting as close escort for the Junkers while the 109's all sat up high waiting to descend on the RAF. The Spitfires were climbing up to engage and were a bit spread out around the table. After a couple of turns of manoeuvring and jockeying for position things quickly broke down into a general dog fight and formations were soon a thing of the past.


Despite their best efforts the plucky RAF pilots were no match for the German aces and Spitfires soon began to fall from the sky. Some nifty moves and lucky cards meant the German junior ace kept on getting shots in and most of them had a telling effect. Blue leader, blue 2, yellow leader and red 3 all fell to his deadly Oerlikon cannons. An Me110 shot down "Trellis" Wilkins, he did survive though after being thrown clear of his exploding Spitfire and floating down under his parachute to fight another day.


As the day came to an end the final score was totted up and it was a grim day for the RAF. Eight Spitfires were shot down, three more crash landed and the last one returned home with a badly damaged engine.


In return the RAF claimed a single Me109 and two Junkers shot down, plus one Me110 and three more Junkers damaged. Highlight for the Germans was when Blue sections Spitfires all blew up, every single one of them!

The junior ace was top dog with four Spitfires with the other kills being spread out among four other planes.


My thanks to "Dead Eye" Bob, "I want a fire card" Christopher and "Low on fuel" Mel for ably commanding the Luftwaffe.

Commiserations to Ian, Jon, Lee and Jamie for their demise at the hands of "ze Germans"!

Monday 11 November 2019

Clotted Lard 2020


Following the highly successful second running of Clotted Lard 2019 this September and the raising of £400 for Combat Stress, the club are pleased to announce that we will be running Clotted Lard 2020 on September 5th, and invite potential attendees to make a note in their calendars.

The contact address for registering interest in attending is as before;

clotted.lard@btinternet.com


It was really great to see the monies raised from this event up by £150 on last year and with plans to have more games up and running for 2020 we hope to be able to add to the total raised next year.

Thanks to all those involved this year and here's looking forward to 2020.

Friday 8 November 2019

Indian Mutiny - Sharp Practice II


An Indian Mutiny game using Sharpe Practice.

British command Neal and John, Mutineer command Colin and Tim.

The village of Aherwa the wives of British officers were being held by a group of mutineers.


A small force of East India Company was close at hand and had sent a message to a nearby British column for support, but decided to bravely attempt a rescue themselves approaching the compound where the women were held at the far end of the village they poured fire into the compound to very
little effect.


The local villagers in the form of two groups of villagers armed with an assortment of liberated muskets and a group with heavy swords ambushed them from the rear causing a great deal of shock. The EIC force ended in the unenviable position of either turning to fight the villagers or assaulting the mutineers in either case taking fire from the rear. They decided to to assault the villagers and hoped to drive them off. The combined fire from the mutineers along with the villagers finally broke their moral and they had to retreat from the village.


British overall moral had dropped at this point but the British column was now on entering the village and the mutineers delayed deploying their troops in the hopes of ambushing the column. A unit of loyal native skirmishers armed with muskets advanced quickly through the village and held up the deployment of the rest of the mutineers, with only cavalry or skirmishers able to deploy due to the closeness of the skirmishers to their deployment point.


The British column filled with enthusiasm advanced rather rashly and took fire from the flank with the resulting double shock causing them to retreat. This allowed the Mutineers to deploy more troops in the form of ordered Sepoys who poured in more fire, the final blow was a unit of Native Cavalry deploying and charging into rear of the retreating infantry that broke the moral of the British.


The British retreated from the field leaving the women to their fate. Another sad day to for the British to be reported in the press back in England.

John

Saturday 2 November 2019

Battle of Khambula 1879 - Sharp Practice II


The newly arrived Zulu Army, commanded by Chief Mnyamana Buthelezei, moved on towards Khambula in battle formation; the mass of warriors forming the ‘chest’ with other columns as the left and right ‘horns’, ready to envelope the British, encamped ready for battle the next day.


This time, the British, while in low morale after Isandlwana and the defeat of Buller’s attack on Hlobane, were prepared and in compact formation behind fortifications, unlike Pulleine’s 24th Foot at the Battle of Isandlwana.


A British patrol, out early in the morning, brought in a Zulu defector with information that the camp was to be attacked at midday. The patrol reported that the Zulu Army could be seen approaching. The main fortification of the camp was the wagon lager, the wagons parked end to end in a square, with additional fortification from heaps of turf, mealie bags and an entrenchment.


The cattle were held in a square of wagons on a raised area of the plateau. In the centre of the camp area stood the earthwork redoubt built on a knoll.


As soon as the Zulu approach was reported, the troops assembled at their positions, 1,200 men of the 1st/13th Light Infantry and the 90th Regiment, with 800 other irregular troops. Ammunition reserves were established along the rear of the lines.


Wood’s artillery comprised four 7-pounder guns, two mule borne guns and several rocket troughs. The mule guns took post in the redoubt, while the 7-pounders stood in the open ground between the
two main fortifications.


The Zulu formation paused for a time, while final arrangements for the attack were made. It may be that the Zulu generals wished to avoid a direct assault on the British camp; Cetshwayo’s instructions being not to repeat the mistake of Rorke’s Drift, but to threaten the Natal border and try to lure Wood’s force into the open. However, the Zulu warriors were in no mood for caution. The Zulu Army began to move towards the British with increasing speed, the horns spreading out to the left and right flanks, the chest heading straight for the camp. The battle began at around 1.30pm.


The left horn disappeared from view, as it moved into the valley to the South, where it was held up by marshy ground. The right horn circled round to the North and came in towards the camp. Wood dispatched Buller with his mounted men to provoke the right horn into making a premature attack, before the other sections of the Zulu Army were in place. Buller’s move had the effect intended, the mass of the right horn rushing towards the British fortifications.


Buller’s troops rode back into the camp, several men having considerable difficulty getting away from the fast-moving mass of Zulu warriors.


This is where our battle transfers to the table top Sharp Practice game, the Zulu army consisted of 20 units of 12 on left and 20 units of 12 on right each with 6 leaders both Black 1 to 6, the British army as per the OOB were within the Laager, the Kraal and the Redoubt, the redoubt and Laager were classed as high and wide obstacles for the purpose of the game...


The Zulus as the cards were drawn out were told they had to randomise the location of point of arrival, 1 to 2 being first 2ft of the 6ft length and 3 to 6 being 4ft length and 7 to 8 being 2ft of the other 6ft length of table, this being done on both flanks, therefore not allowing Zulus to mass straight away and having to manoeuvre to co-ordinate if/when they could...


The Zulus managed to get most of their troops on the table within the first couple of turns with only one group each side not coming on due top card pull or due to space in area where they had to arrive, masses of troops causing tail backs etc.


The Brits were able to throw plenty of fire out at the oncoming Zulus, using 'Sharps Practice' and the double fire of breech loading weapons to their advantage, causing devastating wounds and shock amongst the Zulu hordes, twice the cannons ripped into the ranks of Zulus causing swathes of men to drop and cause massed shock, a couple of flank shots causing double shock.

The Zulus charging at every opportunity forced the Natals back and making the Light Horse make hasty evades, saving their bacon more than once...

Multiple Zulu units charging and getting up against the redoubt and laager were being thrown back with lots of casualties and shock on the Zulus, and a couple here and there on the British, Zulu leaders becoming more cautious and deliberate after these failed attacks, the redoubt holding fast against multiple attacks, the Kraal not fairing as well, with the Natal, Light horse dying or pulling out leaving the British to face the Zulus alone, outnumbered and fighting back to back they would finally succumb to the numbers and ferocious attacks...


All the while the artillery firing into the Zulus massing on the right flank, causing devastating losses amongst the Zulu, the Light horse were trying to assist there brothers in the redoubt, shooting into the Zulu flanks and annoying the attacks...


The Zulu breaking the British in the Krall, swept into the flank/rear of the guns and made the gunners disperse to the redoubt and Laager, at this the remainder of the Natal, and Light Horse beat a hasty retreat to the Laager...


Back at the Laager the Zulus were starting to swarm, and were sending in co-ordinated attacks, and losing men at high rate of fire and fights were desperate at the barricades, however one assault managed to push the British back and force them to face there enemy back to back.

With the men holding the other side of the defences and with casualties mounting, things were getting desperate. With the Zulu massing, at this point the British commander managed to form a decent firing line, with the Natal and Light Horse joining the beleaguered infantry, and if the Zulus ventured over the top of the barricade they would have been ripped apart... 

The Zulu commanders taking the day as a day well fought decided that with the time as it was, discretion was the better part of valour and decided to call a halt there... casualties were high on both sides, but with a few more turns the Zulu may have won the day; however with the Zulu right flank having taken loads of casualties and forced withdrawals and with its morale waning, it was really left to the Zulu left which was still a formidable fighting force and may have carried the day... 

Maybe on another day... really don't fancy facing the Zulu with no defences in play, could get a bit messy for the Brits?

Thanks to all that played and gave there all, don't know about them but I was knackered at the end of the game...