Labels

Showing posts with label Sharp Practice II. Show all posts

Sunday, 10 August 2025

Sharp Practice in the Peninsular War

The Attack by Leith's 5th Division at Salamanca - Bill Younghusband (Osprey)

With 'Clotted Lard' fast approaching in the club calendar and arrangements being finalised on the games available at this year's celebration of all things 'Lardy' a few of the chaps are warming up their planned games with some fun and action at our regular club meetings.


One such game is a Peninsular War 28mm set-to being planned by Bob, wheeling out his serried ranks of redcoats, riflemen and columns of French infantry to provide some Sharp Practice fun, a game I had on my list to play, with me taking a break from being a game organiser this year and instead enjoying the delights of playing in a couple of them instead.


So when I saw Bob's offer to run his Peninsular collection out at club using Sharp Practice, a set of rules I haven't played for too many years now, I jumped at the opportunity to join in the warm up process and refamiliarise myself with the nuances of this unique set of rules.


The premise for our game saw a column of French troops making a nuisance of themselves among the locals in rural Spain and causing particular offence by stealing anything that wasn't nailed down and even then making a serious effort to include that stuff as well, that saw these ruffians trying to make off with their ill-gotten gains that apparently included a lot of gold and bling encrusted with precious stones acquired from a recently liberated church on route and no doubt destined to end up in Marshal Soult's war chest.


However the 'good-guys' were on hand to put an end to this 'making war pay for itself' excuse for modern day rape and pillage created by that jumped-up little General Bonaparte and last carried out with such gay abandon by the Norsemen of old.

Thus close by, looking to administer a bit of a check on Boney's Boys, was a British column of line and light redcoats supported by riflemen operating here on the frontier, and cooperating with the local guerrilla leader by supporting an ambush on the French column as they marched through the last village on their route to more safer territory within their own lines.


As the French debouched from the outskirts of the Spanish hamlet, they became aware of British troops ahead, and eager to get out into the open ground before them, where they could better deploy their numbers, as well as securing a crossing of the nearby stream still carrying some mountain flood waters, immediately deployed their skirmish screen of voltigeurs bolstered by foot dragoons, and sent them ahead to secure the only bridge.


However the British commander, aware of the Spanish guerrilla leader's plan to ambush the column of French troops in the narrow streets and confines of the village was equally keen to contest any French attempts to debouch from the village in numbers and to restrict their advance no further than the stream that flowed between the two forces.

 
The lead elements of the French column were met by riflemen and British light infantry skirmishing from the higher ground beyond, that took a heavy toll of casualties and shock off the French foot dragoons that would see their leader wounded and the eventual dispersal of the unit as a whole as it attempted to control the road over the bridge ahead.


As the French were getting the worst of the skirmish battle ahead, the rear of their column was soon assaulted by a daring attack by a troop of mounted Spanish partisans armed with light lances that crashed into the back of the rearmost French column forcing it to attempt to about-face and deal with this unexpected threat as their comrades ahead prepared to advance out of the village to fight the 'rostbeefs'.


With the battle developing on both sides of the village, the French were torn between forcing a way clear of of its confines by winning the battle with the British to control the road out and a route of march to safety, whilst fending off a serious threat from behind and within the village confines itself, this soon seeing a unit of French hussars about facing from their march to deal with the British skirmishers and instead redirected to deal with the mounted Spanish partisans.


As more units deployed into the battle, the shock and casualties on both sides started to mount, dispersing some, forcing others to break off and retreat to avoid dispersal, intermixed with the wounding or occasional loss of a commander, and the French were fighting back hard bringing some of their line battalions forward to add fire to their skirmish line, that shattered a small group of British riflemen pushed too far ahead and caught well within French musket range.


These damaging blows create a game of 'death by a thousand cuts' as these often small blows start to accumulate, with never enough actions to adequately deal with them all and the inevitable drop in force morale that will eventually decide which side has had enough and is forced to capitulate.


Our game drew to its close, and both sides found themselves teetering on the edge of disaster with about three points apiece left on the Force Morale table but with the French seemingly teetering a little closer from the losses suffered in units and leaders, only made worse in the final turn as the Spanish had the honour of administering the coup-de-grace, and ending French resistance, roughly handling both the French hussars sent to deal with their mounted troop and a damaging round of fire that broke the rear most French column leaving the wagon of booty and gold ready to be taken back by the church, less of course an appropriate handling and recovery fee.


Needless to say much fun was had by all involved and thank you to Bob for giving us a glorious feast for the eyes as well as a fun scenario.

JJ

Tuesday, 24 January 2023

Maximillian Adventure - Sharp Practice in Mexico


The town of La Cipirtea has had unwelcome visitors of late. A French force has been using it a base of operations while sweeping the surrounding hills for signs of Republican forces. The main column left some time ago and the wiley Mexican commander, Hugo de Lardon has decided to sieze the town and lie in wait for their return. But first he has to deal with the Foreign legionnaires who have been left guarding the makeshift barracks.

Friday, 8 November 2019

Indian Mutiny - Sharp Practice II


An Indian Mutiny game using Sharpe Practice.

British command Neal and John, Mutineer command Colin and Tim.

The village of Aherwa the wives of British officers were being held by a group of mutineers.


A small force of East India Company was close at hand and had sent a message to a nearby British column for support, but decided to bravely attempt a rescue themselves approaching the compound where the women were held at the far end of the village they poured fire into the compound to very
little effect.


The local villagers in the form of two groups of villagers armed with an assortment of liberated muskets and a group with heavy swords ambushed them from the rear causing a great deal of shock. The EIC force ended in the unenviable position of either turning to fight the villagers or assaulting the mutineers in either case taking fire from the rear. They decided to to assault the villagers and hoped to drive them off. The combined fire from the mutineers along with the villagers finally broke their moral and they had to retreat from the village.


British overall moral had dropped at this point but the British column was now on entering the village and the mutineers delayed deploying their troops in the hopes of ambushing the column. A unit of loyal native skirmishers armed with muskets advanced quickly through the village and held up the deployment of the rest of the mutineers, with only cavalry or skirmishers able to deploy due to the closeness of the skirmishers to their deployment point.


The British column filled with enthusiasm advanced rather rashly and took fire from the flank with the resulting double shock causing them to retreat. This allowed the Mutineers to deploy more troops in the form of ordered Sepoys who poured in more fire, the final blow was a unit of Native Cavalry deploying and charging into rear of the retreating infantry that broke the moral of the British.


The British retreated from the field leaving the women to their fate. Another sad day to for the British to be reported in the press back in England.

John

Saturday, 2 November 2019

Battle of Khambula 1879 - Sharp Practice II


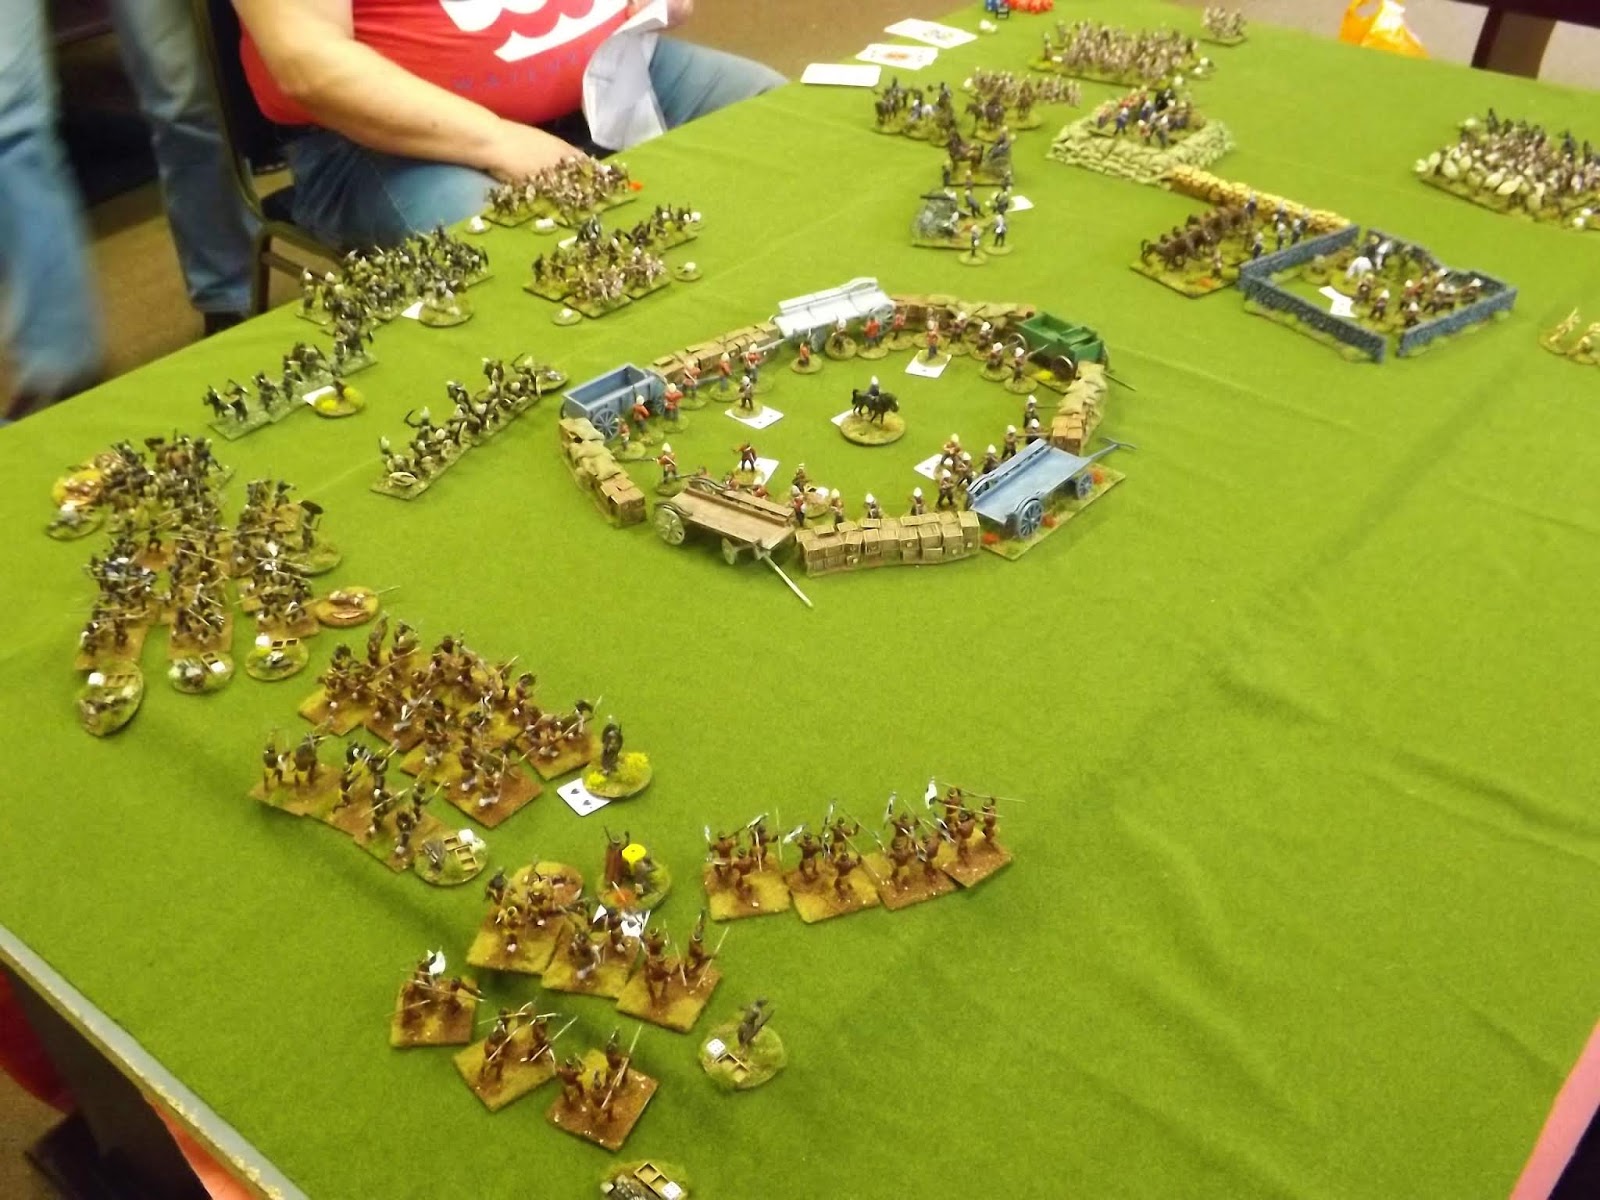
The newly arrived Zulu Army, commanded by Chief Mnyamana Buthelezei, moved on towards Khambula in battle formation; the mass of warriors forming the ‘chest’ with other columns as the left and right ‘horns’, ready to envelope the British, encamped ready for battle the next day.


This time, the British, while in low morale after Isandlwana and the defeat of Buller’s attack on Hlobane, were prepared and in compact formation behind fortifications, unlike Pulleine’s 24th Foot at the Battle of Isandlwana.


A British patrol, out early in the morning, brought in a Zulu defector with information that the camp was to be attacked at midday. The patrol reported that the Zulu Army could be seen approaching. The main fortification of the camp was the wagon lager, the wagons parked end to end in a square, with additional fortification from heaps of turf, mealie bags and an entrenchment.


The cattle were held in a square of wagons on a raised area of the plateau. In the centre of the camp area stood the earthwork redoubt built on a knoll.


As soon as the Zulu approach was reported, the troops assembled at their positions, 1,200 men of the 1st/13th Light Infantry and the 90th Regiment, with 800 other irregular troops. Ammunition reserves were established along the rear of the lines.


Wood’s artillery comprised four 7-pounder guns, two mule borne guns and several rocket troughs. The mule guns took post in the redoubt, while the 7-pounders stood in the open ground between the
two main fortifications.


The Zulu formation paused for a time, while final arrangements for the attack were made. It may be that the Zulu generals wished to avoid a direct assault on the British camp; Cetshwayo’s instructions being not to repeat the mistake of Rorke’s Drift, but to threaten the Natal border and try to lure Wood’s force into the open. However, the Zulu warriors were in no mood for caution. The Zulu Army began to move towards the British with increasing speed, the horns spreading out to the left and right flanks, the chest heading straight for the camp. The battle began at around 1.30pm.


The left horn disappeared from view, as it moved into the valley to the South, where it was held up by marshy ground. The right horn circled round to the North and came in towards the camp. Wood dispatched Buller with his mounted men to provoke the right horn into making a premature attack, before the other sections of the Zulu Army were in place. Buller’s move had the effect intended, the mass of the right horn rushing towards the British fortifications.


Buller’s troops rode back into the camp, several men having considerable difficulty getting away from the fast-moving mass of Zulu warriors.


This is where our battle transfers to the table top Sharp Practice game, the Zulu army consisted of 20 units of 12 on left and 20 units of 12 on right each with 6 leaders both Black 1 to 6, the British army as per the OOB were within the Laager, the Kraal and the Redoubt, the redoubt and Laager were classed as high and wide obstacles for the purpose of the game...


The Zulus as the cards were drawn out were told they had to randomise the location of point of arrival, 1 to 2 being first 2ft of the 6ft length and 3 to 6 being 4ft length and 7 to 8 being 2ft of the other 6ft length of table, this being done on both flanks, therefore not allowing Zulus to mass straight away and having to manoeuvre to co-ordinate if/when they could...


The Zulus managed to get most of their troops on the table within the first couple of turns with only one group each side not coming on due top card pull or due to space in area where they had to arrive, masses of troops causing tail backs etc.


The Brits were able to throw plenty of fire out at the oncoming Zulus, using 'Sharps Practice' and the double fire of breech loading weapons to their advantage, causing devastating wounds and shock amongst the Zulu hordes, twice the cannons ripped into the ranks of Zulus causing swathes of men to drop and cause massed shock, a couple of flank shots causing double shock.

The Zulus charging at every opportunity forced the Natals back and making the Light Horse make hasty evades, saving their bacon more than once...

Multiple Zulu units charging and getting up against the redoubt and laager were being thrown back with lots of casualties and shock on the Zulus, and a couple here and there on the British, Zulu leaders becoming more cautious and deliberate after these failed attacks, the redoubt holding fast against multiple attacks, the Kraal not fairing as well, with the Natal, Light horse dying or pulling out leaving the British to face the Zulus alone, outnumbered and fighting back to back they would finally succumb to the numbers and ferocious attacks...


All the while the artillery firing into the Zulus massing on the right flank, causing devastating losses amongst the Zulu, the Light horse were trying to assist there brothers in the redoubt, shooting into the Zulu flanks and annoying the attacks...


The Zulu breaking the British in the Krall, swept into the flank/rear of the guns and made the gunners disperse to the redoubt and Laager, at this the remainder of the Natal, and Light Horse beat a hasty retreat to the Laager...


Back at the Laager the Zulus were starting to swarm, and were sending in co-ordinated attacks, and losing men at high rate of fire and fights were desperate at the barricades, however one assault managed to push the British back and force them to face there enemy back to back.

With the men holding the other side of the defences and with casualties mounting, things were getting desperate. With the Zulu massing, at this point the British commander managed to form a decent firing line, with the Natal and Light Horse joining the beleaguered infantry, and if the Zulus ventured over the top of the barricade they would have been ripped apart... 

The Zulu commanders taking the day as a day well fought decided that with the time as it was, discretion was the better part of valour and decided to call a halt there... casualties were high on both sides, but with a few more turns the Zulu may have won the day; however with the Zulu right flank having taken loads of casualties and forced withdrawals and with its morale waning, it was really left to the Zulu left which was still a formidable fighting force and may have carried the day... 

Maybe on another day... really don't fancy facing the Zulu with no defences in play, could get a bit messy for the Brits?

Thanks to all that played and gave there all, don't know about them but I was knackered at the end of the game...

Sunday, 11 August 2019

Hold the Bridge and Mind the Muskets - Sharp Practice II


In case you regularly follow posts about games here on the DWG Blog and you hadn't spotted it, we're running our second 'Clotted Lard' gathering at next month's September club meeting, where we will be hosting all things Lardie in the wargaming world, 'Devon-Style', which will mean a cream tea sometime in the afternoon as well as lots of great games and fun, with all proceeds from the show going to 'Combat Stress'.

As part of our club contribution, games wise, Bob brought along his Napoleonic Sharp Practice collection to host a Peninsular War style action as a warm up game for next month in which I will have the pleasure of taking part.


Too Fat Lardies - Sharp Practice II

Having spent the best part of three weeks last month touring key Peninsular War battle sites about which I am currently running a series of posts on JJ's Wargames- Peninsular War Tour 2019 , I was more than happy to 'scratch the Napoleonic itch'; and Sharp Practice is a set of rules that I really want to get better acquainted with particularly after watching Rich and Nick engaging in a very amusing play-through of an AWI scenario on Lard TV, see link below.

Lard TV - Playing AWI with Sharp Practice II

I have long fostered the idea of building a new AWI collection at the 28mm Sharp Practice level of game which seems very suitable for a lot of the action that occurred in the war, not to mention the variable quality of units that really enliven these smaller battles; so I have just started that little project, more anon.

Anyway, back to our game yesterday, which saw a British Light Company tasked with holding a small fortified house full of captured French muskets close to a small river and road bridge.

Our scenario was set just after the battle of Salamanca which saw the French in full retreat looking to make good their escape and likely to be heading in the direction of our position.

The village above the river was occupied by three groups of Light Companies operating in line, supported by some rifles and skirmish light companies, whilst my command able to deploy from the small barn seen on the extreme right of picture consisted of four skirmish groups of riflemen and two of light infantry. The large house in the centre held the French muskets.

Unknown to the British commander was that a French force was on the way from the opposite direction to the battle with orders to secure the bridge to enable the Army of Portugal to make good its escape, thus the small Light Company was likely to end up as the meat within the sandwich!

On the plus side was the fact that our bold light bobs could expect support at some predetermined time from our Spanish allies, sent to help secure the position.

Looking at the table from the Salamanca side, from which we might expect to see some Spanish allies at some point

So an interesting set up with the French interested in grabbing and controlling access to the bridge and the British primarily directed to secure the French arms stash and the Spanish doing something else!

An interesting start to the game commenced with about five 'Tiffin' chits coming out the bag with hardly anybody deployed on the table, as the British were keen to just observe before opting to place troops on it.

Then one half of the table opposite the village seem to fill quite quickly with lots of French infantry supported by French dragoons and hussars, with the bulk of the French cavalry heading down the road and towards the bridge with a small detachment of dragoons riding up to the small barn to presumably ransack it of any supplies.

French troops press up to the river and come under fire from two directions

Before they could dismount a Rifle sergeant organised two groups of riflemen to line the windows and pour in some well directed surprise fire emptying a few saddles and wounding the dragoon sergeant at their head.

Suddenly we had a battle underway as more British riflemen and light company skirmishers ran forward from the village to line the river bank and pepper a unit of French grenadiers heading for one of the fords.

British skirmish light companies and riflemen contest the opposite bank

The noise of French bugles and drums could be heard across their front as the infantry and cavalry rapidly deployed to face the two threats, with a column of French dragoons charging the wall around the small barn to clear it of British riflemen who had come out in force to wipe out the small patrol off dragoons who had rashly inspected their billet.

The 'grasshoppers' evaded the charge and ran back to the cover of the building amid the olive groves as more rifle shots rang out followed up by British Light infantry issuing forth to take the column in the flank to drive them back to the opposite side of the wall.

French dragoons charge the wall lined with riflemen who evade back to their supports in the barn

The French cavalry are looking a little thin on the ground with dragoons dismounted in the lower left trying to take on the light troops opposite them

The small British light infantry force lining the river was only adding to French problems, with units turning to face the barn on their side of the river taking flank shots from the other side, with the cavalry taking the brunt of the hits and soon finding its Force Morale entering the red zone as units fell back, officers and NCO's were wounded and the occasional dispersal off table.

Trying desperately to pull the cavalry back whilst moving the infantry forward created a target rich environment, to use more modern parlance, and the French infantry fought hard to return the firing with some success against the light companies in front of the village who were eventually forced to fall back among the buildings to get some cover to rally off the shock against their casualties.

The light troops in front of the village created a cross-fire with those in the barn that started to up the shock levels for the French

Eventually the French cavalry broke and left their infantry to take up the struggle alone, but now coming under a lot of fire from the barn as, with no cavalry threatening the area, the riflemen and light infantry were emboldened to move up to the wall and pour on the hurt.

This move forced the French infantry closest to the barn to turn and face the threat, engaging in a rather unequal firefight as the greater accuracy of the rifles started to take a toll of the French infantry out in the open, whilst the British lights were able to take full advantage of their skirmish abilities amid the cover offered by the olives and stone wall

The light troops take up the firefight with the French infantry opposite the barn, with more riflemen moving to take up position on the wall

Meanwhile events were unfolding across the river as in the place of the light companies in skirmish order on the river bank stepped forward a line of light companies who presented and started to volley fire in to the massed French ranks, as voltigeurs attempted to find away over to the opposite bank.

To add still further to French woes, the Spanish turned up, no doubt aided by all those 'Tiffin' chits earlier in the battle that helped move the clock a little quicker.

The Spanish arrived just as the battle looked won

The French high-water mark, with the skirmish light companies driven into the village and voltiguers forcing their way across, top right

By this stage of our game it was obvious that the French were getting nowhere fast and that the likelihood of them getting control of the bridge, that alone holding it for any amount of time, looked remote, and with the pub beckoning we called it a game.

The French look set to force a crossing just before three groups of light company infantry deployed from the buildings to whack the centre column with fourteen hits and then the Spanish arrived.

Thanks to Ken, John and Nathan for a fun afternoon in the Peninsula and to Bob for wheeling out the collection which I think you will agree looks very nice indeed.

I am looking forward to playing again next month.