Labels

Showing posts with label Age of Sail. Show all posts

Sunday, 11 May 2025

What a Cowboy Linked Campaign in Wargames Illustrated.


We are very fortunate in the Devon Wargames Group of having an enthusiastic group of wargamers in the club who regularly contribute to our monthly gaming calendar and find fellow enthusiasts who share a passion for the hobby that sees them go on to develop ideas around their favourite genre and rule set.

This often results in their ideas contributing to the wider hobby and we have several members who have gone on to have materials published and to have received recognition for their efforts in various publications from rules to magazine articles.


The latest addition to the laurels of the club in regard to this wider aspect of our hobby has seen some new names join that band of contributors, namely Mark Etheridge and friends Mike Robinson and Nick Mcloughlin, Mike Robinson also a DWG club-mate, who with their combined passion for all things Wild-West have developed a linked campaign set of six scenarios designed for 'What a Cowboy' by the Too Fat Lardies.


The scenarios together with the background to them have been developed and play tested by Mark and the chaps, that has seen their efforts published in April and May 2025 editions of Wargames Illustrated for other What a Cowboy gamers to enjoy and play.


The effort put in to developing these scenarios is plain to see as outlined in the article around them and having worked on a scenario book myself and gone through the sequence of playtesting to see if the ideas first conceived actually work when played out on the tabletop, I am very familiar with the process described.


As well as the set-ups presented for each game, the article, shows the development progress of a series of games run by Mark, that also give ideas on terrain items that could be used together with pictures to whet the appetite for others.


So if the Wild West is your thing and you enjoy a game of What a Cowboy in particular, you might want to pick up the two editions of Wargames Illustrated, which contain the six scenarios recounting the legend of Rambling Pete and the rumours of gold in 'them thar hills'.


Congratulations to Mark, Mike and Nick for their work going to publication and for those of you who intend on getting this campaign game, have fun.

JJ

Postscript.
This weekend has not been a usual one in club activity given that a significant cohort of the club was participating in games at Exeter Legionary 2025, so if you were hoping to see a club related AAR you can follow the link below to JJ's Wargames where I have posted an AAR of the Trafalgar game run this Saturday at this year's show.

JJ's Wargames The Battle of Trafalgar, Legionary 2025

Saturday, 19 April 2025

The Leeward Line - Far Distant Ships.

HMS Royal Sovereign bears down on the line of the Combined Fleet at Trafalgar, capturing perfectly the set-up for this scenario, 'The Leeward Line'.
 
Next month, I and other club members and friends will be attending Legionary Exeter, our local wargaming show on Saturday 10th May, to run 'The Battle of Trafalgar' in 1:700 scale using the rules Far Distant Ships (FDS), written by David Manley and adjusted to accommodate the larger scale models.


FDS were written by David to focus specifically on large fleet action games as opposed to smaller single ship/squadron actions where he has that covered by his other age of sail set Form Line of Battle.

https://www.wargamevault.com/product/352181/Far-Distant-Ships

The description on Wargames Vault gives the gist of what FDS are about and why I have started using them for my big fleet action style of games;

'A quick playing set of rules covering fleet actions in the age of sail where linear tactics were to the fore. The aim of these rules, which draw upon techniques and concepts from LFG’s “Cannon, Cross and Crescent” combined with a development span covering some 20 years has been to develop a quick play set that focusses on the command and control aspects of the battle, allowing large battles such as Chesapeake Bay, the Saintes and Trafalgar to be played out in an evening’s gaming. 


Signalling is key, and complex plans may fall apart if a vital signal is missed, or an order executed late. The rules cover the main ship types involved across the period, focussing on ships of the line and rated frigates, in articular in their role as signal repeaters. Stats are also included for civilian ships, smaller warships and bomb vessels, and shore batteries and fortifications, allowing the full spectrum of naval operations to be played. 

The rules have been written with 1/2400 models in mind but will work with models in larger scales. This set has been updated to include the Anglo Dutch Wars supplement which allows battles from the 17th century to be played out using these rules.'

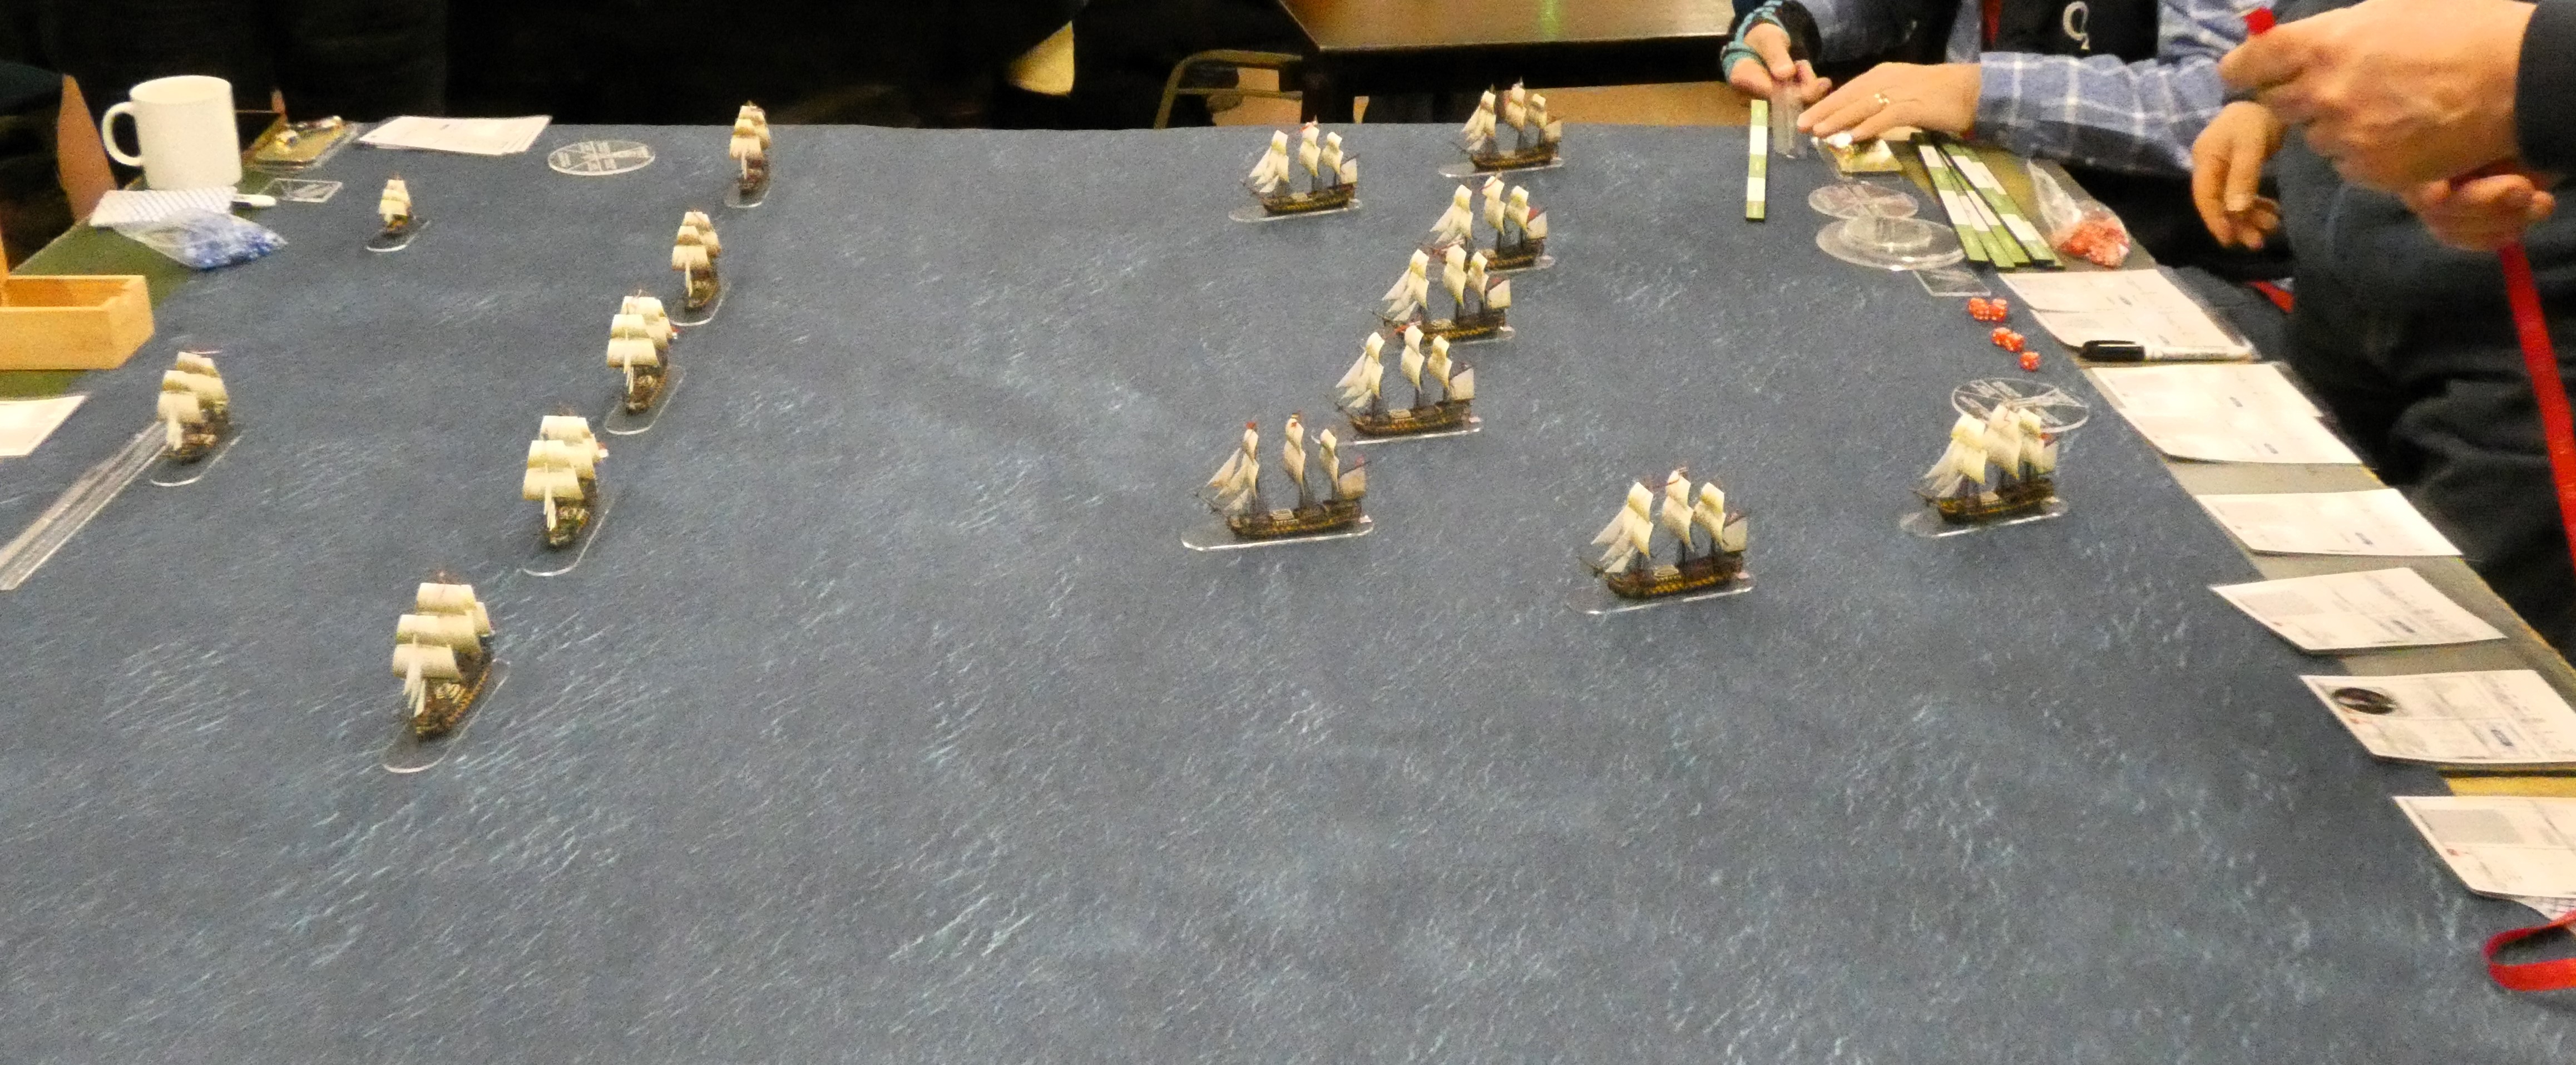
The table plan for the set-up of The Leeward Line, with the Royal Sovereign leading the charge of the Leeward Squadron at Trafalgar, attacking in line of echelon, as the gaggle of a line of Combined ships prepares for the maelstrom that is about to hit them.

Conscious that I and other regular age-of-sail friends had been playing FDS at games outside of our club fixtures and aware that some club mates wanted to play next month, I decided to organise a warm-up game at the club to get everyone used to the mechanics of FDS to speed up matters for 'the big one', Trafalgar, with seventy three models on the table, next month, and this little scenario with just twenty-two models seemed a good choice, themed as it is around the larger battle.

The briefings for the respective commanders were straight forward and very much those that Admirals Collingwood and Alava were tasked with on the day;

Vice Admiral Cuthbert Collingwood

British Briefing:
'You are Vice Admiral Cuthbert Collingwood, and it is the 21st October 1805 at 11.45 am as you lead the Lee Column of the British fleet into the attack on the rear of the Franco-Spanish Combined Fleet. Your plan is simple, namely, to pass between the enemy ships with your ships attacking in echelon allowing each to rake the enemy ships either side of them as they pass through and to then turn to larboard and luff up alongside an enemy ship to continue the attack with a close range cannonade on their leeward side and cause them to strike as quickly as possible with no hope of escape.

The British order of battle with the relevant ship statistics for playing the game, together with my inclusion of a PPV score or Points Preservation Value to determine when ships lost through capture or sinking will provoke a break-off test.

Your ships are well motivated and well lead. Each of your captains knows what is expected of him.'

The game is well under way and flowing seamlessly as the players became quickly familiar with the sequence of play and various game mechanics, and here can be seen the Royal Sovereign and Belleisle breaking through the Allied line, having raked the enemy as they passed.

Franco-Spanish Briefing:
You are Vice Admiral Don Maria de Alava, commanding the rear squadron of the Combined Fleet line, formerly the van squadron and now you have some of Admiral Gravina’s ships close into yours including French Rear Admiral Magon in the Algeciras as you have had to change course and rearrange your line as the British, who were formerly sailing on an opposite tack have now turned towards the Allied line in two columns, one of which is headed towards your squadron.

Vice Admiral Don Maria de Alava

You must maintain your heading in the wake of the other squadrons of the fleet and hope to take advantage of the bold approach of the enemy who have presented their bows to your squadron which, with your ships, sailing on a bow wind and moving slowly, should allow a relatively steady deck to fire at the enemy rigging and cause as much damage as possible; which will in turn allow the option to either disengage or use your larger ships crews, which include large numbers of soldiers, to board and take any of the enemy you manage to cripple aloft.

The Combined Fleet Order of Battle - Note the PPV break-off threshold is just 5.5, meaning just three ships striking will provoke the test.

Your main concern is that the gaps between your ships presents an opportunity for the enemy to pass through your line so you must hope that your captains can close up and that the second line of ships will be able to help deal with any British ships that manage to pass through your line.

The ships nearest to camera are the line of small ships supporting the Combined Fleet line, there for completion to tow damaged friends away from danger if signalled to do so, but not to engage British ships of the line.

As this game was designed to get the players used to the movement, combat and running repairs side of the game, I dispensed with covering in detail about the signalling other than quickly covering the basics about how to do it and the the requirements I have added that orders ships captains to enter the high risk combat zone of 'close range', not something they would do routinely unless ordered to 'engage the enemy closely', preferring to stand off at medium range and attempt to batter the enemy into submission that led to many of the inconsequential battles of the American War.

Belleisle (left) carrying a 'worn' damage chit  and Royal Sovereign centre have passed through the Allied line having raked those ships passed and with the latter closing in on Alava's flagship Santa Ana (right of picture). The British ship beyond the Allied line and sailing parallel is the Mars which failed with a '1' to break the line and so turned away to engage the enemy at close range on the windward side.

To the great relief of the two commanders, I stated that in this scenario Nelson and Vileneuve had already signalled their intentions, namely to engage closely and pass through the line by the former and to engage in line ahead by the latter, and so the only signals that might be needed were if Alava wanted his frigate line to tow badly damaged compatriots away from danger if the opportunity presented.

The follow on British ships are about to break the Allied line having passed their tests to make the attempt, with Tonnant to the left, Bellerophon and Colossus. Note the course adjustments as the players attempt to line up for a gap to make their pass-through move.

The first turn was taken very methodically to illustrate the phases of play and by turn three, the play had become intuitive, with minimal reference to the quick reference sheets, always a good sign of a set of rules, and the first combat rolls were happening as the Royal Sovereign and Belleisle both successfully passed their tests to break the Allied line, followed by Mars which surprised everyone with a failed test, rolling a '1' and turning away to engage in a broadside battering to windward at close range.

The French ship nearest camera is the 74-gun Fougeaux , Captain Baudoin, that has just taken a close in stern rake from the passing Royal Sovereign that has left her with medium damage chit on her bow. She would take another close broadside from the British flagship on her larboard quarter in the next turn raising the damage to 'Heavy' followed by a failed 'Strike Test' at the end of the turn and seeing her become the first Allied ship to do so.

The combat of gunnery and indeed boarding when it occurs, consists of opposed die rolls combined with situational factors to come up with a score comparison, with comparative scores of equal, more than, double or more etc, causing more damage with each higher level of difference and hopefully increasing the woes of the target, and with damage indicated by a counter placed on the base of the model ranging from worn, light, medium, heavy and strike.


To increase the level of damage on a ship damaged from previous action usually requires a damage result the same or better than that already inflicted, although worn on a worn will not and a light on a light requires a test to 'escalate' it to medium damage.

The process keeps both parties involved no matter which was the phasing side, and with die scores of '6' to one party and a '1' to the other, indicating a critical damage result to one of them depending on who rolled the natural '1', only adding to the drama of each exchange.


As more opposing ships became hotly engaged as the rolling attack of the British squadron developed more and more of these gunnery-defence roll offs occurred and with both sides on the lookout for that '6' and '1' combination the inevitable happened as Admiral Magon's flagship Algeciras 74-guns was stern raked by Bellerophon.

Three French third-rates Algeciras (left), Pluton (centre-back) and Fougeux (right) with strike markers under their bows tells the tale of the maelstrom of fire that hit this part of the line of the Combined Fleet, with the Admiral Killed marker on Algeciras flying Admiral Magon's flag at her mizzen, and Monarca the Spanish 74-gunner closest to camera and the stern galleries of the British flagship Royal Sovereign (off-right).

The  bones went down the tower and a roar of delight from the British players followed as the Frenchman rolling a '1' to the British '6' caused enough damage to cause an immediate strike and with the following critical hit die scoring a '6' followed by a '5' saw Rear-Admiral Charles-René Magon de Médin, fall to the deck mortally wounded, talk about history recreated in the game!

Rear-Admiral Charles-René Magon de Médin, killed at Trafalgar
and suffering a similar fate in our game.

To be fair to the Allies their commanders were having a bad day at the office as far as their die rolls were concerned that saw a fire break out on the Spanish 74-gun Montanez on the first time she opened fire rolling another '1' to a '6' in response causing the 'Fire' critical hit, that fortunately was extinguished in the next 'Command Phase' where command points can be used by each respective commander to repair damage levels and aid dealing with critical hits.


Even in this aspect of our game the Allied commander was regularly rolling 2's and 3's which with a -1 on Alava's ability rating frequently left insufficient points to make desperately needed repair attempts; the repair phase in each turn being an important function of each commander with points rolled for in each command phase and spent trying to reduce the amount of damage on ships under their respective commands.

HMS Mars has backed sail and lowered one of my new crewed ships boats to take possession of the struck French third-rate Fougeux, allowing my first ships boat to make its debut on table.
https://www.wargaming3d.com/brands/simon-mann

With Allied ships striking along the line the British were keen to secure their prizes which gave me an opportunity to get the first of my ships boats out on the table to indicate the progress of a boarding party being lowered to take possession. Securing prizes in battle is an important task that prevents struck enemy ships that have fallen away from the main action, simply reraising their colours and slipping off the table, thus denying the victor their full victory point total. 


These 3D ships boats with crews pulling on the oars are from Simon Mann and were free to download (link above) and printed for me by clubmate Jason, finally making it to the top of the painting job list, and make a visually pleasing replacement for the counters used previously whilst also providing a nice option for some cutting out and landing scenarios I have in mind.


This scenario is a great way of putting any ruleset to the test by bringing on the dogfight of a melee that Nelson planned for and seeing opposing ships of the line mixing things close and personal like frigates; on this occasion the British were just too good, made worse by such an imbalance in die rolling for the day which no set of rules can offset.


We played five turns, equating to fifty minutes of battle with close range exchanges of fire breaking out along the complete length of the Allied line that had left three French 74's struck, one a flagship with a dead Admiral aboard and a PPV (Preservation Points Value) break off test required by Admiral Alava, as per the Scenario Briefing set out below;

Retreat Test:
Roll a d6 and add the commander of that fleet or squadron Command Rating (CR). The Fleet or Squadron breaks and disengages on 4 or less. 1 is always a failure. Disengaged squadrons must move to exit the table and may not fire unless enemy ships fire at them.

Admiral/Commodore Command Rating (CR)
Collingwood +1
Alava -1
Magon 0

The resulting roll of 4 was reduced to 3 with Alava's -1 CR and so the Allies would attempt to retreat off the table, causing us to refer to the End of Game Effects;

Game End Effects:
Winning side is the last side whose Fleet Morale breaks or the last side with an unbroken squadron on the table.

If neither side has an unbroken squadron at the end of a turn then game is a draw.

Losing side – roll a d6 for any ships that have suffered Heavy Damage. They founder and sink on a 1 or are captured by the enemy if they have any ships of the same rate or larger that are not more than Light Damage.

If the game ends at the players discretion before a clear winner or drawn game has been established, then consult the damage states of the two forces and take a view on the state of play at the close as to which side is most likely to achieve a result.

Trafalgar 2023 played with the Penarth Club in Nelson near Cardiff, illustrating the complete collection in action and this game a small cameo scenario in a much much larger battle we will play next month.

None of the Heavily Damaged Allied ships sank and two were captured by undamaged British opponents, seeing five Allied ships taken in this section of the line out of the ten engaged, a crushing victory for Collingwood's squadron, but more importantly a thoroughly enjoyable game for all involved.

Of course, had we chosen to continue the action, their was still another scenario left in this game, as instead of rolling for and end of game result the Allies attempted to get their surviving ships off the table to potentially escape, illustrating the potential of FDS to replicate the issues facing fleet commanders fighting these big battles in this era. 

Far Distant Ships is an excellent option for a big fleet action or, as in this case a squadron on squadron action, producing an intuitive, pacey, flowing game with lots of player decision points and involvement during the phases of play combined with the narrative and drama you would want to characterise that play, and we had that in buckets that resulted in two new recruits for the Trafalgar game in May at Exeter Legionary and several sets of Far Distant Ships purchased from Wargame Vault. 

Thank you to Mark C, Matt, Ian, John, Jack and Steve L for a fun day at the table and for the drama of our game, and looking forward to our next meeting off Cape Trafalgar.

More anon

JJ

Sunday, 10 November 2024

Action off Toulon, June 1795 - Kiss Me Hardy

HMS Lowestoffe - Derek Gardner

Kiss Me, Hardy (KMH) made a return to the table at club this month following the completion of my Camperdown collection in October and a warm-up game with it back in March when we recreated part of the battle and the attack by Rear-admiral Onslow's Leeward Division on the rear of the Batavian-Dutch line, link to that post below

The plan and panorama brought to life on the table as the battle commences.
Devon Wargames Group - Camperdown, Attack of the Leeward Division

This time we were playtesting Scenario 21, one of a hundred single-ship, small squadron engagements I have been compiling, with this one taking the players back to the summer of 1795 in the Mediterranean as the British and Revolutionary French navies struggled for supremacy in the Eastern Mediterranean as the latter attempted to frustrate French naval support to their land forces operating against British allies, the Austrians.

William James in his Naval History of Great Britain Vol I picks up the account of this specific action that took place between the two fleets operating bases of Port Mahon in Minorca for the British and Toulon for the French.


In the month of June Admiral Hotham, while cruising with the British fleet off the Island of Minorca, received intelligence that the French fleet was at sea. To ascertain the fact, the admiral, on the evening of the 23rd, detached the 28-gun frigate Dido, Captain George Henry Towry, and 12-pounder 32-gun frigate Lowestoffe, Captain Robert Gambier Middleton, to reconnoitre the road of Toulon. 


On the 24th, at 4 a.m., latitude 41° 8' north, longitude 5° 30' east, these frigates, standing close hauled on the larboard tack, with the wind at north-north-west, descried approaching them, nearly ahead, the French 40-gun frigate Minerve, Captain Perrée, and 36-gun frigate Artémise, Captain Charbonnier, which frigates, by a singular coincidence, had been ordered by the French admiral to proceed off Minorca, and ascertain the truth of a rumour that the British fleet was at sea.


The action on the 24th June 1795, would see the Minerve and the Artémise engage the frigates HMS Dido and HMS Lowestoffe, resulting in the Minerve surrendering to the British, and her consort Artémise escaping having fled, with the former later commissioned into the Royal Navy as HMS Minerve.
 

The set up for this little fight is recounted in James' history, and the scenario picks up from where the two French ships who had originally run from the encounter, hauled up to await their pursuers, seemingly having observed their inferiority to themselves and confident of a positive outcome in their favour.

Captain Perrée and the 40-gun Minerve leads her consort Artémise with the British seen on the starboard bow.

Thus the British have the wind gauge with both forces on a course to intercept one another and bring on the fight.

Likewise the British are set up in line ahead and at quarters 

For these smaller fights I prefer to use the order cards for each model as well as the standard chit draw mechanism in KMH, that requires individual commanders and their respective models to have course orders issued prior to the activation chits being drawn.
  
The KMH system of issuing an order for the model to travel straight, turn to starboard or larboard or tack, with a face down card only being revealed when a model is activated to move.

This simple system of issuing an order for the model with a face down card directing it to travel straight, turn to starboard or larboard or tack, commits the player to that move without knowing what the opposition has ordered, coupled with the move sequence governed by the chit draw adding yet more uncertainty.

The opposing squadrons, with the French still in line ahead, but with the British now acting independently have moved into gun range and have opened fire. Note the order card for Lowestoffe, the rear most British ship is still face down, she not having moved yet but having fired her bow chasers.

Thus the players find themselves forced to anticipate what an enemy commander will do in the next turn, not knowing who will move first, who will fire first or indeed how far a vessel will travel in a given turn, but instead only having a vague idea of the possibilities to work with, very much like their historical counterparts would have had to contend with during a real sea fight.
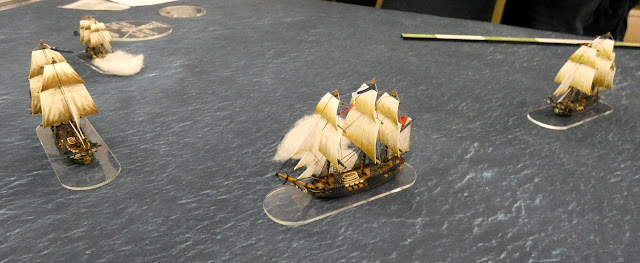
The Dido furthest left has managed to position herself outside the arc of fire of the Minerve, leaving the latter to open her account with an extreme-range broadside against the Lowestoffe's rigging, which has returned the salute with her bow chasers.

With the players briefed on the historical setup but not the outcome, the two squadrons contented themselves to spending the first couple of moves moving in line ahead, with the lead ship dictating the course and her consort simply following and maintaining station.

The next turn and Minerve has managed to cross the 'T', now engaging the Dido with a medium-range broadside to her hull and getting a similar salute from Dido's bowchasers.

However on turn three the lead British frigate Dido signalled Lowestoffe to act independently and course orders were issued by the respective players with no coordination permitted between them until they reformed. This happened to correspond with the Lowestoffe coming into the arc of fire from Minerve at extreme range and the Frenchman opted to open a broadside against the enemy frigates rigging, bringing down several spars in the process, prompting return fire from the British bow chasers that missed.

The British have still to move as indicated by their orders cards face down by the models

In the next turn, about twenty minutes into the action, the Minerve managed to cross the bows of the Dido, at medium range this time opting to put round shot in the enemy's hull, again prompting a response from the enemy bow chasers and suffering slight damage in return, with the French opting to stay in line ahead as the British approached bow on.

With Dido now within range to pass between the two French frigates the next turn would be critical as to who got the drop on the other, namely would the Minerve open fire again before the Dido had moved and then move away from a possible stern rake or would the Dido do just that by placing her broadsides against both French frigates in the gap that loomed ahead?

Captain Towry takes full advantage of the fortunes of war to stern rake Minerve at short range 

Britannia would not be denied and Captain Towry took full advantage of the opportunity as his 'move' chit came out before that of the Minerve to reveal his orders to move straight ahead, soon followed by his 'fire' chit which found the British frigate squarely across the Minerve's stern gallery in a perfect position for a stern rake duly delivered at short range, leaving the French man on a strike test to go with the damage done to his hull. 

Artémise fires of her starboard battery of guns against the fast approaching Lowestoffe causing a small fire to go with the damage inflicted.

Meanwhile the Artémise following in her wake made a ineffectual attempt to support Minerve by firing her bow chasers against the Dido, but made much better use of her starboard battery of guns as she loosed off a medium range barrage against the fast approaching Lowestoffe that caused a small fire on board the British frigate.

The game was producing swings of fortune in each turn as each side strove to get into a commanding position and pull the fight in their direction, with the larger French ships relying on their greater size and ability to soak up punishment to outweigh the better fighting attributes but less sturdy British opponents.

The Minerve is adrift, top left, having struck last turn and the Lowestoffe, closest to camera, has just fired a point blank broadside into the larboard quarter of the Artémise knocking out all the remaining guns on that side and bringing down the Frenchman's mainmast with a devastating critical hit result

The next turn, with our battle closing in on an hour of hard fighting, provided the first indication of who would get command of the situation as the Minerve looking to continue the fight but required to check her morale after being stern raked by HMS Dido faced a 'strike test' chit early in the move.

The damage had been chastening but not overwhelming and the Minerve with her large crew and hull still had a positive morale rating of 75%, meaning any die score at or below that number would keep her in the fight, that was until the dice settled at the bottom of the tower to reveal a score of 77% and thus she hauled down her colours to await a British boarding party.

Captain Charbonnier and the Artémise are assailed from both sides as the Minerve having struck drifts close by impotently. 

Captain Charbonnier aboard Artémise was stunned to see his comrade haul down his colours and, making preparation to abandon the fight and attempt to flee the table, was assailed from two directions as the Dido grazed his starboard bow and fouled his ship, and the Lowestoffe, having extinguished her fire poured in a devastating broadside at point blank range on her larboard quarter knocking out her remaining larboard guns and bringing down her mainmast in the process.

The resulting boarding action initiated by Charbonnier seemed to be the right response as his crew narrowly won the first attempt to get over the bulwarks of the Dido and take the fight to the British, but in the next two rounds of combat they were driven back by the Dido's and on to their own lower deck as the Lowestoffe kept up a remorseless barrage on her defenceless larboard side in support of the melee that had its inevitable result as the Artémise hauled down her colours with her morale rating reduced to a mere 25% of its original rating.

My two new Turner Miniatures 3D printed French 40-gun frigates Virginie (right) and Coquille (left).
JJ's Wargames - French 40-gun Frigate Virginie
JJ's Wargames - French 40-gun Frigate La Coquille
The next time I run this scenario I aim to do it with more appropriate models.

This scenario produced the game I had hoped for with two evenly matched sides pitching the larger or equal French frigates against two similar or smaller but better quality opponents and giving me the opportunity to run out my two new Turner Miniatures 3D printed French 40-gun frigates Virginie and Coquille for the first time, but sadly with the Coquille and my two British imposters, as I am still to build my new 32 and 28 gun British opponents and a French 32 in post 1794 colours which are in the shipyard as I type.

All the models are kitted out with Warlord Games, Black Seas boats, masts, sails and in some cases figureheads.
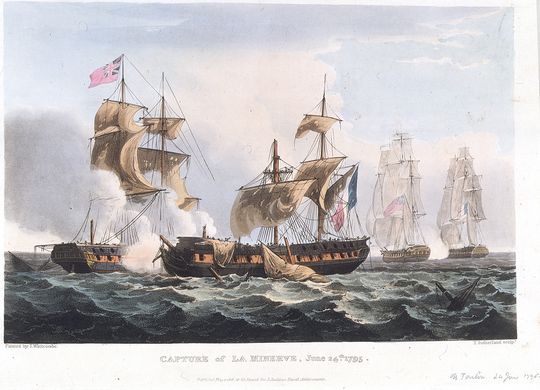
Capture of La Minerve by Thomas Whitcombe

Thanks to Ian, Gavin and Paul for producing a very entertaining and well played game, with bags of drama and laughs, and with Gavin and Paul new to the club and to Kiss Me, Hardy.

JJ