Labels

Sunday, 12 December 2021

Gus Murchie Memorial Game 2021 - WWII Normandy Corps Attack


The final meeting of the Devon Wargames Group for 2021 took place this weekend with our annual one club big game in memory of a stalwart of the club and a very fine chap Gus Murchie, with last year's game sadly cancelled due to Covid restrictions, and so it was great to get back to our usual club business.

Gus

This year's theme was to be WWII and set in Normandy recreating one of the big set piece British breakout offensives that came to characterise much of the campaign as the Allies fought hard to drive the Germans back from the Normandy beachheads.

With plans finalised in October following our Club AGM, our planning team, Chas and Jason, issued an alert order with the the briefing that follows and the club geared itself up for the big show!

Overview

This years game will simulate a British attempt to breakout from Normandy.

The game will cover several days of fighting, the initial British attack and the German counter attack.
British objective is to capture game table 4, German HQ, after fighting their way across Tables 1,2 and 3. German objective is of course to prevent the Brits achieving objective but to also take back tables 1,2 and 3.

In addition to the table top gaming, this game will introduce the the concept of resources. Resource Points enable players to move and do things, they should be considered to be fuel, ammo, organisation, communications etc. As in real life there will not be enough resources to do everything so it is up to the commander to work out priorities.

Our table plan for the upcoming offensive

Game Sequence

The game is split into two phases, Day and Night.
The Day Phase consists of six turns, Night Phase only one turn.
The Day Turns are made up as follows:-
  • HQ Commander's dice for “Resource Points”
  • HQ Commander's allocates “Resource Points” to players.
  • Artillery and Air force players allocate which table their assets will be committed to. Provided they have been allocate “Resource Points”
  • HQ Commander's dice off to who has “Initiative”.
  • Side with “Initiative” undertake Order of Play as on page 2 of the Rules. Note only those players with “Resource Points” may move bases and vehicles.
  • Side with out “Initiative” now undertakes Order of Play.
End of Turn
The Night Phase is used to reorganise forces for next days fighting.
The following is undertaken:-
  • HQ Commander dice for “Resource Points”.
  • HQ Commander allocates “Resource Points”
  • Players with “Resource Points” may withdraw units from game table and dice to recover men and vehicles. In addition they may move reinforcements.


Command Descriptions

Each player is allocated a command:-
HQ Commander. In charge of everything, they allocate “Resource Points”, allocate support units, tell other commander what they are to do, remove commanders who don't come up to mark.
ADC. He is the HQ Commanders eye's and ears he can also be sent in to take over command of tables or units.
Artillery Commander. Allocated tables for batteries to fire at. Will move to table during combats to throw dice etc.
Air force Commander. Allocated tables and operation for each aircraft. Will take aircraft to table and conduct attacks.
Battalion/Regimental Commanders. These are on the sharp end of the fighting. They are allocated a force and table. They are given orders and told to get on with it, while the HQ sit back drink coffee and eat goodies.


Game Objective

This is to tell you what has driven the design of this game.
We have a lot more people in club and our more traditional games would not provide the interaction of players with each other. We hope this new set up will enable players to be more interested in the “big picture” and not just fighting the player opposite.

Oh and very importantly have fun celebrating our hobby and the year end.

Thus with the orders plan issued, the club began organising the forces with the rule set Rapid Fire Reloaded chosen as the rules of play, very much because of their fast play options and relatively low complexity to allow everyone to get going with them as quickly as possible.

Allied air support indulging in a bit of 'softening up'.

The force lists included basic units for the on table set ups and a list of reserve formations that the respective army commanders could allocate to reinforce success on the various tables.

Examples of our start forces for the Germans and British can be seen below:

German Grenadier Regiment
Regt HQ 1 base, 1 Kubelwagon
1 75mm IG & tow
1 Pak40 & tow
4 Panzerschreck teams
1 FO base, 1 Kubelwagon
1st Battalion
Bttl HQ 1 base
1st Company 4 bases, 1 Panzerfaust
2nd Company 4 bases, 1 Panzerfaust
3rd Company 4 bases, 1 Panzerfaust
4th Company 2 MMG, 1 8cm mortar
2nd Battalion
Bttl HQ 1 base
1st Company 4 bases, 1 Panzerfaust
2nd Company 4 bases, 1 Panzerfaust
3rd Company 4 bases, 1 Panzerfaust
4th Company 2 MMG, 1 8cm mortar

British Armoured Regiment
Regt HQ 1 Sherman Command Tank
1 Sherman Dozer
1 Sherman OP
1 Stuart
1 Scout Car
1 Crusader AA
1st Squadron 2 Sherman and 1 Firefly
2nd Squadron 2 Sherman and 1 Firefly
3rd Squadron 2 Sherman and 1 Firefly

British Infantry Regiment
Regt HQ 1 CO base, 1 Carrier
FO Team 1 FO base, 1 Carrier
Carrier Platoon 1 base, 1 Carrier
Support Company 1 3” mortar, 1 6pdr AT Gun, 2 Carriers
A Company 4 bases
B Company 4 bases
C Company 4 bases
D Company 4 bases

The Devon Wargames Group, Gus Murchie Memorial Game 2021

With the the troops put on alert and forming up and jump off areas arranged, the day of battle was on us and there was just a few minutes to get the obligatory photo shoot done of the respective commanders before the opening barrage of artillery announced the start of the 'big-show'.


As one of the cogs in the Allied war machine taking the roll of a forward British infantry battalion commanding officer I was very much involved in the little battle that formed our small part of the big picture out on the extreme Allied left with Jack joining me to command the British Armoured Regiment that was in support and Oberst Paul, hunkering down amid hedgerows and orchards as his Grenadier Regiment prepared to resist our assault.

The game was an opportunity for me to field this British OP Sherman liberally festooned with radio aerials which is modelled on my dad's own tank, as pictured in Eindhoven during Market Garden and commanded by Capt. W. Good RA, 55th Field Regiment, part of Guards Armoured Division with Sergeant H.F. Jones and Capt. Good out of the tank getting a better look. The captured German optics poking out of the commanders hatch were seen being used by another 55th FR OP tank and the tool box mounted on the front hull was another particular field modification to this vehicle .

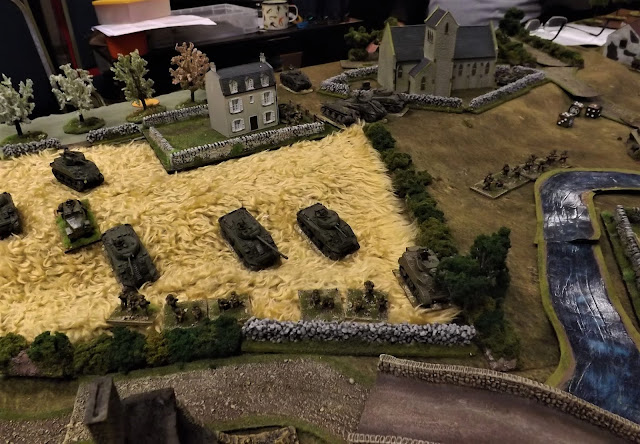
Our table was a length way affair with more of the open terrain around Caen covered in ripe cornfields and the occasional orchard, perfect 'tank country' as dad would have called it, and so Jack took the lead with his sabre squadrons forward ready to shoot my infantry lads on to the target, namely the village which was our Phase One objective, before pressing on with Phase Two to break out off the far end in support of the final push into the German rear area.

British 25lbr support mixed with the infantry 3inch mortars hammers the village as the armour advances


As our little battle developed, I donned my other cap as the I Corps official frontline photographer and jumping in the handy little Auster Army Co-Op light plane made available to me to whisk me swiftly to all sectors of the front I made my way around the other tables to give the folks back home an idea of how their boys were doing in France.
 

The table next to ours being fought width-wise was more of a  'knife fight' affair with both opposing sides close up and personal from the get-go with a German minefield blocking the river bridge on the road leading to the village ahead, guarded by a knocked out panther tank from a previous attempt to take this sector.

Massed British tanks rumble forward having crossed the river to their left the night before the attack.

Corps assets in the form of heavy artillery batteries, infantry tanks, including 'crocodiles', reserve exploitation armoured regiments and recce support, not to mention massed lines of rocket armed Typhoon fighter bombers were festooned across forming up grounds and close support airfields 

My pilot was happy to take a detour behind our lines and land close by Corps HQ where I was warmly greeted by the general's staff officer and invited to stay for lunch before seeing the general (Steve M.) at work fighting his battle and meeting the Air Officer Commanding (Si) in charge of the liberal amounts of Allied air support backing this particular offensive.

'Jerry' would have a hard time stopping this lot!

General commanding British I Corps (Steve M.), 21st Army Group hard at work in his admin caravan


After lunch in the rear we were back in the air heading further into the middle sector and the German rear areas, the objective for the attack, deceptively quiet as the enemy below were careful not to reveal their positions to our view and any foolhardy attempts to take a pot shot at our inspection likely to be warmly met with a response from our Typhoon escort followed by some Royal Artillery medium and heavy howitzer support.

The German rear area table, deceptively quiet when we flew over on our recce flight of the forward line.

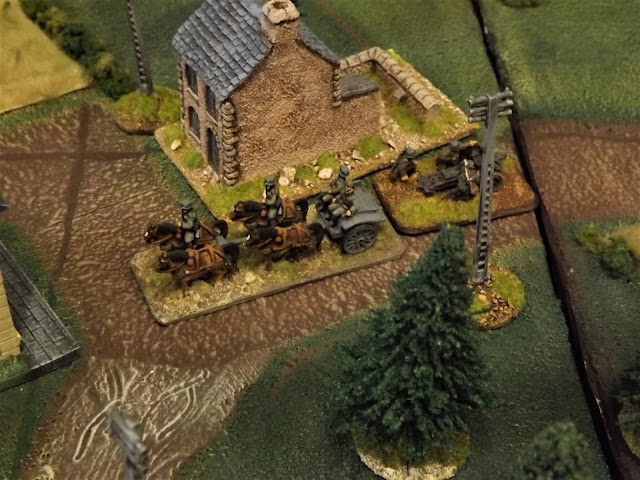
The right flank of the battle proved to be a real treat, going over ground very familiar to anyone who had the pleasure of playing Gus at perhaps his favourite period, Normandy WWII, and here with Nathan setting up Gus's old prepared boards and with models very familiar to me having painted and played with them before selling them on to Nathan. It's really great when collections stay with the club and we are lucky in that fact.

As on the left flank the right flank was a lengthways German defence in depth table but obviously closer to the American sector with more hedgerows lining the fields in this part of the French countryside likely to be lined with well dug in German defenders as seemed to be the case when we arrived.

Gus's former collection of models and terrain now with Nathan and nicely gracing our game

A massed armoured attack was in full swing on the right flank when we arrived.


German infantry were battling away from concealed position along the hedges lining the small roads on the right flank.


It was the afternoon of day one as I returned to my comrades on the British left with our armour hotly engaged with German infantry in and around the village, dropping the occasional mortar 'stonk' among our tanks as Allied close air support zoomed in overhead to bomb and strafe the village.

Occasional German mortar fire dropped amid our lines as the advance pressed on

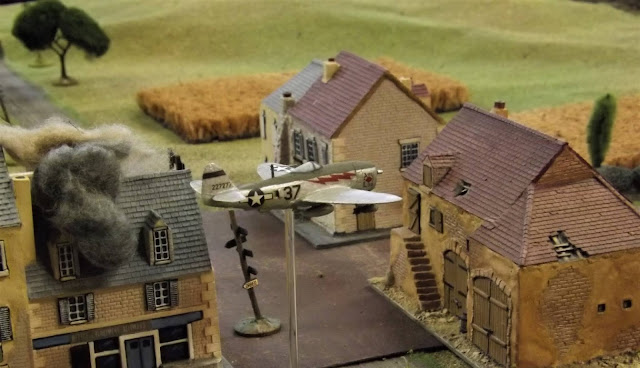
As German POW's recounted, when the Luftwaffe were near, no one ducked, when the RAF was near, we ducked and when the US Airforce was near, everyone ducked! Button up boys this one is close!

Allied air support was deadly, with the fighter bombers backed up by rear area bombing attacks by medium Boston bombers.

On all the tables the pressure appeared to be taking a toll on the dogged German defences and the inevitable closely conserved assets started to appear to shore the situation up with the odd Tiger tank being spotted and warnings called out over the radio net - of course every enemy tank is a Tiger!


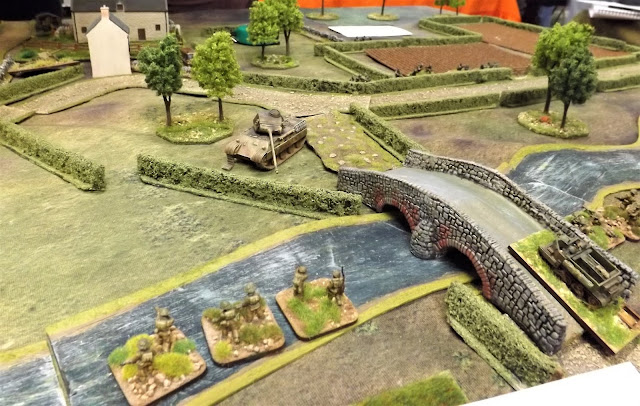
British infantry force a crossing of the river wary of the enemy minefield beyond blocking the road

When heavy armoured assets weren't available German commanders had to eke out their situation by resorting to close defence from their panzerfaust and panzerschreck teams backed up with the regimental Pak 40's.

Now that definitely looks like a Tiger - Driver reverse!!


Any stiff resistance was met with calls back to Corps with a visit from the AOC and Corps RA in the form of Si who was having a great time wheeling out his big guns and fighter bombers eagerly checking back with the sector commanders whom he had lavished with his largess to establish the results which seemed to be having the desired effect, as German defences started to buckle.


Our game turns were under strict timing and the pressure was on for all field commanders, German and British to get on with their selected moves before the dreaded air raid warning siren announced the end of the turn and to stop what you were doing as the turn was handed to the opponents.

Needless to say Turn Six was reached in good time and both sides had a chance to regroup in preparation for the return of day light and battle. This took the form of withdrawing damaged tanks into reserve and following an announcement of a successful opportunity die roll the chance to bring back knocked out and damaged tanks and lost infantry bases.


Sadly on our sector we only got the chance to resurrect our three tank losses, only managing to reclaim one of the damaged tanks, but with our two destroyed tanks, one infantry base and the carrier platoon base lost to us for the resumption.


Paul managed to secure the support of a Panzer IV battalion on our sector just as his rear area infantry support units were fending off the irresistible approach of our tanks.

Our advance was now up on the village and so the battle was being fought to stop our breakout beyond and the troops Fireflies came into their own, deftly sniping at hull down Panzer IVs with their long 17-pounders on the slope beyond, only to see the German tank line devastated by a Typhoon attack that left the road into the German rear wide open.


On our sector the infantry prepare to go firm on the village as the tanks exploit around it only to come under panzerfaust and Pak 40 attack

Paul's Pak 40 team desperately try to hold a collapsing position around the village

However things had progressed more quickly in the centre and the British spearhead was ahead of our flank with their lead elements composed of an Armoured Reconnaissance Squadron of Cromwell tanks probing forward on the German rear table as our game came to a close.


As you can see the club pulled out all the stops on this game with multiple collections of 15mm WWII being brought together to create our end of year celebration.

As always the game was played in a great spirit with everyone determined to make the occasion fun for all involved and with the outcome very much not the focus of all the effort.


I hope those who have followed the club's reduced calendar of games this year have enjoyed the output as much as we have playing the games presented.

Devon Wargames Group, like the wider hobby, has shown it's resilience in the face of the pandemic and there is a feeling of a gradual return to normality with members feeling encouraged to plan bigger and better games in the New Year and to welcome new members who are interested in playing historical wargames and enjoying the social side of gaming with a club.

On behalf of the DWG I would like to wish everyone a very happy and peaceful Christmas and a great 2022.

Cheers
JJ

Saturday, 4 December 2021

Hardee's Attack, Atlanta, 22 July 1864 - Fire & Fury Brigade ver.2


This club game was based on the Confederate attack on the Union force undertaking the siege of Atlanta. The rules used were Fire and Fury Brigade (ed2), and the figures were 28mm.


The Confederate plan was to turn the flank of the Union force at Bald Hill, which was a crest commanding the eastern approach to the city. Hardee's Corps undertook a night time march and came out of the woods to the south of the Union Force.

https://warfarehistorynetwork.com/2018/12/18/clash-at-bald-hill-atlantas-bloodiest-day/

This is where the game started. The game was fought on an 8' x 4' table, a line of hills along the north edge, Bald Hill situated on the western end and the south side was mainly woods.


The Union force started with G.A Smith's division behind fortifications (facing east and slightly refused at the end) in front of Bald Hill.

Two other divisions, Fuller and Sweeney, were held off table and represented Union forces coming down from the north in support.


The Confederates come steaming on in march columns with artillery at the rear (historically the artillery got held up in the woods). They were safe as most of the Union artillery faced west or covered the woods. They came on in the same formation as the historical battle,  Manley on the left, then Cleburne, Walker and Bate.


The Union response was to re deploy Smith's division to face off the Confederates. In classic F&F, the guns were attached to brigades. Manley and Cleburne formed up and demonstrated at the edge of the wood, while two brigades swung around the fortification to attack the now depleted defences.

In the centre Sweeney started to set up a battle line and Walker went straight for him with artillery giving supporting fire from a hill.


On the right Fuller and Bate also went for each other but Fuller did give support to Sweeney.

The battle was now fought as two separate engagements. On the left, although the Confederates took some casualties, they pinned down Smith's force, at the same time however two brigades swept over the fortifications and rolled up the line. There was a general retreat up to Bald Hill. On the right both sides were attacking and counter attacking in a close range tactical game.


It was however on Bald Hill where the game hung in the balance, Smith, who up to then had been cursed by the dice god came good. He rallied all of his units, silence fell over the Confederates. Their units were now in a bad way and there was no way they could pull off another attack.

The Union Line had held, much like in the real battle.


The rules played well, some players had played the rules before and helped those not familiar to pick them up. After a few turns the game flowed well as the rules are easy to learn. In addition they have a good historical feel and give a good ACW game.


Many thanks to those who played the game and made my umpiring an easy job. Paul (Smith), Nathan (Sweeney) Si (Fuller), Laurence (Bate), Bob (Walker), Tim (Celburne) and Steve M (Manley).

Technical Stuff


Due to a lack of information, I used the Army Generator found at the rear of the rules. With a bit of tweaking of course. Units size was reduced by half to fit the figures available as this meant the unit frontages were half, I decided to play the game using the 15mm scale play sheet. This worked well, however units, especially the Confederates, were more brittle.

Figures used were 28mm mostly Redoubt and Renegade also Celburne brigade was provided by Stephen H, many thanks. 

Abandoned Confederate defensive works in front of Atlanta

Editors Note: The next meeting of the DWG is our annual Gus Murchie Memorial Game when the whole club comes together to play one 'big game' to end our year on and celebrate the seasonal festivities in proper form, and this year we're off to WWII Normandy!

Friday, 26 November 2021

Lion Rampant in the Crusades

 
Editors Note: One of the three games played at this month's meeting of the DWG was a clash in the Crusades using Lion Rampant from Osprey & Dan Mersey. Mike C. put on the game and recounts the action, and any questions about figures, terrain or the game in general, please post in the comments box and I'm sure an answer will be forthcoming:


The year is 1097 and a Friar of questionable ethics has "acquired" a cup (some might call it a chalice) from a local Arab holy man. The Muslims believe this cup was used by the Prophet himself celebrating a famous victory. The Christian Church believes that this up was present at the Last Supper and may have been used by one of the disciples if not Christ himself. It is for this reason that the Friar now has it is in his possession. And it is also the reason why the Friar, having celebrated his success with too much communion wine, now lies comatose in a local village unaware that two warring factions are about to descend on that village to rescue the Holy relic.


The Arab light infantry make great haste and enter the village, checking each dwelling they come to looking for the Friar and the Chalice. On their right flank the fanatical Arab heavy infantry, including their leader the aggrieved holy man, make their way towards the north end of the village supported by a unit of medium horse archers. On their left flank a unit of archers moves towards the south end of the village.


The Frank's send forward a unit of skirmishers (bidowers) who quickly reach the village supported by a unit of crossbows. They too start searching buildings looking for Friar and chalice, but have no luck. The Arab light infantry enter a courtyard and start to search the buildings around it. Unfortunately for them another unit of Frankish bidowers has entered the North end of the village and fires at them through a large open archway. The Arab light infantry suffer casualties and are forced to retreat from the courtyard straight into view of the advancing Frankish crossbows who send a deadly volley of bolts into them. Suffering further casualties, the Arab light infantry retreats away from the village centre.


To the north of the village Frankish knights (heavy cavalry) together with two units of heavy foot, including their warlord move to engage the Arab leader and his two units of fanatical heavy infantry. The knights take some casualties, but losses on both sides are fairly equal and both sides stand their ground.


Meanwhile in the village, the unit of bidowers who drove off the Arab light infantry, have found the Friar and the cherished cup (or chalice) and are in a hurry to get out of the courtyard.


To the south of the village the Arab archers move up to support the battered light infantry, but they are wary of the Frankish crossbows and now begins a game of cat and mouse with each side trying to get a line of sight on the other to release their missiles. Each unit is reluctant to move out of cover but, the crossbows see two backsides sticking out from behind a wall and release at a short range. The Arab archers suffer only a few casualties but stand firm hiding behind the building.


Back at the north end of the village the fight between the Arab heavy infantry and the mounted knights is intensifying. Sensing that a pivotal moment is approaching, two more units of Arab medium horse archers are diverted away from the southern end of the village to support their leader and the fanatical heavy infantry and the other unit of horse archers. This leaves the Arab light infantry and archers unsupported. When they are hit by the Frankish crossbows again, the light infantry flee the field leaving the archers exposed to s pincer movement by bidowers and crossbows.


At the north end of the village the fanatical Arab heavy infantry units throw themselves on the Frankish knights. Casualties are taken on both sides, but as the knights pull back, this leaves room for a fresh and full-strength unit of Frankish heavy foot to charge the depleted Arab heavy infantry. In the ensuing melee, the Arab holy man is killed. Despite this the Arabs stand firm. The bidowers fleeing the village with the Friar now start to make their escape. The three units of Arab horse archers are ground down by the Frankish knights and heavy foot. They fight to the last man, but it is now clear that the Frank's have total control of the village and the cup (or chalice) is now well and truly secured. The Bishop will be pleased!

Saturday, 20 November 2021

Zulu - Rorke's Drift Battle in a Box!


Every now and then you get to play a fun wargame that leaves a marked impression, and a game that seemed a bit different from the usual stuff.

This month at the club, Mel and Lee travelled down from their home in Bournemouth to put on their second game at the club since running their great rendition of The Battle of Pelennor Fields using War of the Ring, back in March 2020 just before we and the rest of the world got used to a new normal and our regular gaming meetings got put on hold. If you missed the report on that excellent game, enjoyed by all who took part, just follow the link below.

Devon Wargames Group - The Battle of Pelennor Fields

Remembering the fun we had and the recollection of the effort and attention put into that game I was very interested and looking forward to seeing what they had come up with for our excursion into the Zulu War of 1879 and more precisely the famous Battle of Rorke's Drift, an action we have played previously at club with various rule incarnations, but this time we would be using Lee and Mel's very own rules designed around the set up seen below which forms the prototype for a potential new game in a box, perhaps complete with figures rules and terrain for those of us who love this colonial wars theme. 

The Rorke's Drift layout complete with prototype buildings lacking roofs at the moment while the game is in testing.

So what's different about this particular rendition of such a famous action, you might be thinking, as indeed I was when I sat down to assume the role of Corporal Allen and his brave section of twelve stout hearted lads ready to do or die for Queen and Country.

Stanley Baker and Michael Caine in Zulu 1964

Well first off the game is designed to very deliberately recreate the film driven images this battle has taken on ever since the release of the iconic film Zulu made in 1964, perhaps one of the best British war films, if not one of the best war films ever made and now a staple of most Xmas or Bank Holiday viewing with a stellar cast of character actors headed up by the late great Sir Stanley Baker as Lieutenant John Chard, Royal Engineers and the up and coming new star back then, Sir Michael Caine in the role of Lieutenant Gonville Bromhead 24th 'South Wales Borderers' Foot.

Given how most modern wargame audiences familiar with the battle would immediately think of the film and all its memorable moments and catch phrases that have become common parlance, certainly among British wargamers gathering around a table for Rorke's Drift; such as the brilliant portrayal of Colour Sergeant Frank Bourne, by another great English character actor, Nigel Green when asked by one of his nervous young privates on sight of the Zulu horde before the ramparts 

'Why us sarge?' 
'Because we're 'ere lad, now face your front and mark your target.'

Perfectly capturing the stiff upper lip, determination in the face of a desperate situation displayed by the defenders that day in 1879 and their courage no doubt bolstered by a reliance on discipline, drill and training epitomised in the words 'face your front and mark your target'.

Zulus are sighted in the hills around the Rorke's Drift post and the bugle sounds calling the men to arms

The second interesting aspect of the game is that all the players involved assumed the role of key characters from the battle and indeed the film, with each of them having their own particular characteristics to influence the fighting in their area of the table and with the soldiers under their direct command as well as having their own unique combat skills and abilities together with the occasional personal mission, such as Corporal Allen using his personal initiative to rush to the aid of the men trapped in the hospital when set on fire later by the Zulus.

Each of our player characters came with their own unique set of stats to facilitate their personal role in the battle and capture still further the filmic nature of our game.

In addition my character Corporal Allen would contribute directly to the combat efficiency of his twelve man section, by the addition of a red (discipline) and blue (combat) dice added to the twelve white dice rolled by his soldiers when shooting or engaged in melee, with a successful score causing him to add to the enemy casualties with his own effective shooting or bayonetting but also making it more likely for his men to cause more casualties by directing their efforts, indicated by a lower score on the white dice needed for their effectiveness at killing the enemy.

Lieutenant Bromhead oversees his reserve section ready to deploy to a threatened sector as needed

Finally the actions of the Zulus and the impetus of their attacks on the defences was all controlled by Lee and Mel as they ran the game, seeing cards drawn to determine British and Zulu special game events each turn, that could cause a positive or negative impact to either side that turn and generate the arrival of Zulu regiments from different board edges throughout the game.

The results of combat would see the effects on the Zulus referred back to Lee as he could check to see what each unit would do in response to being shot at or casualties received, whilst we as the defenders could only look on and wait and see what the reaction to our efforts would be and prepare our response to the Zulu reaction accordingly.


The great thing about the card sequencing of play is that it enables aspects in the film to take effect, nicely modelling the seemingly random attacks by relatively small groups of Zulus early on in the battle as the defences were tested for weak spots, finally ratcheting up following the historical eclipse of the sun that confirmed to the Zulus that victory was theirs for the taking and causing multiple attacks to suddenly generate from multiple directions all at once.

The first attacks tested the defences for weak points but were limited and allowed a focussed response

The attacks soon built up and stretched the British line to hold them

As players focussed on managing the various sectors of our respective perimeter the tension built and calls would go out for support from other less hard pressed sectors or for an encouraging shout from a charismatic leader to help bolster the discipline and therefore capability of a hard pressed unit.

Another enemy group thrown back with heavy losses but look at the the thinned out defenders before them

Groups of Zulus could range from two, four or six bases each with eight figures per base and with the game based on a what you see is what you've got, one figure to one man ratio, the small thin line of redcoats could suddenly look rather hard pressed, raising the tension another notch.

Firing on newly appearing Zulu warbands could provoke an immediate charge to a standing chant by the warriors clashing their shields in imitation of the distant train so well imitated in the film.

Knowing when to fire and hold the position or to fall back as supporting units fired on large groups clambering over the mealie bags became a required skill, made more tense when the  'low on ammunition' card came out prompting Commissary Dalton to have to make his way to the affected sector dragging the necessary ammunition boxes to keep the line firing.

Nine men down from the section of twelve and things are looking a bit concerning!

Of course success in driving off the attacks was one thing but if our player characters were to imitate their historical ones we needed some heroics to be rewarded with the bucket load of Victoria Crosses the actual action merited and so managing to disperse a Zulu attack was rewarded with a VC and all the players were able to encourage their commands with additional medals as 'the general public don't like to read about too many defeats in their morning papers - bad for morale' card delivered said encouragement and we all rolled for additional gongs for the men - great stuff.

Allen's sector holds firm but he can do little to help those men caught in the hospital as the fire takes hold

What we as players didn't know, rather like the real life defenders and as depicted so artfully in the film, was precisely when this battle would be all over - you remember the scene as the chanting and singing starts from the Zulus on the cliffs above, leaving our heroes thinking their time was up, only to be told by the Afrikaner Adendorff that they're saluting you! Its all over!

Each game will have its own predetermined ending and so ours reached its ultimate climax as multiple large Zulu attacks crashed into the perimeter from all sides with Colour Sergeant Bourne up on the parapet delivering well timed bayonet thrusts and Corporal Allen forced to abandon his barricade to help the defenders on the other side of the perimeter forced back in the last attack and now down to a handful of defenders.

Allen successfully delivered a telling volley that stopped the Induna led six base Zulu attack right on the perimeter to then have to turn his men about to deliver yet another telling volley that drove out the Zulus that had just charged in on the section of defences he had just pulled back from.

Then just as it looked like the outer perimeter would have to be abandoned with the last escapees evacuating the burning hospital, it was over and the station was held heralding a Zulu withdrawal and for us a well earned pint. 

What a battle and with ten VCs awarded for bravery over and above in the face of the enemy we could take time to tend the wounded and prepare for all those after dinner speeches that would be required once back home. 

Colour Sergeant Bourne up on the parapet winning his VC in the thick of the action as the last big attack was held

Mel and Lee are to be congratulated on designing such an filmic and fun game capturing all the narrative that this iconic battle deserves and frankly I'm surprised no one has come up with a similar idea previously.

Having played several of these Rorke's Drift battles with other systems this was by far the best and most immersive of them and that's saying something, as we have had some cracking games at the club and reported about them here on the blog. You can get a feel for the game in a short clip of it below as the action started to intensify as the hospital caught fire.


The rules themselves would also likely lend themselves to a big battle version for doing the larger field battles of the campaign and the Zulu activation and response method pioneered by systems such as Pony Wars and Peter Gilder's Sudan rules really work well for these kind of native irregular armies and I know, talking to Lee, that he sees the rules very much as a tool kit designed to have some of the rules used for certain game types and not for others depending on what is needed for that particular game.

I wish Mel and Lee well with developing this idea further as the work they have done to get the game to this stage is impressive and I would certainly be interested in it as the kind of game you could put on quite easily with a group of friends, with no two games ever likely to play out the same and with loads of narrative to chat and laugh over with a beer when the shooting is done. 

Saturday, 13 November 2021

Infamy, Infamy! - Romans versus Goths


Infamy! Infamy! was released in the middle of lockdown last year which means it's not been able to make much of an impact at club meetings. Being a contrarian I hadn't gone for any of the armies in the book but had instead, used the release of the rules as an opportunity to paint up the Late Romans and Goths that I've had hiding in boxes in the garage. Having toiled away all summer it was time to get all my toys out on the table.
  

Saturday, 6 November 2021

Clotted Lard 2021 in Support of Combat Stress


This year saw the return of the club's annual Lardy event, Clotted Lard, following the disappointment of having to cancel last year's show in the wake of the global pandemic.

We had a fantastic day with the show well supported by the Lardy community and an opportunity to welcome back previous and new guests to the club to enjoy a day of Lardy games as reported here on the blog back in September.


As well as having a great day of wargaming, the show has traditionally allowed the club and our guests to support our veterans by contributing the monies collected from it to Combat Stress who, as well as providing specialist mental health care for those military personnel that serve the country, today and since 1919, also rely very much on public funding to support their vital work with over 75% of that funding coming from charity raising activities, which as you might imagine was badly affected by the social restrictions imposed by Covid 19.

Thus instead of running marathons and such like, the wargaming hobby is only too happy to show its support in our own inimitable way by doing what we do best, having fun with our hobby and enjoying the great social activity that is historical wargaming captured so well by the rule sets offered by Too Fat Lardies and their own ethos of promoting having fun with our games.


In previous years the event has gone from raising £250 in 2018 to £400 on the last two occasions, with all those planning to attend our cancelled show last year very generously passing on their pre-paid contributions to the charity.

This year as you will see the final tally came in at £700 which was absolutely fantastic, and with a growing interest in attendees and folks wanting to put on games at Clotted Lard we are very hopeful of maintaining this trend in charitable collecting.

Many thanks to the Devon Wargames Group club members, the management of the Whipton Institute, Nick Skinner and Richard Clarke from Too Fat Lardies and all our enthusiastic Lard loving guests who support and make our show the great day it has become in the club calendar. 

Here's looking forward to Clotted Lard 2022.