

The new year kicked off with a very good start when Jason offered to bring along his very fine collection of 28mm WWII 1940 France collection for my first game of Chain of Command in 2019; this following having missed the chance of playing Nathan's Battle of the Bulge themed scenario back in November.

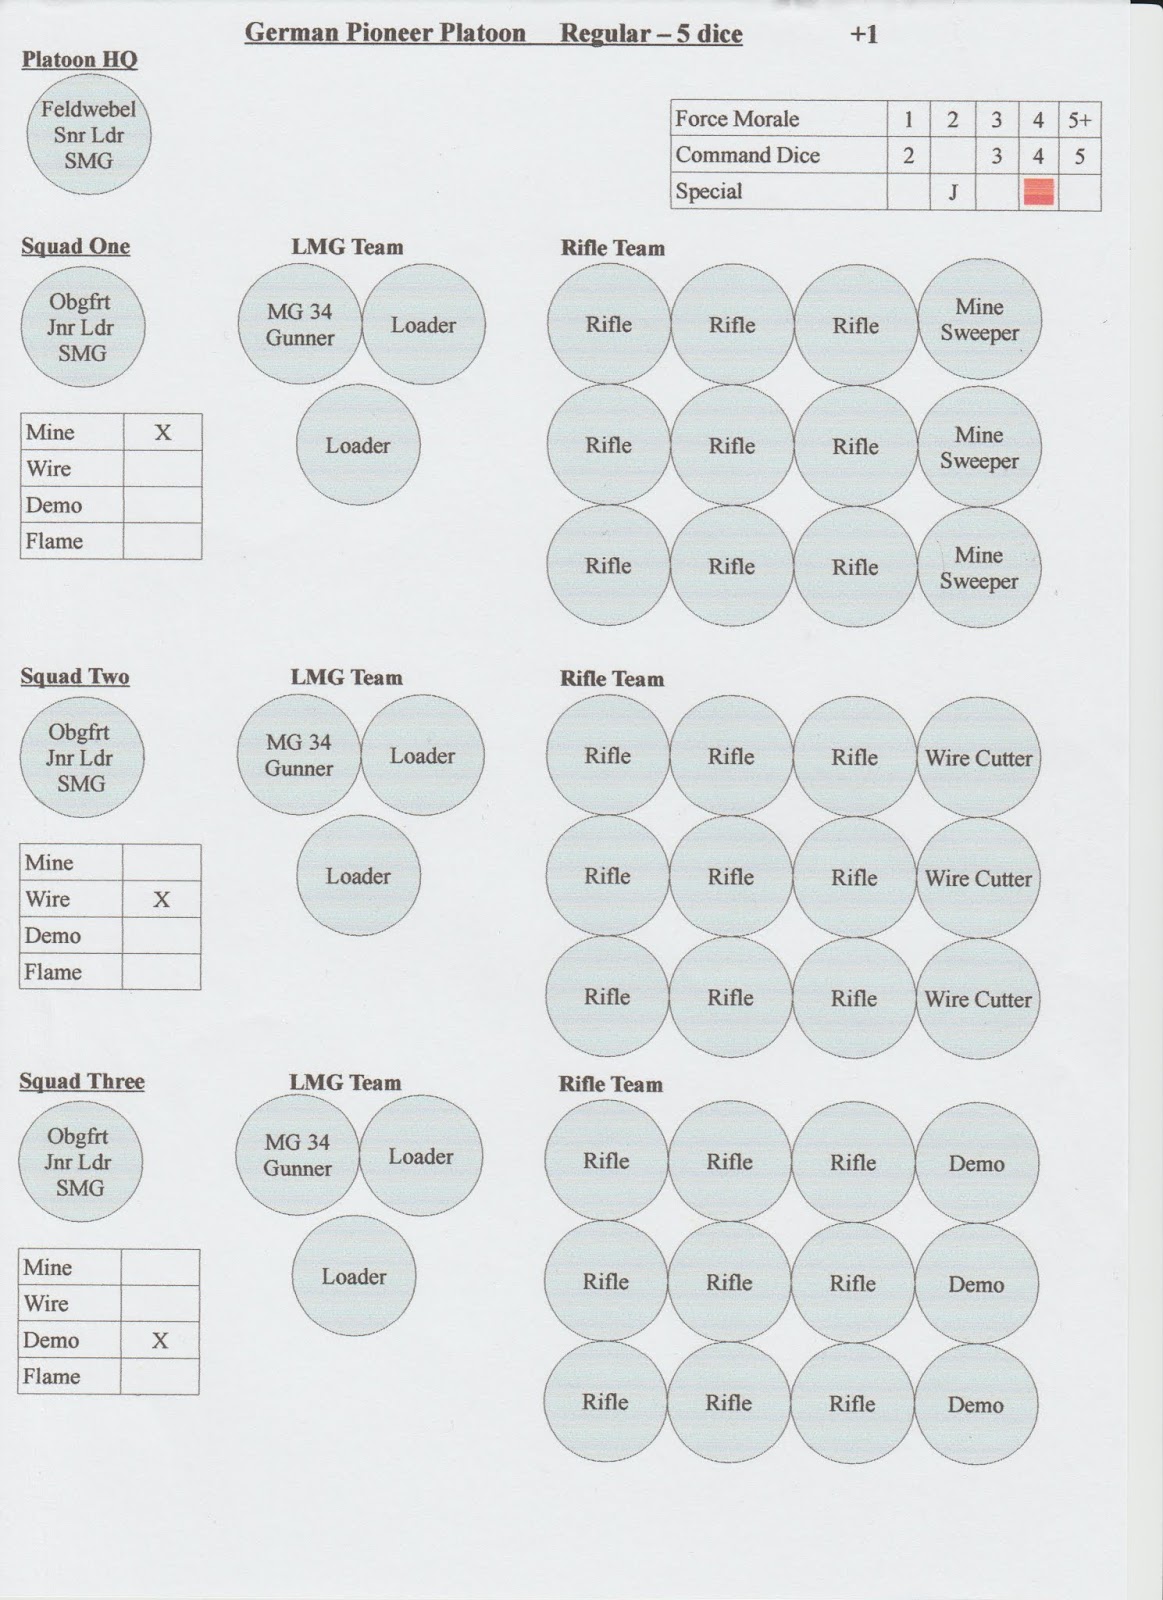
Given that following that game we had a few requests for more information on the orders of battle and the scenario I thought I would head that off right from the start by reproducing the excellent orbat sheets that Jason produced; which as you can see from the pictures also allowed our troops to be laid out in their respective commands ready for deployment onto the table.

As you can see we had an attacking force of German infantry and Pioneers supported by tanks attempting to force a river crossing and drive their armour off the other side of the table heading for the French coast.

 |
| Note the radio truck and two multi figure command groups served as German jump off points |


To save on drawing maps the picture below shows our table with the river to the right with the first German elements having deployed near the road bridge and further along at the ford which has a minefield blocking the latter and tank obstacles and wire on the former.

To frustrate the dastardly 'Boche' plans of European domination our heroes took the form of a hastily formed group of British and French infantry supported by some British tanks including one rather formidable Matilda II.
Their task was to prevent the Germans driving through their position and off the opposite table edge whilst also defending a disguised British command bunker, no doubt full of decrypted German signals traffic that might have alerted the enemy to a successful breach of their unbreakable enigma code.
 |
| As with the Germans, various trucks and multi-figure command groups served as jump-off points. |


One of the really clever parts of the Chain of Command design is the 'cat and mouse' process of laying patrol markers as both sides attempted to get control of key areas of terrain in preparation for deploying their forces, whilst also attempting to stop the enemy from doing the same.
 |
| German infantry get into cover ready to protect the pioneers advancing over the bridge |
For the Germans the game was very much about pushing over the river and securing key points of cover to facilitate the advance of the German Pioneers and to cover their work parties as they set about demolishing and destroying allied blocks to the German tank force.
 |
| Likewise at the ford the first German elements attempt to make the best use of the cover around the position |
For the allies a very similar but conversely different plan developed as they sought to get their defending infantry into the best forward cover and batter the German infantry elements before they could feed their armour across to join the battle.
 |
| The first allied elements were quickly deploying along hedgerows opposite the German crossing points |
Thus the game developed into a ferocious exchange of small arms fire interspersed with the odd bit of mortar and infantry gun high explosive as the sides sought to dominate the two river crossings while German Pioneers quickly disposed of one of the mine-fields on the ford and broke down much of the tank delaying obstacles on the bridge.
 |
| Soon British small arms fire was zipping across the fields towards the German troops |
The removal of just a part of the minefield at the ford only allowed enough room for the diminutive Panzer I to cross in support of the infantry, but the deployment of the German HMG on tripod together with a section of Pioneers and infantry quickly drove the French infantry off the opposite hedge line.
However the arrival of a British Vickers VIB tank stabilised the allied flank especially when the PaK 36 missed a golden opportunity of taking out the British tank.
 |
| Amid smoke rounds and small arms fire the German tanks move towards the bridge |
The battle for the bridge saw the German armour advance slowly through the partially destroyed road block and start to drive through the infantry delaying wire entanglements, drawing copious fire from the large shop facing the river, which turned out to be a British command bunker in disguise.
 |
| The Germans out in the field and exposed to fire from the British bunker deploy smoke |
Despite a hosing down by German small arms, HE and tank rounds causing seemingly endless casualties and gathered shock markers the resistance from the building never ceased demonstrated by endless rounds of return fire that stymied attempts by the German infantry to press further forward.
 |
| As the building around the bunker catches fire, the first British tank can be seen approaching along the road behind the building |
In the end the arrival of further British armoured elements signalled that the allies had won the race to dominate this particular part of the front line and that German attempts to press on would have to be directed to other parts of the allied positions.
I really like the way Chain of Command models WWII combat at the platoon level and know that more games would increase that enjoyment as I became more familiar with the nuances that the rules offer the junior commander from the various nations.
Sadly with my own focus directed more towards the sandal clad spear and shield eras of history at the moment I don't play quite as often as I would like, so have to grab my occasional WWII fix with very nice games like this one.
Thank you to Jason for the pleasure of playing with his very nice collection of toys and to John, Steve M, Stephen H, Ian and Chris for a very enjoyable game to kick off the club new year.
No comments:
Post a Comment