

The newly arrived Zulu Army, commanded by Chief Mnyamana Buthelezei, moved on towards Khambula in battle formation; the mass of warriors forming the ‘chest’ with other columns as the left and right ‘horns’, ready to envelope the British, encamped ready for battle the next day.

This time, the British, while in low morale after Isandlwana and the defeat of Buller’s attack on Hlobane, were prepared and in compact formation behind fortifications, unlike Pulleine’s 24th Foot at the Battle of Isandlwana.

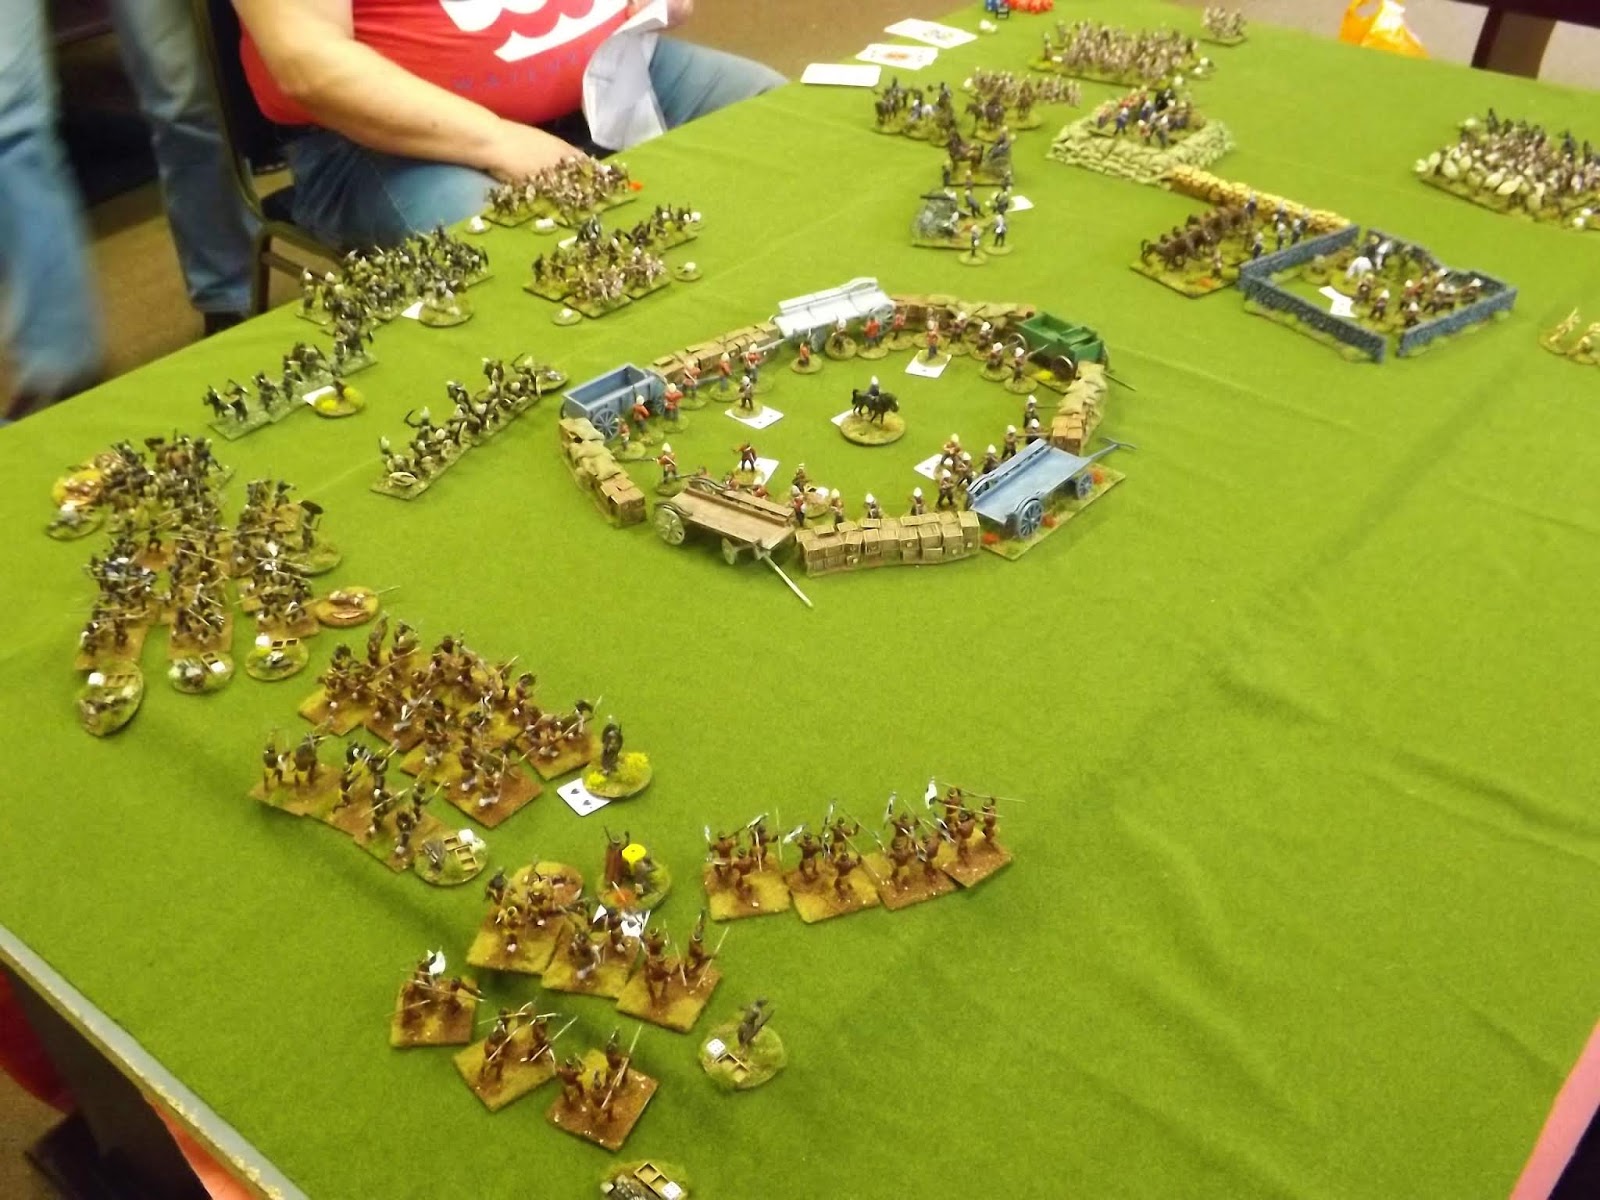
A British patrol, out early in the morning, brought in a Zulu defector with information that the camp was to be attacked at midday. The patrol reported that the Zulu Army could be seen approaching. The main fortification of the camp was the wagon lager, the wagons parked end to end in a square, with additional fortification from heaps of turf, mealie bags and an entrenchment.

The cattle were held in a square of wagons on a raised area of the plateau. In the centre of the camp area stood the earthwork redoubt built on a knoll.

As soon as the Zulu approach was reported, the troops assembled at their positions, 1,200 men of the 1st/13th Light Infantry and the 90th Regiment, with 800 other irregular troops. Ammunition reserves were established along the rear of the lines.

Wood’s artillery comprised four 7-pounder guns, two mule borne guns and several rocket troughs. The mule guns took post in the redoubt, while the 7-pounders stood in the open ground between the
two main fortifications.

The Zulu formation paused for a time, while final arrangements for the attack were made. It may be that the Zulu generals wished to avoid a direct assault on the British camp; Cetshwayo’s instructions being not to repeat the mistake of Rorke’s Drift, but to threaten the Natal border and try to lure Wood’s force into the open. However, the Zulu warriors were in no mood for caution. The Zulu Army began to move towards the British with increasing speed, the horns spreading out to the left and right flanks, the chest heading straight for the camp. The battle began at around 1.30pm.
The left horn disappeared from view, as it moved into the valley to the South, where it was held up by marshy ground. The right horn circled round to the North and came in towards the camp. Wood dispatched Buller with his mounted men to provoke the right horn into making a premature attack, before the other sections of the Zulu Army were in place. Buller’s move had the effect intended, the mass of the right horn rushing towards the British fortifications.

Buller’s troops rode back into the camp, several men having considerable difficulty getting away from the fast-moving mass of Zulu warriors.

This is where our battle transfers to the table top Sharp Practice game, the Zulu army consisted of 20 units of 12 on left and 20 units of 12 on right each with 6 leaders both Black 1 to 6, the British army as per the OOB were within the Laager, the Kraal and the Redoubt, the redoubt and Laager were classed as high and wide obstacles for the purpose of the game...

The Zulus as the cards were drawn out were told they had to randomise the location of point of arrival, 1 to 2 being first 2ft of the 6ft length and 3 to 6 being 4ft length and 7 to 8 being 2ft of the other 6ft length of table, this being done on both flanks, therefore not allowing Zulus to mass straight away and having to manoeuvre to co-ordinate if/when they could...

The Zulus managed to get most of their troops on the table within the first couple of turns with only one group each side not coming on due top card pull or due to space in area where they had to arrive, masses of troops causing tail backs etc.

The Brits were able to throw plenty of fire out at the oncoming Zulus, using 'Sharps Practice' and the double fire of breech loading weapons to their advantage, causing devastating wounds and shock amongst the Zulu hordes, twice the cannons ripped into the ranks of Zulus causing swathes of men to drop and cause massed shock, a couple of flank shots causing double shock.
Multiple Zulu units charging and getting up against the redoubt and laager were being thrown back with lots of casualties and shock on the Zulus, and a couple here and there on the British, Zulu leaders becoming more cautious and deliberate after these failed attacks, the redoubt holding fast against multiple attacks, the Kraal not fairing as well, with the Natal, Light horse dying or pulling out leaving the British to face the Zulus alone, outnumbered and fighting back to back they would finally succumb to the numbers and ferocious attacks...

All the while the artillery firing into the Zulus massing on the right flank, causing devastating losses amongst the Zulu, the Light horse were trying to assist there brothers in the redoubt, shooting into the Zulu flanks and annoying the attacks...

The Zulu breaking the British in the Krall, swept into the flank/rear of the guns and made the gunners disperse to the redoubt and Laager, at this the remainder of the Natal, and Light Horse beat a hasty retreat to the Laager...

Back at the Laager the Zulus were starting to swarm, and were sending in co-ordinated attacks, and losing men at high rate of fire and fights were desperate at the barricades, however one assault managed to push the British back and force them to face there enemy back to back.
With the men holding the other side of the defences and with casualties mounting, things were getting desperate. With the Zulu massing, at this point the British commander managed to form a decent firing line, with the Natal and Light Horse joining the beleaguered infantry, and if the Zulus ventured over the top of the barricade they would have been ripped apart...
The Zulu commanders taking the day as a day well fought decided that with the time as it was, discretion was the better part of valour and decided to call a halt there... casualties were high on both sides, but with a few more turns the Zulu may have won the day; however with the Zulu right flank having taken loads of casualties and forced withdrawals and with its morale waning, it was really left to the Zulu left which was still a formidable fighting force and may have carried the day...
Maybe on another day... really don't fancy facing the Zulu with no defences in play, could get a bit messy for the Brits?
Thanks to all that played and gave there all, don't know about them but I was knackered at the end of the game...
Thanks to all that played and gave there all, don't know about them but I was knackered at the end of the game...
A riveting narrative JJ and great pictures
ReplyDeleteA superb table, a magnificent battle that I would have liked to play ... but that I would not have wanted to live, especially in the center!
ReplyDelete